Sunday, May 19, 2013

SCARY Sharp

The second law of homestead thermodynamics goes something like 'sharp things will always tend to become dull.'  This is especially true if the sharp thing is a blade on a tool you need for the next task on your list.  We we were reading about ways to sharpen blades a while back, and since blade sharpening one of the skills we wanted to develop this year, we figured we should probably get around to it (it is almost June, after all).

The best description we've come across of how to sharpen a (flat) blade is this tale of the Scary Sharp method.  Even if you don't have any blades to sharpen, it's worth a read.  Make sure you're not drinking anything at the time, because you might accidentally spit it out.  Basically, the technique involves a hard, flat surface (like a piece of glass) and increasingly fine grades of sandpaper.  Pretty simple, eh?  The method works best with straight (as opposed to beveled) blades, but it was good enough to get a beveled hunting knife back to factory sharp last fall. (Not quite sharp enough to shave, though, which was another one of our goals).  So we decided to try the same technique on another knife with a flatter blade in hopes of being able to rediscover Jake's face!

*NOTE: We could not be considered experts in blade sharpening by any stretch of the imagination.  We are simply chronicling our experiments in learning to sharpen blades proficiently.  If you're searching for a way to sharpen your own blades, please don't use us as your only source of information. :-)


Here are our materials and our setup.  Sandpaper: 400, 600, 800, 1000, 1500, and 2000 grit.  A pane of glass from an old window (came with the windows we got for free for the coldframe), and a knife.  The knife is a one-edge straight blade, stainless steel (the blade style is more visible in the next picture).

Here it is after the 400 grit.  We sanded all three faces: back, front, and cutting edge.  Since the cutting edge had coarse marks in it from the factory grind, this grade of sandpaper took the longest (about 15 minutes).  We wanted to get it to the point where all we could see were the scratches from the 400 grit sandpaper.  When sanding the cutting edge, it's very important to keep a consistent angle between the knife and the sandpaper.

After the 600 grit.  It might not look much different, but for alternating grades of sandpaper, we try to use a different sanding pattern.  For one grade, we move the knife in straight lines back and forth (parallel to the handle for the front and back, and perpendicular to the handle for the cutting edge); for the next grade we move the knife in a circular pattern.  That way it's easier to see when scratches from the current grade of sandpaper have erased scratches from the lower grit.

After the 800 grit.  You know we're getting serious now because the sandpaper has switched to black.

The 1000 and 1500 grit looked pretty much the same as the 800 grit, so we skipped to the picture of the 2000 grit, where we've gotten a sort of mirror finish on the blade (reflecting the sandpaper box on the flat part).  Must be sharp now!

The classic test to see how sharp it is (other than cutting a piece of newspaper or something more reasonable) is to see if the blade will shave off a few arm or leg hairs.  After all, the closest piece of newspaper was like, ten feet away.  Looks like it will take off some leg hairs, no problem!  (Edit: Katie says, "Jacob!" [uh-oh...she only calls me that when I'm in big trouble.] "Did you shave off a random patch of extremity hair just to see how sharp your knife was...again?!"  Response: "Yes, but this time it will still be covered by my shorts, so I won't have to wear long-sleeve shirts for two weeks!"  Re-response: *eye rolling.*)  Can't wait to see how it works on facial hair!

Tune back in on Thursday to find out if the newly sharpened knife works for shaving facial hair!

Do you have a favorite technique for getting knife blades razor-sharp?  What is your preferred test of knife sharpness?  Tell us about it in the comments section below! (so Jake can stop having random hairless patches on his arms and legs!)


Thursday, May 16, 2013

Side Effects of Fertilizing with Worm Compost

One of the fun things about running a worm composting system is the (pleasant) surprises that greet us when we open the bin to add more kitchen scraps.  The innards from that cantaloupe we put in there three weeks ago?  All 800 seeds decided to sprout at the same time.  That apple core from two days ago?  Completely gone!  Herds of springtails stampeding across the open plains of finished castings!  Brushing off the top half-inch of castings to be greeted by a solid mass of happy, healthy Eisenia foetida.  (They look happy to us, anyway.)  It never gets old.

But the surprises don't stop there!  Lots of seeds that don't sprout in the worm bin proper are still viable.  We found that out last week, which was conveniently enough, a couple weeks after we mixed the crop of castings from over the winter into the square foot gardens on the decks.  Evidently, we had a very fertile cucumber in there.

All we planted was the broccoli, but we have a stochastically distributed crop of cucumbers and an apple tree as well!
In the past, most of the things that have sprouted from the worm castings have done so in the bin itself, and we haven't had to worry too much about using the vermicompost in the garden.  Don't get us wrong--plenty of things have sprouted--tomatoes, peppers, potatoes, melons, carrot tops, avocado pits, mulberry trees, and apple trees (the biggest one is almost three feet tall now!).  But these cukes caught us off guard.  We'll probably have to pull 'em to make room for the lettuce.

A quick search on the internets reveals that many other vermiculturers have had similar experiences--often with unwanted seeds that sprout from their seed-starting mix!  A few mentioned that one way to get around this problem is to expose the vermicompost to light for a few weeks before planting anything in them--that way all the seeds sprout that are going to, and it's possible to remove them without damaging the desired plants.  It seems that the most foolproof way would be to mix the vermicompost in with the dirt and expose the mixture to light for a few weeks.  Since we haven't planted anything but the broccoli yet, it turns out that this is pretty much exactly what we did, (although we did it accidentally), and it looks like it worked!  Now we just have to go pluck out all the cucumber seedlings.

Have you had any fun surprises from your worm bin?  Figured out a good way to get seeds out of the vermicompost?  Tell us about it in the comments section below!

Monday, May 13, 2013

Honey and Bee Nutrition

It might seem intuitive that feeding bees honey rather than a sugar-syrup substitute would be better for their health.  However, it has become a common practice to feed sugar syrup to bees, and let them get their other required nutrients through pollen.  (That trend is mainly due to a 1978 paper in Apodologie that showed bees could survive as long on corn syrup as on honey, and slightly longer on a syrup of sucrose, or table sugar.  Then, due to the magic of international trade, beekeepers figured out they could sell their honey for much more than an equivalent amount of sugar syrup cost.  The paper can be found here--it's the third in the list, by Barker and Lehner).  So, if honey bees can get most of their nutritional needs from pollen, and only really need honey as a carbohydrate source, what is actually the advantage of feeding honey?  A paper in Proceedings of the National Academy of Sciences from a couple weeks ago has provided some new insight on the topic.

It seems that the honey acts as a sort of extracting medium, which results in bees getting some constituents of pollen and propolis from the honey.  (Propolis is the tree resin-based material bees use to polish honeycomb, seal cracks in the hive, and glue frames to hive boxes.)  These extracted constituents in turn stimulate the bees' immune systems, allowing them to metabolize pesticide residues and resist pathogens.

Some of the compounds extracted into honey from pollen and propolis, except coumaphos (upper left), which is a chemical commonly used to fight varroa mites.  p-coumaric acid (upper right) comes from pollen and was the most universal activator of the bee immune system.  The bottom three come from propolis; pinobanksin (middle bottom) wasn't as helpful as the other two.

As researchers are trying to figure out how the pieces of colony collapse disorder (CCD) fit together, this paper demonstrates how several of the suspected factors might interact to make honeybees susceptible.  (...which is why it was able to be published in such a prestigious journal!)  Beekeepers commonly treat their hives with coumaphos to combat varroa mites, which have become an ubiquitous pest over the last couple decades.  (Coumaphos itself may or may not be a contributing factor to CCD.)  If, at the same time, bees are eating sugar syrup instead of honey, their immune systems aren't sufficiently activated to metabolize the coumaphos (and other pesticides the bees encounter in the field), which ends up stressing the bees in addition to killing the mites.  A corollary is that if the bees' immune systems are not sufficiently activated, they are also less able to fend off other pathogenic bacteria.  If this situation goes on for long enough, the worker bees run out of vacation days, and then sick days.  And once the worker bees run out of sick days, they have no choice but to call in 'dead.'

A varroa destructor mite.  'Varroa destructor' would be a good name for a band (or maybe a professional wrestler), but as a honey bee parasite it should just go extinct.  Someone should discover the anti-varroa equivalent and name it varroa self-destructor.  Photo credit: Wikipedia.

The authors showed that they could get the same immune system stimulation by adding p-coumaric acid to 'bee candy,' a mixture of powdered sugar and sucrose syrup. Then, in an example of how to shoot a good arrow yet miss a target completely, the authors propose that based on this finding, toxicity indices of certain pesticides, which are typically tested on bees eating sugar syrup instead of honey, may need to be re-evaluated. (Because if the bees are eating honey instead of sugar syrup, they can probably handle a higher pesticide load than we're giving them credit for.)  Fortunately, the authors come around to imply that feeding bees sugar syrup laced with p-coumarin is better than unlaced sugar syrup, but is only a good option when real honey isn't available.

Of course, beekeepers can minimize the pesticide load on their bees by invoking natural beekeeping practices.  The Walden Effect has had a few discussions on the topic (e.g., here and here), and there is a growing body of science and experience of how to keep bees without adding synthetic chemicals.

Have you had good luck with keeping your bees healthy?  Have you been able to do it naturally?  Other thoughts on this research paper?  Tell us about it in the comments section below!


Thursday, May 9, 2013

Our Big Fat Greek Yogurt

Here at the lab, we've been making our own yogurt for a while and wanted to share what we've found to be the most efficient way to do it, which includes making a single big batch instead of a series of smaller cups.  The whole process itself is really easy, consisting of essentially two ingredients and 3-4 steps, but there are a few tricks we learned along the way that have helped us fine-tune the process.  We also recently tried making Greek yogurt, which worked well enough that we decided to get excited and blog about it.

We normally start by adding 7.5-8 cups milk to a glass bowl.  We've been using whole milk lately, but skim, 1% and 2% work fine, too.
Our first step is to scald the milk so our yogurt cultures don't have any competition, and so the milk proteins start to denature, which can give a thicker yogurt in the end.  The fastest way is in the microwave--we do 12 min first, then in 2 min intervals until the temp is 180 °F or a little higher, but lower than boiling (~212 °F).  It works to do this part on the stove, too, but it takes a lot longer.
Success!  Now we play the waiting game.  The milk has to be less than about 120 °F before adding the yogurt culture or the culture will not do as well, and might even die.  It usually takes 1.5-2 hrs to cool, so it's possible to get a lot done in the meantime.
As it's cooling down, a skin will probably form on the surface.  It's probably mostly protein that was denatured during the pasteurization.  Don't throw it out!  It makes a good snack (or Jake treat).
Although the good bacteria you will add in the next step will typically survive at temperatures less than 120 °F, they do better closer to 100 °F, so that's the temperature to which we let ours cool.  Make sure to clean the skin off the top one last time.
The next step is to add your yogurt starter culture!  There are a variety of bacteria that will do the job well, each with their own subtle flavors and growing preferences (maybe we should do a post on that!), but the main point is that some live good bacteria are required to get started turning the now-sterile milk into delicious creamy yogurt.  Some of the ones we've used are shown in the picture.  From left: a half-cup portion of the previous batch we stored in the freezer, a box of powdered special fancy culture that was a gift from Matt and Elise, and a bottle of powdered culture from the local Amish grocery store.  It will also work to use store-bought plain yogurt if the label says something to the effect of 'contains live cultures,' and has minimal additives (like corn starch and sweeteners).  For this batch, we're going to use the stuff we saved from last time.
This step isn't too hard to figure out: add the starter culture to the cooled milk and stir it up.  At this point, we've added so much good bacteria that they should be able to out-compete anything that might get in from the atmosphere over the next several hours.
Our oven doubles as our yogurt maker.  Unfortunately, even just the 'warm' setting is too hot (~170 °F), so we just turn it on for a minute or two until it's maybe 120 or 130 °F, then turn it off.  The nice part is that the oven holds heat pretty well, so it will still be a little warm several hours later.  Note that it's ok if the oven is a little warmer than optimal to begin with because it will take a long time for that temperature to get to the middle of the bowl (as in, it probably never will, as long as the oven is turned off)--at the same time, the oven is losing heat to its surroundings, so having the temperature a little warm to begin with actually keeps the yogurt culture near the optimum temperature for longer.  That's another advantage to making the yogurt in a big batch like this--a large bowl is more resistive to temperature changes than the little cups are, which makes the temperature easier to manage.  There are economies of scale even within a homestead!
Then we put the milk/culture mix in the oven and close the door!  In the past, we've used the light bulb to help keep the temperature up in the oven (when we've had a working light bulb in there), but then we don't preheat it as much to begin with (only to 100 - 110 °F).
While the door is closed, the bacteria do their thing and, seven or eight hours later (i.e. overnight), voila!  Yogurt!  Don't stare at the oven while this is happening.  A watched culture never gets thick!  On the other hand, 'watching yogurt thicken' could be added to the list of exciting ways to pass time, next to 'watching paint dry' and 'watching grass grow.'
If we disturb the the surface a little, the curd separates from the whey a bit.  This yogurt will be thinner than probably anything available in the store, but if we stir it up a lot (until it's homogeneous), it works fine for eating with granola, cookie bits, animal crackers, or whatever we're into at the time.
After stirring, don't forget to save out a half-cup or so to make the next batch!  We've made a batch this size work with as little as a tablespoon or two of starter culture (much less for the powdered cultures), but in our experience, a half cup or more is pretty fail-safe.
Now it's time to get this yogurt Greekified.  It seems that the only real difference between regular and Greek yogurt is that the latter has the whey strained off, which makes it much thicker.  So here we are, with our whey strainer (a piece of muslin cheesecloth in a bowl).
We poured in the yogurt and tied up the corners.  Then we had to figure out a way to suspend it above the bowl while keeping the yogurt cold.  (Now the good bacteria have stopped growing as fast, and we don't want bad bacteria to settle in.)  There are most definitely more elegant ways to accomplish that, but this is what we came up with in the moment.  Good thing for mostly empty fridges, wire racks, and muslin cheeseclothes that at first glance appear way too large.  We probably could have used a colander or sieve to support the cloth also.
There's our little whey droplets, doing their condensation impression on the filter!  Either that, or the yogurt has broken into a cold sweat thinking about the Greek economy.  (To be fair, yogurt from almost any nation could have similar concerns.  Except yogurt from Greenland, but it would probably be frozen by this point anyway.)
We've managed to drain quite a bit of whey!  The yogurt will surely be thicker now.
Definitely thicker!  Of course, our yield is lower, too, but look!  It's much thicker than before!
Don't waste any!  It's not too hard to scrape off the cloth with a spatula on a flat surface.
Also, don't forget to use the whey for something, like corning meat, baking bread, or making tea!  We made a big jar of chai tea with ours this time.  However, in the process of heating it up, leftover soluble protein or small curds that made it through the filter might denature, similar to what happens in making ricotta cheese. (ok, exactly what happens in making ricotta cheese).  So, it might be a good idea to make the ricotta, separate it from the remaining whey, and then make the chai.  That's what we'll do next time.
Have you made your own yogurt at home (Greek or not)?  Have you used other types of milk (goat, sheep, etc.)?  Tell us about it in the comments section below!

Sunday, May 5, 2013

Patching Bike Tires, Method #1: The Easy Way Out

We noted a while back that one of the skills we want to develop this year is the skill of patching bicycle tires.  In particular, the road shoulders and bike lanes seemed to be cluttered with an abnormally high concentration of pokey things this last year, resulting in more flat tires than we had in the previous three or four years combined.  We were in the neighborhood of a dozen or more flats, which if replaced with a new ($5.00) inner tube every time, can start to add up.  (That's more than a tank of gas costs!  Unacceptable!)  Also, even though there's lots of uses for inner tube rubber around the homestead, eventually the tubes (or at least part of them) will end up in a landfill.  That's definitely something we want to avoid.  Fortunately, patching an inner tube can be ridiculously easy, and pretty cheap, too.  This morning, we had a patching party in the kitchen to repair the collection of holey tubes we had accumulated before getting smart.  We note that although our focus is bikes, the technique is applicable to most equipment with similar tires that can go flat, including wheelchairs and baby strollers.  It's valuable for all stages of life!

The first step (for the most recent casualty, anyway) is to get the tube off the rim.  That requires two tools with which to apply leverage and bring the tire bead outside the rim.  The one on the left is a plastic tire lever designed for this purpose and is recommended by bike experts because it doesn't scratch the rim or damage the tube.  The one on the right is a screwdriver and is not recommended by bike experts for the opposite reasons.  But we've had good luck by being very careful.  The advantage is that the screwdriver can give a lot more leverage than the tire lever.
Once the tube is off the rim, the next step is to figure out where the leak is (unless you already know).  We pump the tube up a little bit and 'listen around the tube' to see if we can hear air hissing out anywhere.
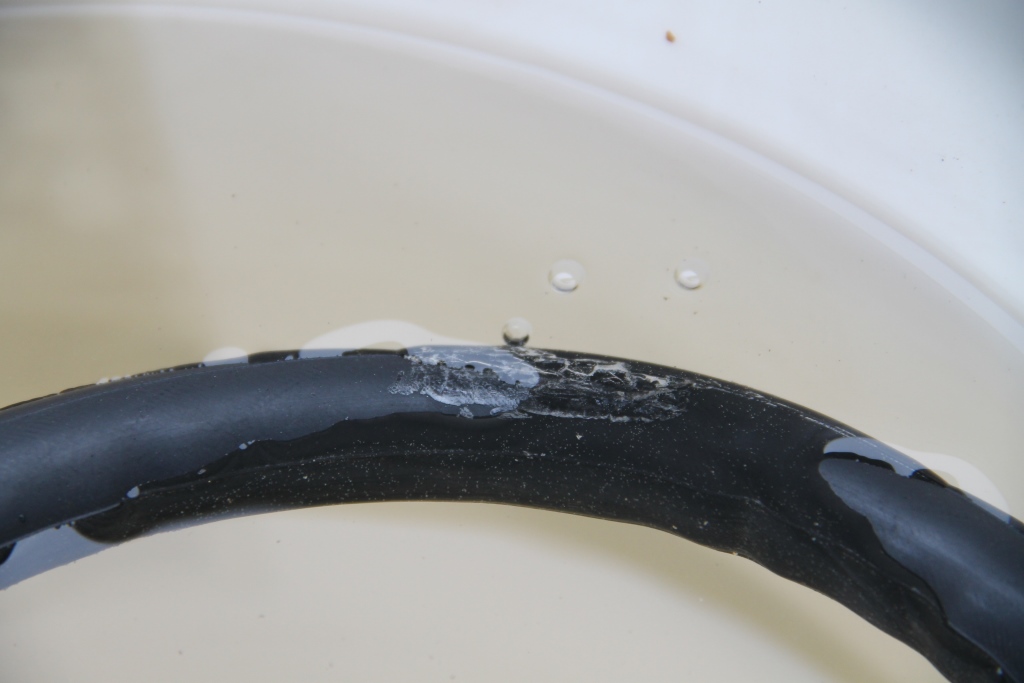
If we can't (i.e., it's a fairly slow leak), we take the tube to a bucket of water and look for bubbles.  This happens a lot if it's a puncture leak, like we somehow managed to ride over a tiny pin at exactly the right angle.
Once we know where the leak is (which in this case turns out to be an old patch that didn't hold because we're new at this), we can let most of the air out of the tube.  Make sure the tube and your hands are clean and dry.  It might also help to hold the tube flat against a table top, if one is available.  Cast iron frying pans work well as paper weights (rubber weights?)  Also pictured is our patch kit--it has six patches for $3.00.  In other words, we get a 'new' tire for $0.50, which is a little more tolerable than $5.00.
In addition to the six patches, it comes with a free 1" x 1" piece of ~220 grit sandpaper.  Bonus!  The idea here is to rough up the tire in the area of the hole to help the patch stick.  Make sure to smooth down the ridges in the tire, get rid of any superglue you might have added to the old patch because you touched the sticky side with greasy hands and the edges wouldn't stay stuck, etc.  The area where the patch is going should be flat and no longer shiny.  Also, when you've gotten to that point, make sure to clean off any rubber schnibbles from the sanding.
The rubber is now ready for its patch!  Peel the new patch off the backing, being careful not to touch the sticky side with bike grime-covered fingers, and apply the patch to the tire.  Press it down hard, like with the back of a fingernail or something, and make sure it's all even and stuff.  Man, whoever fixed that tire might not have buffed up a large enough area for this patch to hold reliably, but he should definitely be a hand model.  Mint condition, baby.  (It's almost never that clean.)
There she be!  Looks like solid B+ level work.
Some say to let the adhesive set for a while before testing it.  That may not matter for the ready-made adhesive patches as much as for other kinds of patch kits that come with rubber cement and separate patches, but since we don't need all six patched tires right away, we figured it couldn't hurt.  Thank goodness we also didn't need the frying pans, or we would have had to invent a hexacycle.
Now we've just got to get the fixed tube back in the tire and on the rim.  It's a good idea to check both the tire and the rim to make sure whatever cased the flat in the first place is not still there.  Once convinced that all is clear, pump up the tube slightly (just enough to make it round), and work it into the tire, and eventually onto the rim, starting first by putting the valve stem in place.  Yes, that is duct tape augmenting the original rim tape, which has started to lose its stickiness and doesn't cover some of the rusty spots on the inside of the rim.
Work around the rim, popping the bead of the tire back into place, being very careful not to pinch the tube in between the edge of the rim and the tire.  The job will get progressively harder as you near completion.  Some say to avoid leaving the part by the valve stem for last, but we like to end at least near the valve stem because the tube is sort of anchored to the middle of the rim there and seems least likely to interfere with popping the last section of tire back onto the rim.  It should be possible to pop the tire back on with just your thumbs, but it will take considerable effort.  Fingertip pushups will help (over time), which is an additional translatable nugget from learning kung fu (in addition to manual almond chopping).
Time to flip it over and pump it up to test!  If it holds, you can ride off into the sunset on your newly repaired bike (depending on which way you need to go).
For further reading (but fewer pictures) from someone much more knowledgeable than us, see Sheldon Brown's article on the matter.  Actually, we've found Sheldon's articles to be a good starting point for almost any bike repair.

This method of patching bike tires is probably the most convenient available.  It's also very inexpensive, but it's not quite homemade-enough for us.  We'll continue working on this skill and report back when we have a more homestead-friendly version!  In the meantime, if you have any suggestions on how to improve our technique, either to improve our results with this method, or a more DIY version, tell us about it in the comments section below!

Thursday, May 2, 2013

Pasta Primaveragus

Every once in a while when Katie gets home from work, she's on a mission to build the perfect supper.  She's got a clear vision of what should happen with the leftovers in the fridge and freezer, and the veggies that are ripening in the garden.  Last night was one such night.  Let's tag along and see what she's making!

First she got the asparagus out of the fridge, put it on a cookie sheet, and dusted it with pepper and garlic powder.  Asparagus on a cookie sheet?  In the oven at 375 °F for 20 minutes?  Intriguing.

She sliced up some mushrooms and put them in a frying pan with a little olive oil.

Then she said, "Jake, go cut some swiss chard from the coldframe.  It's trying to bolt, so cut most of it."

I had to chop it up and add it to the mushrooms.

Now she's making noodles!  Looks like 2.5 cups of whole wheat shells.  The best part about making whole wheat noodles is the leftover water.  Add some honey and bam! Liquid graham cracker.  It's the beverage that goes with any meal.

The chard and the mushrooms get stirred together?  Well, ok...actually, that looks good enough to eat!

Oh!  That's the leftover pasta sauce from the fridge!  Apparently it goes on the noodles.  Katie says, "Jake, stop taking pictures over my shoulder.  You're making it hard to scrape the rest of the sauce out of the jar."

The noodles get seasoned with garlic and onion powders, pepper, and green onion powder, too!  That also looks good enough to eat.

The asparagus looks roasted now.  Smells roasted, too.  Katie says, "Jake, stop drooling on the camera."

So, the chard and mushrooms get mixed in with the pasta, the roasted asparagus gets set next to it, and the whole shebang gets sprinkled with parmesan cheese.  Her vision is complete!  She probably picked the yellow can to complement the colors of the food.  She's good with that kind of stuff.

When we were all done eating that, Katie said, "Let's make some more room in the freezer!"  We have blueberries and strawberries from last summer that we need to use up to make room for new ones!  So she added a couple handfuls of blueberries and a handful of strawberries to a cup of milk or so and took to it with the immersion blender.  In a couple minutes, the mixture transmogrified into a tasty smoothy/sorbet-like thing!  Yay for dessert!

The recipe:
1 bunch asparagus (~1 lb or ~15 pieces)
1 lb mushrooms, sliced
~2 tablespoons olive oil
1/2 lb swiss chard, chopped

2.5 cups pasta
1 cup pasta sauce
Parmesan cheese to sprinkle on top
Seasonings to taste (garlic powder, onion powder, green onion powder, pepper, dried basil)

2/3 cup frozen blueberries (when freezing, we added 1 cup sugar to 5 cups blueberries, so if your berries are unsweetened, you can add a tablespoon or two of sugar if you like)
1/3 cup frozen strawberries
1/2 cup milk

Set the asparagus on a cookie sheet, drizzle with olive oil, sprinkle with seasonings to taste, and set in oven at 375 °F for 20 minutes.  Check doneness at 12-15 minutes.  In the meantime, sauté mushrooms and chard.  Cook noodles and drain, reserving liquid.  Add pasta sauce, more seasonings, and mushroom-chard combo to the noodles.  Mix well, serve with the roasted asparagus and sprinkle Parmesan cheese on top.

If you still have room, blend berries and milk with immersion blender, taking care to lick up all spatters.  Serve in bowls and eat with spoon if the product is more solid, or serve in mugs and eat with straw if product is more liquid.


How are you mixing your stocks of preserved foods from last summer with the early spring treats that are starting to come up fresh?  Tell us about it in the comments section below!