Showing posts with label Skills. Show all posts

Thursday, April 7, 2016

Sap Recap

With overnight lows consistently staying above freezing, it seems like the sap flow is pretty much wrapping up around here.  That means it's time to look back through our notebook and write up the results!

How did it go?  Overall, not particularly well.  But we did get about three cups of syrup, and other reports we've heard from different parts of the country have said they also didn't have a very good year.  The 2016 spring weather just didn't cooperate.  But, we definitely got some informative results, and we can put at least one data point out there on the internets for future reference.

In general, the box elders were the only trees in our yard that produced a useful amount of sap.  We got about a gallon (total) from the smaller elm, about a quart from the Lombardy poplar, and about a pint from one of the Bradford pears.  The Tree of Heaven, the other elm, and the other pear didn't produce anything.  The box elders were also running earlier than the rest of them--they were dripping when we tapped them on February 7, and had pretty much wrapped up by the end of February, which is when the elm got started.  The elm and poplar are actually still flowing now, but now that we know what the sap tastes like (see below), we probably won't bother collecting the sap any more.

Sap flow graph
The box elders started out strong, but petered out by the end of February.  The dates with the symbols are when we harvested (except 2/7, which was when we set the taps).  We should have been harvesting more frequently; this site recommends collecting sap every two days to keep the quality of the resulting syrup from degrading and/or to keep microbes from moving in and eating the precious sugar.

Early on, we harvested the box elders about once a week because the three-gallon buckets were full; the long gap between the end of February and the end of March was due to us waiting for a usable amount of sap to accumulate.  As noted in the caption above, we should have collected more frequently and stored the sap in the fridge, which would have both mitigated off flavors and given a better estimate of when the peak run was.  But, we've got some sap now, so we might as well analyze it!

Sap sugar content and color
Test #1: the 'sugar' content.  The box elder was showing about 2% sugar, which was slightly down from the earlier runs of 2.5% (it was also cloudy, when earlier runs were clear).  The Bradford pear was at about 0.7%, the Siberian elm was also at about 2%, and the Lombardy poplar at about 2.5%.  However, most of that increase in density relative to water was probably due to dissolved stuff other than sugar, because...

Sap in cups
Test #2: the taste (and color)!  To be frank, they all tasted gross.  The earlier runs of box elder actually had a detectable sweetness to them, but not this time.  They did all taste slightly like the wood smells when you cut it. 
Or, in other words, here's our best description of the flavors:
  • For the box elder, it's sort of astringent and mildly acidic, 
  • For the pear it's...not much of anything, but it still somehow off-putting,
  • For the elm it's sort of like wet leaves in the fall, but somewhat more phenolic (if that helps...),
  • For the poplar it's more strongly astringent and more earthy than the box elder.  Also, really bitter.  

It's possible that the flavors changed while sitting out for almost a month, but we did try fresh elm sap that only sat for a day and it wasn't any better.   The colors didn't change much on sitting, and they smelled about the same, too.  Katie tried the elm, but none of the others, and generally concurred with the above assessment.  Actually, her response was something along the lines of, "if you already knew what it tasted like, why would you ever want me to try it?!"  (For science, of course!)

Needless to say, we didn't bother making syrup out of any of the non-box elder saps, and we won't bother tapping any of our trees other than the box elder next year.  But now we know, and now you know, too!

How did your sugaring season go this year?


Monday, February 8, 2016

Non-Maple Syrups on Tap

It's tree-tapping season!  Since we're huge pancake lovers, we've been keen on tapping trees for quite a while.  Two potential problems, though, are that we live in suburban Denver (is there enough of a cold period to generate a significant sap flow?), and we've got exactly one maple tree in our yard, which isn't big enough to tap. (It's not even an actual sugar maple--it's a silver maple!)

We do, however, have several non-maple trees that are big enough.  And since the process is pretty much the same, we figured we'd tap what we've got and see what we get!  Several places note anecdotally (e.g., here) that other tree species can be tapped (with tempered expectations because the sugar content and/or sap volume is lower than for sugar maples), and some even talk about tapping coniferous trees!  But with few exceptions (mostly for other types of maples, birches, or walnuts), these sources don't give much in the way of what to expect in terms of yields or flavor.  Looks like a data gap waiting to be filled!  We ordered up a set of 10 taps from the internets, scored some free buckets from the local grocery store bakery, and set 'em up yesterday.

We went around the yard and measured tree circumferences at about chest height.  The diameter is the circumference divided by pi (d = c/π); and a general recommendation is to tap trees no smaller than 10 inches in diameter.  Looks like we've got two each of box elders, Bradford pears, Siberian elms, and Colorado blue spruces, along with a Lombardy poplar and an invasive Tree of Heaven that qualify.  We'll probably pass on the spruces this year.  The tapping process is not supposed to hurt the tree or affect its longevity, but the elms and the Tree of Heaven would surprise us if they lasted beyond this year anyway.

The buckets are 3.5 gallons and used to have "donut glaze" in them.  We washed them out in the bath tub, although if we had thought ahead a little, washing them outside with the hose last summer would have been a lot easier.

The taps came with two-foot sections of tubing attached, the ends of which we warmed up with hot water to make them easier to push onto the barbs of the taps.

We connected the tubing to the taps in the kitchen, before we went outside.

One last bit of prep (heh) was to add a duct tape stopper about 1.75" up the drill bit so we don't go too far into the tree.  We also drilled holes in the bucket lids; the tubing said 5/16", but it needed a hole a little larger than 3/8" to fit through.

First hole in the boxelder, and it started dripping immediately.  That's a good sign!

The two box elders that were big enough to tap are actually two trunks on the same tree.  It's also right on the property line, so we don't have access to the south side, which is the side most preferentially tapped.  The East side will have to do!

Here are the other three trees we tapped with out first five buckets.  None of them had sap running right away.  We scored three more buckets the next day, so the two elms and the other Bradford pear are next in line.  Woo hoo!  Visions of pancakes are dancing through our heads.

What kinds of trees are you tapping this year?


Monday, January 27, 2014

Nice Sliced Lunchmeat!

Almost a year ago, we noted that one thing we wanted to learn how to make was additive-free lunch meat.  A bit of bumming around YouTube turned up several examples, but most featured involved processes that looked like they produced delicious results while entailing enough labor to lose our interest.  However, two videos were particularly useful for us.

The first showed us how lunch meat is made industrially, which we may try to approximate on a home scale some day.  It's not as involved as we expected, basically comprising three steps: beating the heck out of some raw meat, sticking the beaten pieces together to form a nice round shape and holding them in place with some type of casing, then cooking them in a well-controlled oven.

The second showed us how to make a passable--yet still slice-able--substitute from leftover roast chicken, which involves blending up leftover roast chicken, mixing in extra seasonings and gelatin, forming into a loaf, and chilling in the fridge.  Mrs. Volfie noted that the gelatin wasn't necessary if the roasting liquid was retained--during roasting the collagen in the chicken's connective tissues breaks down into gelatin, which ends up in the roasting liquid at the bottom of the pan.  In fact, it'll cause the liquid to gel up if it goes in the fridge, provided the chicken was roasted long enough to break down the collagen (and the chicken had enough collagen to begin with).

So, we wanted to try it without adding gelatin to see if we could get a nice firm set and something to slice for our sandwiches.

We started with some leftover chicken chunks and their cooking liquid.  The liquid is currently gelled, which is a good sign.

Then we put everything in the food processor...

...and blended it up almost to the consistency of a chicken salad spread.  We added a few pinches of salt, pepper, and garlic powder.

Then we carefully sculpted it into a loaf.  In retrospect, we should have made the loaf shorter and taller.  Now it looks kind of like a nugget.  The nugget/loaf went in the fridge overnight.

The next morning, we tried slicing it...and it worked!  It's definitely more fragile than the pieces Mrs. Volfie was able to shake like a Polaroid picture, but it holds together good enough for the sandwiches we eat!

Look at that nice row of cold cuts!

It doesn't cut as well with a regular knife as it does with the slicer, and neither the knife nor the slicer do a good job when the loaf warms up.  So heads up, if you try to cut it at room temp, you might end up eating a chicken salad sandwich anyway.  It might hold together better if we cooked the chicken longer or boiled the liquid down with the bones, etc. still in it.  But we were in the process of making biochar, so our starting material didn't get as much attention as it maybe should have.
The sliced meat is now an integral part of our soon-to-be-famous alliteration sandwich (chicken, chard, and cheddar).  Jake might just have to consider expanding his lunch repertoire beyond PB&J!


Have you made slice-able lunch meat before?  What's your favorite method?  Let us know in the comments section below!


Tuesday, December 10, 2013

Knotty Spruce

When we said back in February that we wanted to learn new knots, the knot we had in mind (although we didn't know it then) was the trucker's hitch.  It's one of the best knots for tying stuff, such as a canoe, pile of lumber, or Christmas tree, onto the top of a car.  Of course, the advent of ratchet straps has made knot tying on cargo a dying art, but we had a chance this weekend to, well, practice a dying art.  Actually, as long as we're at it, why don't we try to see how many knots we can use in this exercise?

The first step is to head out in -9 °F weather to find a tree.  Tying knots with frozen fingers builds character!  Looks like this lovely specimen is an Engelman Spruce, Picea engelmannii, with crowded growing conditions and a buck rub on the trunk.  Yup, this must be our tree!
When we got it back to the car, we laced it up in a tarp to keep the branches from flapping in the wind and/or scratching our car too much.  (Some of these pictures might seem out of order since we forgot to bring the camera on the trip.  Or, yes, the national forest does look a lot like our driveway!)
We took one end of the rope and fed it through the first corner grommet, then tied a bunch of overhand knots in the same place so it wouldn't slip out.
We did the same thing on the last corner grommet, except with a loop of rope since there was a lot of extra.
With the extra we kind of mangled it together, but it's sort of a clove hitch around the loops of rope.  We tossed the excess rope inside the tarp by the tree and put the tree on top of the car.  As a side note, the site linked there is one of the best knot-tying resources we could find.  The animations are super easy to follow (like, way easier than trying to figure out what we did by looking at these pictures).
Now to affix the tarped tree to the car.  On the back side, we started with a simple noose knot, plus a half-hitch for extra security.
We threw the rope over the top of the tree to a loop at the front of the car, and finally we get to practice our trucker's hitch!  Whatever trucker invented that hitch was a pretty bright guy.  Note that making the tag end a loop instead of pulling the thing all the way through will make it easier to untie later on and work better if there is a lot of extra.  The tradeoff is that if we tie another knot with the extra, we risk pulling out this knot.
We threw the extra back over the top of the tree and tied another trucker's hitch to the inside of the car on the opposite side. (Practice makes perfect!)
There!  Secure atop the car. (Actually, this picture was taken before we tied the second trucker's hitch.  So, don't worry!  We didn't leave the rope in the wheel well like that.)
Also, since we brought along the ratchet straps to be safe, we might as well use 'em...
And we made it home with a 100% survival rate!  What a nicely shaped but sparsely packed tree.  Thanks for helping us get it home, knots!

What are your favorite knots?  Do you know of another knot-tying resource with cool animations like netknots?  Let us know in the comments section below!

Sunday, November 10, 2013

Using a Compass to Find Treasure

Back in February, we said one of the things we wanted to get better at was navigating by compass.  A common exercise for aspiring orienteers is practicing in a familiar area such as one's backyard.  As it just so happens, a treasure map showed up in our mailbox this week.  It even has a north arrow and scale bar!  What a considerate cartographer!  Let's follow it and see what we find!

It looks like a map of our yard, amateurishly constructed in PowerPoint! Somewhat disconcerting, but it seems to suggest we need to start at the mailbox, get a shovel from the garage, detour to the biggest tree in the yard, and then head toward the second-biggest tree at the northwest corner of the property.  The treasure is just southeast of that tree.  What's the best way to follow the dashed line?  Since we're trying to get compass practice, let's use a compass.
Assume that we don't know right where on the map we are to start with.  As it happens here, we can see two landmarks, which means we can triangulate our position.  If we hold the compass in front of us and face the northeast corner of the house, we see that we are standing along the 330° bearing line.  If we face the southeast corner of the house (actually the carport), the compass tells us we're on a bearing of 250°.  Where those two lines intersect is where we are.  If we wanted to, and also had a ruler, pencil, and calculator with trigonometric functions (or sine/cosine/tangent tables) handy, we could draw those lines on the map.  Or, we could approximate with grid lines on the map or by holding the compass by the map.  In any case, it looks like we're standing at the mailbox.  Thank goodness!  If things go badly, we can probably find our way home from here.
In the current scenario, we can see through the carport to the southwest corner of the house, which is where the black dashed line on the map almost intersects the house.  If we use the compass to get a bearing between our current position and the southwest corner of the house, we should be able to walk along that line to the point where we can peek around the corner and see the garage.  It's trivial here, but if that corner was half a mile away and we had to go through dense woods or fog on the way and lose sight of the landmark, the compass would be a lot more helpful.  Sorry the numbers on our little compass are hard to see--but the red North direction is visible, and the other large lines correspond to 90° increments.  The small lines (if you can see them) are 10° increments, and every 30° increment is labeled with text.
Garage ho!  Shovel ho!  [Insert music for video game character finding useful tool here.]
Now we need to head due west to the edge of the shed, at which point we can turn and head toward the big tree along the dashed black line.
Compass says the first tree is on a bearing of 330° from the southwest corner of the shed.  What a magnificent tree.  It must be a tree from heaven.  Actually, it is a tree of heaven, an invasive species imported from China.  Fun fact: the bruised leaves smell vaguely like peanut butter.  Don't eat them.  Katie says, "We can also see the tree next to the 'X' on the map.  Why don't we just walk there?"  Because the map says we have to go by the big tree, Katie!  Who knows?  There might be bandits or crocodiles along the direct route.
It's sometimes a good idea to get high up in the air and survey one's surroundings to find landmarks and regain one's bearings.  Katie says, "The landmark you're looking for is 20 yards away and you can probably see it better from down here where there aren't any branches to block your view."  Compass says we need a bearing of 275° to find the next tree.
There's the X!  It's not red like the map shows, but this must be it.  Time to start digging!
A hastily-constructed wooden trunk buried in a shallow hole!  How mysterious!  Whoever buried this treasure must have been worried about getting caught.
Hey!  The treasure is Katie's cell phone!  It must have been there for hundreds of years.  Katie says, "I can't believe you went to the trouble of making a wooden trunk out of pallet wood, hiding my phone in it, and burying it in the yard just to get some practice with your compass."

If this practice exercise didn't make sense, check out a real orienteerer's guide with a different kind of compass.  For more advanced exploring, there are other things to think about, like the difference between true north and magnetic north and the inherent uncertainty in getting and following a bearing (especially with a little compass like ours!), but for now, we at least know how to find buried phones in the backyard.

What kind of buried treasure have you found in your yard?  What was a situation where you really needed your compass?  Let us know in the comments section below!

Friday, September 6, 2013

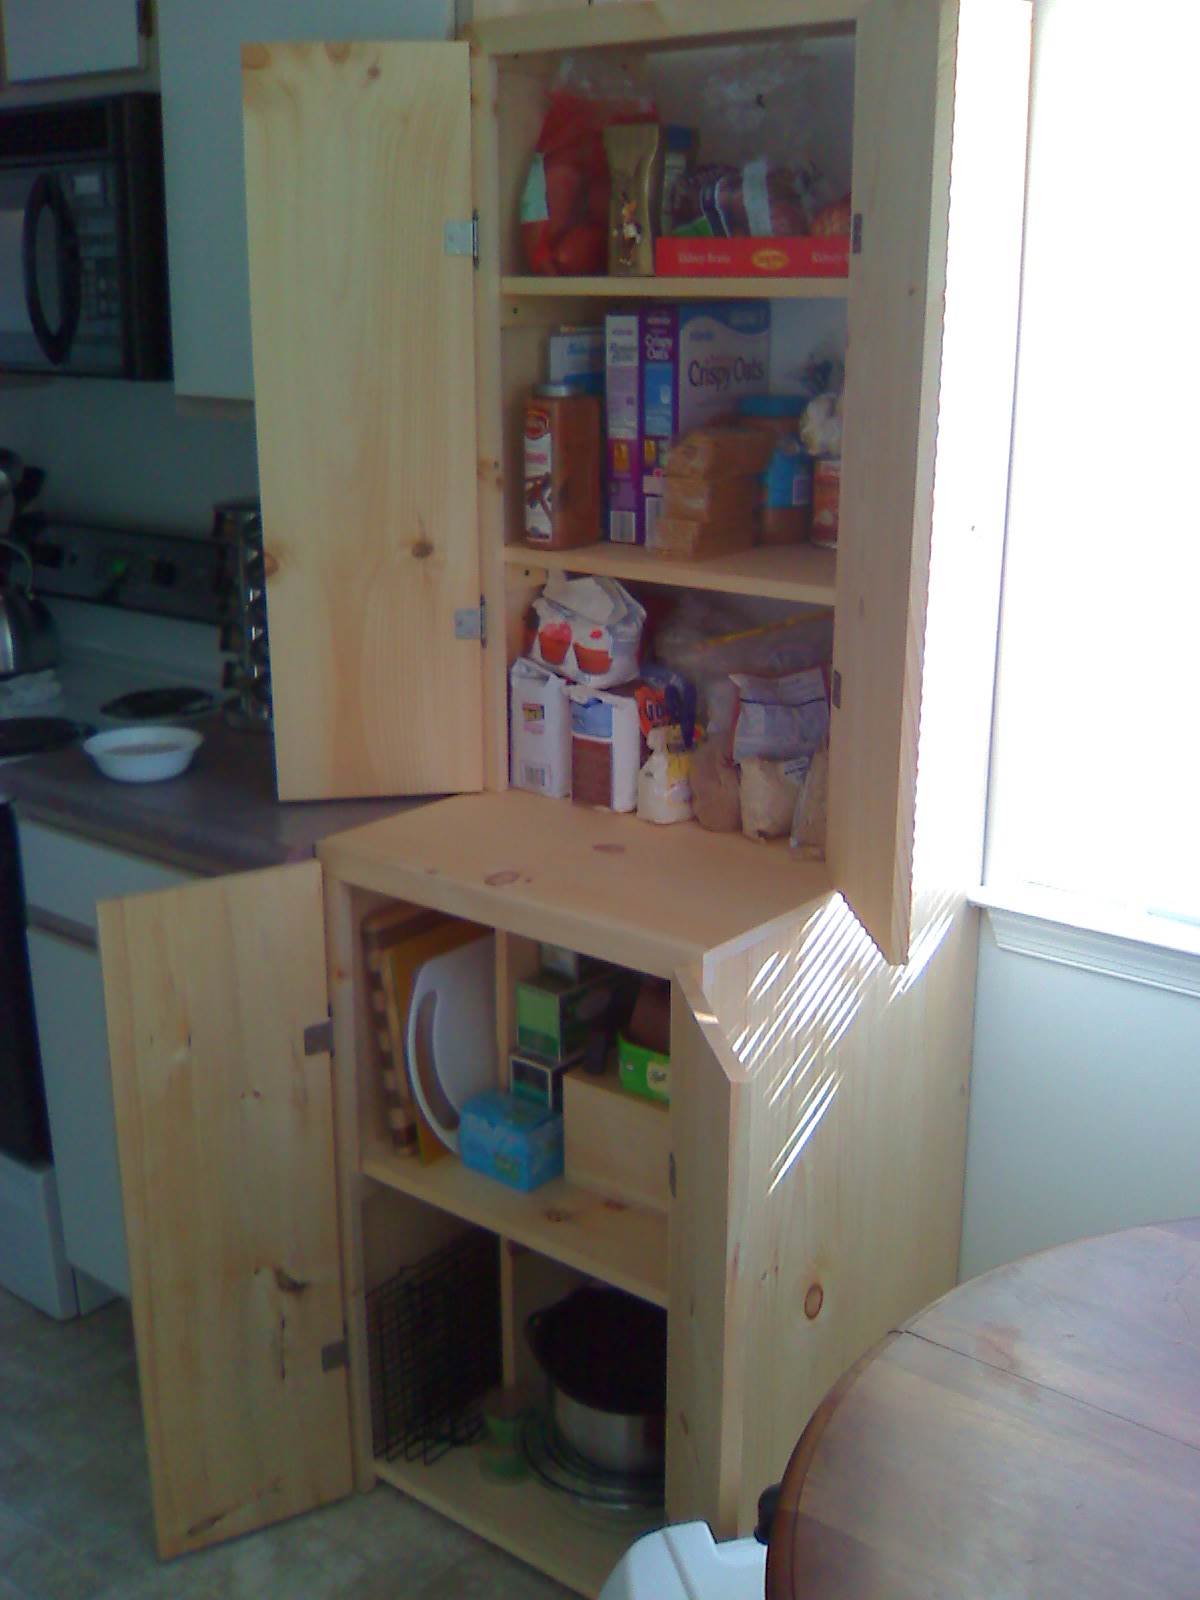
Pantry Cabinet

When we moved into our old place, one thing sorely lacking was storage space in the kitchen.  Then, when we moved into our new place, one thing sorely lacking was storage space in the kitchen.  We are leaning toward the conclusion, therefore, that many kitchens do not have adequate storage space for foodstuffs and cookware.  Fortunately, in our old place we pieced together some dimensional lumber and made a functional pantry cabinet.  We had the foresight to dismantle it and move it with us to our new place, and we're glad we did.  Even though we built it to fit a specific space, it's found use again, and seems to be of a size that might actually be useful in a number of households.  It is therefore with a small sense of pride that we share the plans and construction with you, dear readers.

We began with some 1 x 12"s and 1 x 2"s, cut to length as shown.  The 1 x 2"s are cut either to the width of two 1 x 12"s or to the width of one 1 x 12".  The bottom cross piece is 3/4" square, but could easily be another 1 x 2".  The 35-5/16" height of the front board was what we needed for the top of the main shelf piece to be even with the top of our counter.  Note that a six-foot 1 x 12" is actually a little longer than six feet.  The lumber companies are kind enough to leave some room for squaring the ends.
Once we had one side complete, we made another one!
Then we connected them with more pieces of 1 x 12".  The width here is 23" across the top two (21.5" for the other two), but could be whatever fits where you need it.  Screw them in from the bottom of the 1 x 2"s to keep the thing looking pretty.
Then we added more 1 x 2"s as trim around the front side.  They also give a sturdy piece to support the hinges.
Making the doors is the only place we had to do some serious ripping (lengthwise cutting) of boards.  We took 1 x 12"s and cut a half inch or so off.  These smaller pieces were actually what we used for the bottom cross pieces in the first picture.  I guess that makes the dimensions of the bottom cross pieces incorrect.  Good thing it's not that important!
If we left the doors closed, we might have forgotten that there's no shelves in there yet!  Fortunately, we remembered to open the doors and add shelves (21.5" long).  For these, we actually didn't screw them into place, they just rest on the 1 x 2"s.
One design feature Katie thought of (and that has proved incredibly useful) is to put vertical pieces a few inches from the side to hold up cutting boards, cookie sheets, cooling racks, special ribbed plates for cooking bacon in the microwave, or whatever.  Anything that makes it easier for Katie to bake cookies is a worthwhile addition.  We left a gap of about 6" from the left wall in ours.
At this point, we called it done.  It was right up against a wall in the back, so we didn't see the need to put a solid back on it.  If you wanted to enclose yours, two 1 x 12"s would leave a half-inch gap in the 23" span.  Sometimes a little circulation is good!  It's pretty sturdy without the back, but side-to-side pressure can make it sway a little, and adding a back would help mitigate that.  We found that if it's supported between a counter and a window sill, it'll be rock solid, even when practicing kung fu in the kitchen.
The next step is to fill it with goodies!  Well, OK, you could finish it with a nice stain or some paint first.  We prefer the natural wood look.  (Or at least, that's how we help justify filling it right away because we needed the space pronto!)

If you'd like to download the Google Sketchup model, you can get it here.

Have you built similar storage devices in your kitchen?  What other design features could we have included in the pantry to make it even easier for Katie to bake cookies?  Let us know in the comments section below!


Thursday, August 15, 2013

Battling Thermodynamics: The Corner Shelf

The second law of thermodynamics says, in one phrasing, "the entropy (or 'disorder') of a closed system is (essentially) always increasing."  While a homestead (or a laboratory) may not be formally closed, personal experience tells us that these systems also tend to follow the second law of thermodynamics without a considerable effort to the contrary.  But while "the law" may ultimately win in the end, we can definitely fight it for the time being! (Just like the Bobby Fuller Four...)  To that end, we have developed a powerful new tool to fight homestead entropy: the corner shelf.  (Ok, maybe it's not that new, but we designed this version out of standard dimensional lumber and built it for much cheaper than we could find an equivalent shelf anywhere else.)

We started by building a frame of 2 x 2 lumber.  Six 6-foot 2" x 2" boards are needed for this design.  The distances between the support pieces aren't critical, we just tuned them to what we wanted to stack there.  We left 0.75" at the top for the shelf part, and we put screws in at an angle from the bottom side of the support pieces.  The support pieces have to be level, or it will look like Picasso built it!  Picasso was a huge fan of entropy; he's not on our team.


Then we made the shelf pieces out of 1 x 12" (back piece) and 1 x 4" (front piece) boards.  For six shelves, we needed one 8-foot 1 x 12" and two 8-foot 1 x 4" boards.  The sketchup model assumes that the 2 x 2" boards are actually 1.5" square, but make sure to check before cutting the square out of the back--ours were closer to 1.375.  Also, don't be confused by the wood grain in the model.  The grain in both pieces runs parallel to the longest dimension of the 1 x 4" board.
Then we put the shelves into the frame.  It looks like this from the top.  We screwed them in from the bottom with 2" screws.
When it's done, it will hopefully look something like this.

Or maybe like this if you're really tall.
Here's how the real deal looks in a corner.
And here's how it looks when it's actively fighting entropy.  All that stuff would just be in a pile on the floor if it weren't for this shelf.  Well, it might be jammed into a closet somewhere else, but that just means the shelf helps keep the whole place looking better.  Plus, that corner would have just been empty otherwise.  Although it was built for this particular corner in our old place, it fits quite nicely in a corner behind a door in our new place, too.
If you're interested in the Google Sketchup model, you can download it here, kindly hosted by OpenDrive.

What are your favorite entropy-fighting devices?  Have you made any custom-built corner shelves?  Let us know in the comments section below!