Showing posts with label Whatchagotics. Show all posts

Monday, May 2, 2016

Bee Package Box Sifter

As we were doing some spring cleaning in the garage the other day, we came across some old screened boxes that had previously contained packages of bees.  They were this kind:

Bee package boxes
Now featuring garage dust!


The originators of the boxes had no desire to get them back and, as we are definitely not in the bee package business, we clearly had no use for them.  At least, not in their current form.  We were pondering what we might do with such a contraption (other than throw it out) when we realized the screens had openings of useful dimensions.  With 10 minutes and $4 of parts, we figured we could turn them into sifters!

Package boxes on the half shell
First step: saw them in half the long way.

Sieve bolts
Second step: drill holes and bolt them together.  3/4" bolts are too short; 1" bolts work fine.

Sieve orientation and bolts
We did two to each side, and it feels a smidge flimsy for heavy sifting jobs.  More bolts would help.  Also, make sure the hole that was previously in the top is in the center or a lot of what you're sifting might spill out the sides.

Sieve on plastic tote and biochar
Our immediate use for the sifters was for processing biochar. But you could also use them for sifting compost, large quantities of powdered sugar, or whatever else you have on hand!

Washed biochar
Just sifting gets rid of a lot of the ash, but a little hose water really cleans it up.

Washed biochar closeup
Most of the dirt that came along with it is easily washed away, too (except a few pieces of now-kiln-fired clay), leaving a nice shiny batch of black charcoal for whatever we want to use it for.

What do you do with your old bee package boxes?

Monday, April 18, 2016

Glass Storage Jar Lid Protection

Given the need for relatively small storage containers of bulk goods in our small-ish kitchen, we've settled on two-gallon all-glass jars.  They seem to be a good compromise between size, price, aesthetics, and non-plastic-ey-ness.

Brown sugar jar
They also take well to chalkboard paint labels, which is nice.

Chipped glass jar lid
We've been overall pretty happy with them, except for one small thing: the lids are fragile.

Inevitably, it happens that as we're clumsily putting them away, we'll bump something with the jar (usually the shelf we're trying to set it on), and the lid and jar will collide in just the right manner to break off part of the lid's inner rim.  With the sugar containers, we can dissolve the sugar in water, filter out the broken glass, and drink the sugar water like hummingbirds. (Which is awesome, but slightly inconvenient when we were planning to make something else with the sugar. Plus, Katie just loves it when Jake goes full hummingbird).  But with the flour containers, we've got to just toss the broken glass-contaminated flour.  Throwing food away makes us sad.

So, we've been pondering solutions to this problem for a while, and this weekend (while trapped inside by a snowstorm!) we came up with something that works well, while arguably not damaging the jar aesthetics too much.  First, we tried making a rubber o-ring with some leftover pond liner from our aquaponic grow bed, but found it was hard to get a good fit because the inner rim of the lid (the fragile part) is tapered.  Thus, it's hard to fit a sheet of rubber on to it.  Fortunately, we also had some leftover silicone caulk sealant from the butcher block counter top.

Padded jar lid
We applied a bead of the sealant around the inner rim, then smoothed it out with a flat head screwdriver.  We're definitely not professionals, but it works.  (Done is better than perfect, right?) If we were going to do it again, we'd probably tape the flat part to keep it from getting dirty, because it turns out this stuff sticks really well to glass and isn't easy to peel off.

Padded jar lid close up
Here's a close-up.  In the background, you can see the same stuff sealing the butcher block counter to the wall.

Padded lid on jar, side view
When it's on the jar, it's hard to tell it's there from most angles.  (Other than the fact that putting the lid on the jar is now much less...well, jarring.)

Padded lid on jar, top view
Even looking straight down, it's not that noticeable.  If we were starting from scratch, we'd probably get the clear silicone sealant, but for the sake of whatchagotics, we're glad the white doesn't look too bad.


Have you protected glass lids on your jars?  How did you do it?


Thursday, April 7, 2016

Sap Recap

With overnight lows consistently staying above freezing, it seems like the sap flow is pretty much wrapping up around here.  That means it's time to look back through our notebook and write up the results!

How did it go?  Overall, not particularly well.  But we did get about three cups of syrup, and other reports we've heard from different parts of the country have said they also didn't have a very good year.  The 2016 spring weather just didn't cooperate.  But, we definitely got some informative results, and we can put at least one data point out there on the internets for future reference.

In general, the box elders were the only trees in our yard that produced a useful amount of sap.  We got about a gallon (total) from the smaller elm, about a quart from the Lombardy poplar, and about a pint from one of the Bradford pears.  The Tree of Heaven, the other elm, and the other pear didn't produce anything.  The box elders were also running earlier than the rest of them--they were dripping when we tapped them on February 7, and had pretty much wrapped up by the end of February, which is when the elm got started.  The elm and poplar are actually still flowing now, but now that we know what the sap tastes like (see below), we probably won't bother collecting the sap any more.

Sap flow graph
The box elders started out strong, but petered out by the end of February.  The dates with the symbols are when we harvested (except 2/7, which was when we set the taps).  We should have been harvesting more frequently; this site recommends collecting sap every two days to keep the quality of the resulting syrup from degrading and/or to keep microbes from moving in and eating the precious sugar.

Early on, we harvested the box elders about once a week because the three-gallon buckets were full; the long gap between the end of February and the end of March was due to us waiting for a usable amount of sap to accumulate.  As noted in the caption above, we should have collected more frequently and stored the sap in the fridge, which would have both mitigated off flavors and given a better estimate of when the peak run was.  But, we've got some sap now, so we might as well analyze it!

Sap sugar content and color
Test #1: the 'sugar' content.  The box elder was showing about 2% sugar, which was slightly down from the earlier runs of 2.5% (it was also cloudy, when earlier runs were clear).  The Bradford pear was at about 0.7%, the Siberian elm was also at about 2%, and the Lombardy poplar at about 2.5%.  However, most of that increase in density relative to water was probably due to dissolved stuff other than sugar, because...

Sap in cups
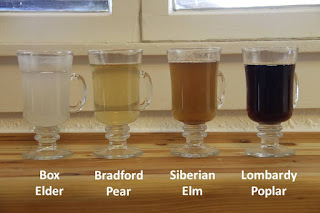
Test #2: the taste (and color)!  To be frank, they all tasted gross.  The earlier runs of box elder actually had a detectable sweetness to them, but not this time.  They did all taste slightly like the wood smells when you cut it. 
Or, in other words, here's our best description of the flavors:
  • For the box elder, it's sort of astringent and mildly acidic, 
  • For the pear it's...not much of anything, but it still somehow off-putting,
  • For the elm it's sort of like wet leaves in the fall, but somewhat more phenolic (if that helps...),
  • For the poplar it's more strongly astringent and more earthy than the box elder.  Also, really bitter.  

It's possible that the flavors changed while sitting out for almost a month, but we did try fresh elm sap that only sat for a day and it wasn't any better.   The colors didn't change much on sitting, and they smelled about the same, too.  Katie tried the elm, but none of the others, and generally concurred with the above assessment.  Actually, her response was something along the lines of, "if you already knew what it tasted like, why would you ever want me to try it?!"  (For science, of course!)

Needless to say, we didn't bother making syrup out of any of the non-box elder saps, and we won't bother tapping any of our trees other than the box elder next year.  But now we know, and now you know, too!

How did your sugaring season go this year?


Monday, March 28, 2016

More Stuffed Squash

It's the time of year when the winter squash stash is waning and overwintered greens are just maybe waxing enough to start harvesting some nibbles.  (We don't have any such greens in our garden this year, but last year we did!)  What better way to celebrate the start of a new garden season than to take a winter squash and stuff it with some of that new growth?  If you liked our stuffed squash boats, you'll probably dig this version, too.  (If not, thbbbt!)

Kabocha squash, venison, kale, and lentils on a cutting board
Our ingredients: a 2-3 lb Scarlet Kabocha squash, 1 lb ground venison, 1 lb kale, and 1 cup lentils (more than 1 cup pictured here).  NOTE: We only needed about a third of that filling to stuff this squash.  Also, we had to buy kale from the grocery store!  Oh, the humanity...

Roasting a kabocha squash
Cut the squash in half and scoop out the guts, then set the halves cut-side-down in some water on a cookie sheet and bake for 20-30 min until tender. 

We got the squash in early November and had it stored in a corner of our house that was 50-60 °F all winter; it was still in pretty good shape here at the end of March, but some of the seeds were looking like they were about to go all Kylo Ren on us (as in, turn to the dark side, not necessarily fight us with a light saber).  The Johnny's Seed catalog suggests storing this variety at 60-65 °F, so our slightly cooler temps might have decreased its staying power a bit.  Fortunately, the squash meat was still delicious.

Browning venison
Speaking of meat, while the squash is roasting, start browning up that venison...

Cooking lentils
...and cooking those lentils.

Sauteing kale
When the venison is done, put it in a bowl and saute the kale in the frying pan. 

When the kale and lentils are also done, add them to the bowl, too.  Season the whole shebang with salt, pepper, garlic powder, green onion powder, plenty of sage, some lemon pepper, and something labeled Chicago steak seasoning, to taste. Our proportions were probably 1.5 teaspoons of salt, 0.5 teaspoons each of lemon pepper, and steak seasoning, and 1 tablespoon each of everything else.

Stuffed kabocha squash, with cheese
When the squash are done, season them with salt and pepper, too, and stuff them full of the venison-kale-lentil mix.  Pile some shredded cheddar cheese on top.  Katie says, "Hey! Aren't you going to put cheese on that other one, too?" Maybe if you tell me where you hid the Easter candy!

Stuffed kabocha squash, cheese melted
Found it! :-) Ok, put the squash back in the oven to melt the cheese, like so.

Stuffed kabocha squash, with toast and fruit salad
As it turns out, a whole half-squash is more than a serving.  Half of a half squash (that's a quarter squash, for the fractionally-challenged) is better, especially when it means we might also have room for buttered toast and fruit salad.  The buttery flavor of the squash pairs most excellently with the buttery flavor of the toast.  Yum!

There you have it--now you should have no trouble using up your remaining winter squashes before the spring produce starts rolling in!  How's your winter squash stash looking?


Monday, December 14, 2015

Rescuing Renegade Fudge

The other day, we made our first batch of fudge for the year.  We've got a pretty robust recipe, so the ingredients normally yield a flavor that's to our liking.  But with the first batch of the year, we often get humbled on the mechanics of making it perfect. Such was the case this year, when it set up too quickly as we were pouring it into the pan.

"No problem!" we thought. "We'll just stick it in the oven for a few minutes to get it to soften up again, and when it cools down, it'll have a nice smooth top like a lake frozen on a clear, windless night."  So, we stuck it in the oven.  And it would have been alright if 1. we had set the oven to the lowest setting (170 °F) or 2. we had stayed focused on the fudge and not sat down to eat pizza, assuming we'd only need five minutes to scarf it down.

By now, you can probably see where this is going.  When we checked on the fudge, it was nearly boiling over the pan like an angry chocolate lava pit, and the top was anything but smooth.  Fortunately, we're happy to report that we didn't have to throw out a single crumb.  (House rules: don't waste chocolate!)  Here's how we brought our overcooked fudge back from the brink.

First, check to make sure it needs saving.  Ours was definitely overcooked, but the middle was more like a Tootsie Roll, and the edges had a slight S'more flavor because the sugar started to caramelize.  Not necessarily bad flavors.  We ate almost half the pan as it was before we decided we really ought to to something else with it.  Of course, if it had tasted burnt, it might have been better to stick it back in the oven and take it all the way to biochar.  (Well, maybe not the indoor oven.)

Option #1: Put it on oatmeal.  Katie added peanut butter to hers.  Actually, this works with good fudge, too.

Option #2: Make fudge sauce!  We chiseled out about 9.85 oz. from the pan, and added half a cup of milk, then put it on a low heat.  To be honest, if we had wanted to, we probably could have omitted the milk and just reprocessed it into straight fudge again.  This article suggests that fudge can sometimes be rescued that way, and if it came back with a non-fudgy texture again, then we could have gone the sauce route.

After a little while, stirring frequently, it had all melted and was nice and homogeneous.  We transferred it to a 1-pint canning jar and stuck it in the fridge.

Right out of the fridge, it was pretty stiff.

With about a minute in the microwave, it was much more saucy.

Perfect consistency for banana fondue!

Or, you know, other types of fondue, too.


How do you rescue overcooked fudge?


Friday, November 27, 2015

Reader Tips: Neill's Bike Tube Wood Clamp

Today's post is a tip from reader and whatchagotics expert, Neill Goltz, who came up with a great way to repurpose old bike tubes.  He says:
I just had a wonderful result repairing an old bureau (with mirror) where the laminate exterior had gone bad, i.e., was coming up off the underlying wood on the surface of the main drawer.

Not shilling for a particular product, but I used Gorilla brand wood glue. (I'm sure that Elmers would work just as well here. Or perhaps readers of this site already know how to make their own? Horses' hooves? Not going there…)

Anyway, two possible points of interest to your blog-readership.

How to apply a clamp - and what kind to a large drawer. Didn’t want to take it apart…

Working with glue is messy, and it extrudes from the seams once the clamp is applied.

The solutions:

As a clamp item I used old bicycle tires freely given by the owner of the local shop. They wrap beautifully around any unusual configuration and can be adjusted to any lengths and tension all the way around the project, in this case the drawer.

I just put a loop in one end, and thread the other end thru and pulled to desired tension. [I] recommend that you put "Shoe-Knot loop" thru on the second tie off so as to release it very easily when glue is dry. 

  I wanted to create a barrier-layer between the glue (which would extrude) and the tubes. A magazine cover or ordinary cardboard would be adhered to by the glue, so I tried the cellophane wrapper from a box of Cheerios.

Photo credit: Neill Goltz.

Voila! The results could not be better. [Excess glue can be removed with] water-based OOPS or GOOF-OFF. It's water-based, but I still use rubber gloves.

Photo credit: Neill Goltz.

Jake's Note: there are multiple formulations of those paint removers; some are water-based, some are not.  Definitely wear gloves with all of them!
Great work repairing your bureau drawer, and thanks for sharing the story, Neill!


Monday, November 23, 2015

Dakota Rocket Silo, version 3.0

We love our Dakota Rocket Silo--it helps us cook outside, put our pruning brush and small-diameter dead trees to good use, render wax, make biochar, and do lots of fun things.  But the original and rebuilt designs had one flaw that cropped up during extended use:


The piece of ground between the holes gets baked pretty good, and eventually weakens and starts crumbling, which makes the chimney part not level.  It might not be as much of a problem with wider cinder blocks where more of the support comes from the sides.

But we've got skinny cinder blocks, so we took out the middle part and built a brick foundation.  They're not fire bricks, so they probably won't last too long, but they were free!  This setup lets us keep the in-ground aspect that we like so much, but hopefully will stay level for longer.  Plus, it looks kind of Petra-esque.

We fired it up, and sure enough, it burns like a champ.  Next test: will it stay level through a winter?

Jalapeño popper, anyone? (They took a LONG time to cook this way, but they were really good!)


Monday, November 16, 2015

Garden Review

It's the time of the year that we're wrapping up the bulk of our gardening activities for the season.  When the frost threatened in mid-October, we picked all the remaining tender veggies, protected the hardy greens, and started putting the garden to sleep.  The fall greens will continue to trickle in, but the majority of the harvesting is done until spring.  And now that we've had a few weeks to let the fervor of vegetable processing subside, we wanted to take a look back and see how we did!

First, what did the garden look like?  This was our general setup: 15 beds at 3' x 9', or about 400 square feet of growing space.  However, we harvested basically nothing out of six of those beds due to poor germination, inconsistent irrigation, or marauding varmints.  So, we were actually working with more like 250 square feet.

Second, what did we grow?  Mainly tomatoes, squashes, potatoes, and onions, it turns out.  We totaled a little over 150 lbs total.  Back in January, we had set an arbitrary goal of harvesting 100 lbs of food from the yard, so blowing past that mark by more than 50% was satisfying.  It might not sound like much when some of our electronic friends are growing more than 225 lbs of butternut squash alone, but hey, we gotta start somewhere!

Third, how did it compare to our meal plan?  Most things were quite a bit less, but the summer squash and zucchini exceeded our plan by a lot.  We didn't have any delusions of being able to grow all our vegetables in 250 (or even 400) square feet of growing space, but we hit about 20% of our total annual vegetable demand (or about 50% during the harvest season).  That is, over the summer, we were bringing in about 7 lbs/wk of produce from the local farmers market, and harvesting about 7 lbs/wk from the garden, which was about as much as we could keep up with.  Those 14 lbs/wk through the whole year work out to 728 lbs of veggies.  For what it's worth, our meal plan called for about 675 lbs of vegetables over the course of the year (not counting garlic powder, onion powder, or herbs, if we wanted to make those, too), so not too far off.  Is it just us, or does the fact that our theory and our experiment line up so well make you really excited too?  ...Just us?  Ok, nevermind.

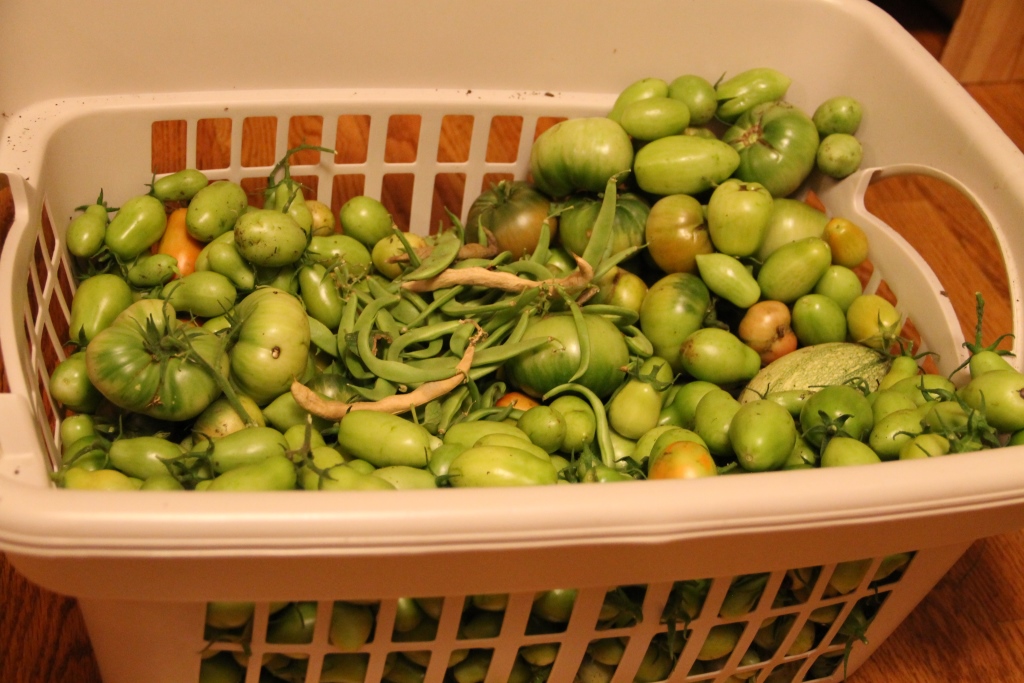
We'll just finish up then with a few pictures to show you how the end-of-growing season frenzy played out here.  This is the 25 lbs of veggies we brought in right before the frost.  It's about 80% green tomatoes.

These are the volunteer potatoes we dug a few days later.  The volunteers made up about 60% of our potato harvest, probably because they got to start growing right away in the spring while the rest of the garden was still too wet to dig and plant until early June.

Part of putting the garden to bed is pulling out the delicious weeds, like these dandelions.  But wait!, you say?  You're harvesting and eating the quintessential spring green that supposedly turns irreparably bitter after blooming, in October?  Why yes, dear readers!  Soaking the greens (and roots!) in cold water removes most of the bitterness any time of year.  It's great!

All the damaged volunteer potatoes ended up in this casserole, along with some freshly smoked bacon, some of the damaged tomatoes, green beans, some onions and garlic, and a creamy plain yogurt sauce.  It doesn't look terribly colorful from this angle, but the flavor was great!

The sweet potatoes, nearly all of which were damaged on harvest, ended up in this quiche, along with more tomatoes, onions, garlic, and plenty of herbs.  Yum!

We had made buffalo-seasoned cauliflower before, but then we got the idea to try it with other veggies, too.  The eggplant, with its spongy, sauce-saturated texture, was the best, but the summer squash and zucchini weren't bad, either.

We made multiple types of pizza; these two had a buffalo-type sauce, except with spicy salsa instead of Frank's hot sauce.  Our recipe needs some tweaking yet, but the concept is good, and the pizza was delicious!


How is your gardening season wrapping up?

Tuesday, November 10, 2015

Fun with Green Tomatoes

In years past, we've covered our tomato plants with tarps through the first frosts of the fall, and eventually brought them inside to let them ripen up through Thanksgiving or so.  But some never ripen, eventually shriveling up into tomato raisins.  Others go bad.  And even the ones that do ripen seem to lack the pizzazz that fresh summer tomatoes have.  And this year, we planted a lot more tomatoes than in years past, so there would have been sacrifices of counter or garage space.  Most importantly, however, when we started experimenting with green tomato recipes last fall, we realized that we were only brushing the surface of our green tomatoes' potential

It was a perfect storm such that when frost threatened in mid-October this year, we gleefully picked all the tomatoes and got to work processing them right away, ripe or not.  Here's what we tried this year.

This bowl is just the Romas! It's about 15 lb. worth.  The green Black Krims, Mr. Stripeys, and volunteers made up about another 7 lb.

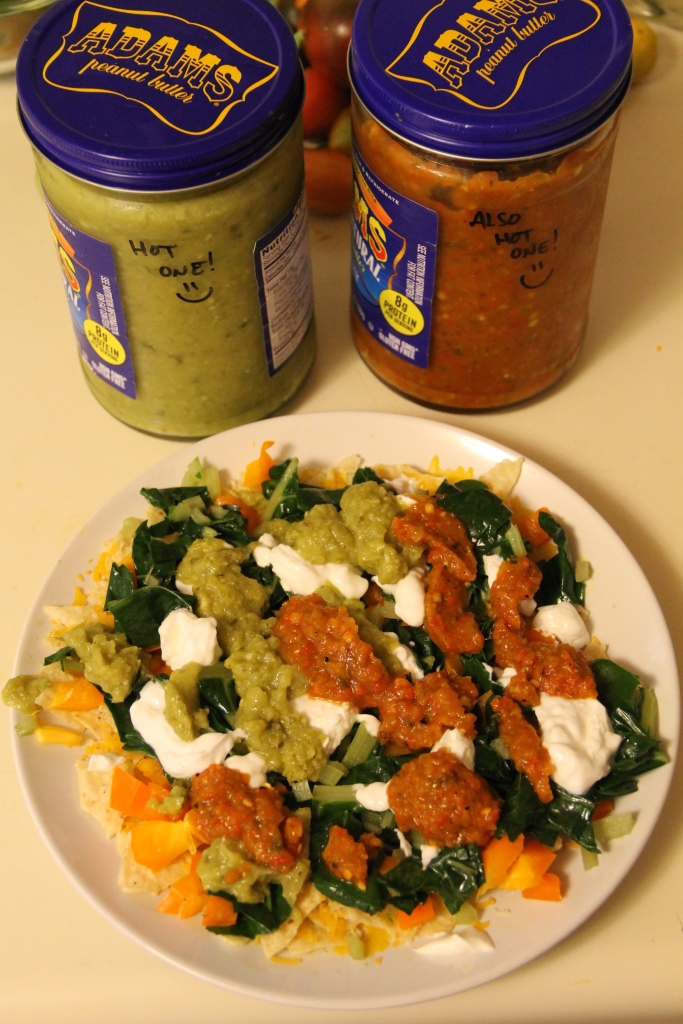
As we did last year, we didn't scrimp on the salsa making.  The batches all come out pretty good, but we haven't found a home-run recipe yet.  When we do, we'll for sure post it on here.  Our favorite uses for the salsas new this fall: nachos (of course), corn bread (both for part of the recipe and on top), and eating straight-up for sinus clearing.  Katie requires any homemade creations with more than about 2,000 Scoville units to be labeled as hot.  As a point of reference, all of the red color in the right-hand jar comes from cayenne peppers.  That kind of heat will keep you feeling warm and fuzzy inside all day!

We also made a green tomato jam (with vanilla and ginger), mainly following this recipe, but chopping everything with a stick blender in the pot, and ignoring the advice to remove the tomato seeds.  It's pretty good, but we feel like the long cooking time lets the ginger and vanilla flavors (especially the vanilla) start to dissipate.  Next year, we'll probably add some pectin and make it like regular jam.  The site we got the recipe from says it's good on plain yogurt, which it is, and it's also good on a sandwich with peanut butter (the way jam is meant to be enjoyed!).  Katie says the ginger flavor is a a little strong for her tastes, so you might want to cut back on that if you're somewhat ginger-averse.

The jam recipe also makes a pretty mean fruit leather.  It's got a molasses-type flavor, but the ginger still comes through strong enough to deter Katie.  (But she says she's not a bigot, and that some of her best friends are gingers.)

And last, but not least, mince filling!  We had never had a mincemeat pie before, but will definitely make it again.  We followed this recipe for the most part.  On its own, the filling kind of tastes like a spicy apple butter.  When mixed with an oat-and-almond crust, it tastes kind of like a Fig Newton. 

All told, those green tomatoes contributed to 14 pints worth of food, not including the test samples taken above.  Pretty good!

What do you do with your green tomatoes?