Showing posts with label Kitchen Science. Show all posts

Monday, March 21, 2016

Corned Beast Death Match

A couple weeks ago, we wrote that we were pitting the three types of corned venison we've made for past St. Patty's Days against each other in a head-to-head competition. After two weeks of marinating and trash talking in the fridge, Saturday night was finally fight night for our corned beast death match.  Time for the contestants to put their money where our mouth is.

The three curing recipes had identical seasonings except for the liquids; one was a dry rub, one was a brine made with whey, and one was a brine made with apple cider vinegar.  The cooking process was also similar for all three recipes: empty the meat plus all the cure ingredients into an oven-safe bowl, rinse the cure bag out with water, and add additional water as necessary to cover the meat.  Then bake at 350 °F until well-done (meat internal temperatures actually reached 185-190 °F); total time in the oven was about an hour.

The taste tests had two parts: ex-reubo tasting and in-reubo tasting, which are Latin-sounding terms we invented to mean 'out-of-the-reuben (sandwich)' and 'in-the-reuben,' analogous to in-situ (or in-vivo) and ex-situEx-reubo was just a bite of the cooked beast; in-reubo was obviously in the sandwich, along with Swiss cheese, sauerkraut, and thousand island dressing on rye bread.

Somewhat to our surprise, there was a clear winner in this epic battle.  Which recipe emerged victorious?  Read on to find out!

Corned venison
Fresh out of the cure stage, they look pretty similar.  The dry rub is maybe a little darker, and the whey-brined meat is more squishy.

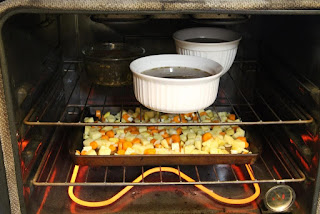
Cooking corned venison
Here they are, warming up for the fight.  A pan of roasted root veggies is ready to make sure any boil overs aren't wasted.

Cooked corned venison
Post-cooking, they also look pretty similar.  There is less foam with the dry rub, and the whey brine had the most.  Not sure if that's significant in any way.

Cooked corned venison, sliced
The internal texture and color looks pretty similar, too, and all were readily edible in the ex-reubo test.  No forced smiles or slipping pieces under the table to the dog were required.  But the whey brine is the clear winner!  It's by far the most tender.  The flavors were pretty similar for all three, too, except the dry rub was more salty.  To be fair, though, the original instructions for cooking the dry rub called for washing off the cure ingredients, cooking it, and letting it sit in a second, less-salty liquid for several hours before doing the final cooking.  For us, the extra required effort does not help the dry rub's case.  The apple cider vinegar-brined meat was also quite a bit drier than the whey-brined version.

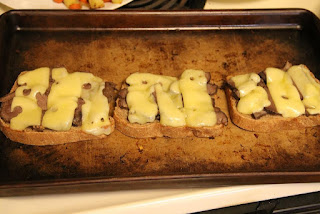
Reuben with melted Swiss cheese
Let's move on to the in-reubo test.  Pro tip: melting the Swiss cheese with the broiler helps keeps the slices of corned beast in place.

Reuben sandwiches, cabbage, roasted root veggies
Of course, it wouldn't be a true St. Patty's Day reuben meal without the root veggies and some cabbage to go with it.  It's a lot harder to tell a difference between the different cures in-reubo, but the whey-brined version is still noticeably more tender.  Score settled!  Follow-up question: why is the whey best?  Short answer: we don't know for sure.  The whey has different acids (lactic and citric) than the vinegar (acetic), but also has other things the vinegar brine doesn't have, like lactose and proteins.  Apparently, the combination of ingredients in the 30-min mozzarella whey is a good one for brining meat.

Blueberry pi pie
This photo doesn't have anything to do with corned beast, we just didn't want anyone to think that we missed celebrating the most precise pi day in 100 years (3-14-16 → 3.1416, which is correct to four digits past the decimal point).  The filling is blueberries, which are appropriate for a pi pie because they're spherical.

So, there you have it.  Whey brining is the best way to cure corned beast, in our opinion.  What's your favorite way (or whey) to do it?


Saturday, March 19, 2016

Book Review: How to Bake Without Baking Powder by Leigh Tate

Our last three posts were inspired by Leigh Tate's series on her own blog about baking with ash water, and she's now got an eBook available, too.  The latest volume in The Little Series of Homestead How-Tos includes much more than just baking with ash water leavening, though.  It's a comprehensive guide to understanding what baking powder is and how it works, and how to substitute for both the baking soda and acid components.

Book cover image
Biscuits on a fence for the cover.  We would definitely not be on the fence about eating those biscuits.

Since this is a unabashedly nerdy blog, we cannot, in good faith, mention baking powder without discussing the chemistry.  Briefly, baking powder contains a carbonate (typically baking soda), one or two types of acid (typically sodium aluminum sulfate (NaAl(SO4)2), various phosphate salts, and/or potassium bitartrate (cream of tartar)), and some kind of starch to keep the powder from sticking together.  The acids react with the carbonate to produce carbon dioxide gas when liquid is added and/or when the mixture is heated, depending on which acids are present in the baking powder.  The release of carbon dioxide is what causes baked goods to rise.

So, to bake without baking powder, as the title says, you need to substitute at least the carbonate and the acid components.

As you may know, your kitchen likely contains a lot of options for substituting the acid component, including vinegar, apple cider vinegar, lemon juice, sour cream, yogurt, whey, molasses, and honey.  At least some of those you could probably make on your own if you couldn't get to the grocery store (or didn't want to), or if society had collapsed but you still wanted to make biscuits.  There are also instructions for making some of them, like buttermilk (and cultured buttermilk), along with sourdough starter, which might have fit better in a future volume of yeast-based leavenings, but is nice to have here nonetheless.

Your options for substituting the carbonate component with homemade ingredients are more limited, consisting of essentially potassium carbonate and bicarbonate from wood ashes.  Calcium carbonate from eggshells doesn't work as well, although you might be able to make ammonium carbonate from deer antlers if you're not opposed to setting up a still and happen to have some potash laying around. (Who says you can't eat the horns?)

Of the 54 recipes the book includes, 33 use baking soda, one uses sodium carbonate, 10 use pearlash, saleratus (potassium bicarbonate), ash water, or wood ash, and three use hartshorn (ammonium carbonate).  The other seven get their leavening from eggs or 'emptings,' the yeasty residue that settles at the bottom of brewing vessels, but that, unlike most yeast-based leaveners can apparently be used in quick breads like a chemical leavener. So, in some cases, it's also possible to get by without a carbonate at all. It's worth noting that with a little trial and error, you can substitute some of the wood-ash based leaveners for baking soda, as Leigh did in the series linked at the beginning of this post.

Recipe-Leavening breakdown table
Here's the recipe-leavening breakdown for the book.  Saleratus = potassium bicarbonate; other includes eggs and 'emptings.' (Click it to enlarge.)


It's also really cool to see recipes that are over two hundred years old compiled into the same book as recipes Leigh developed on her own modern-day homestead to make use of her own byproducts, like whey from making goat cheese, and wood ashes from her wood stove.  In that way, it's sort of a living history book. Reading between the lines, there's a story that develops from 'people who realized mixing these random ingredients together made bubbles, which in turn made tastier cookies,' to 'if we mix an acid and a carbonate in these ratios, we'll produce sufficient carbon dioxide to leaven the cookies and not leave a bitter taste.'  Fascinating stuff.

Along the same line of thought as that latter point, one of our favorite parts of the book is the table of recommended ratios for the various household acids and baking soda.  i.e., how much lemon juice do you mix with a teaspoon of baking soda?  How much molasses do you mix with a teaspoon of baking soda to get the same leavening effect?  That's a pretty handy resource that makes substituting ingredients much easier.

The only thing we would have liked to see more of is photographs of the baked goods!  There's a delicious picture of biscuits on the cover, but inside the book, there are only links for a few of the recipes that appeared on Leigh's blog, 5 Acres and a Dream.  On the other hand, fewer pictures to drool over means a lower probability of a shorted-out keyboard, so maybe it was a good strategy after all.

We should mention that we received a free copy of the book, not with any expectations of a review, but, well, for simply being interested enough in the chemistry to contribute some thoughts on Leigh's blog.  That said, we would have gladly ponied up the $2.99 price tag of this book.  It's clear that Leigh put in many, many hours of research on this book, and three bucks is more than fair for that effort.

In summary--How to Bake Without Baking Powder is an excellent reference and we have no qualms about recommending it to everyone.  Readers, start your ovens...ready...go!


Monday, March 14, 2016

Wood Ash Leavening--Biscuit Baking Time!

Last Tuesday, we hypothesized, based on historical tales, that wood ash leachate ("ash water") likely contains both potassium hydroxide and potassium carbonate.  On Saturday, we proved it with a titration experiment.  Today, we find out what it all means with a biscuit baking party.

As a recap, we calculated that the hydroxides in the ash water outnumber the carbonates nearly 3:1, and that one teaspoon of ash water should have the same leavening power as about 1/46 teaspoon of baking soda.  Fortunately, baking with the ash water has turned out to quite a bit better than our prognostications suggested.

This is the recipe that we used as a starting point (and a positive control):

Base recipe:
0.5 cups all-purpose flour
0.125 (1/8) tsp salt
1 Tbs butter
1 tsp apple cider vinegar + milk to 0.25 cups
0.25 (1/4) tsp baking soda

Mix apple cider vinegar and milk to make a faux buttermilk.  Combine flour, salt, butter, and baking soda in food processor and process until butter is cut in.  Combine buttermilk and solid ingredients, mix well, and form into drop biscuits on a cookie sheet.  Bake at 400 °F for 20 min.  Yield: 3 biscuits.  Serving size: 3 biscuits.

To modify it for wood ash-based leavening, we figured we'd need more acid to neutralize the hydroxides.  Also, based on Leigh's experiments, using dry wood ash seemed to work just about as well as the ash water, so we did started with two variations on the base recipe:

Variation 1:
Same amounts of  flour, salt, and butter

1 Tbs apple cider vinegar + milk to 0.25 cups
1 tsp ash water
no baking soda

Variation 2:
Same amounts of flour, salt, and butter
1 Tbs apple cider vinegar + milk to 0.25 cups
0.25 (1/4) tsp dry ashes
no baking soda

We also made a negative control, which was the same as the base recipe, but without the baking soda.  This is what we got:

Ash and ash water biscuits, THL recipe, top view
The 'no leavening' control was the least risen of the bunch, and the baking soda was much better than the rest.  The ash water and dry ash were somewhere in the middle, but, like the calcium carbonate experiments we did here and here, closer to the 'no leavening' than the 'baking soda.'  Still, they made a good lunch, and they're very tasty with cheese.

Ash and ash water biscuits, THL recipe, side view
Here you can see how the textures compare.  No competition for the baking soda...yet.

When we were taste testing these biscuits, we noticed that the biscuit with dry ash had a sort of tangy flavor, suggesting that all the apple cider vinegar hadn't been consumed.  The ash water one didn't, but looking back at our recipe, we realized we actually meant to add 2 Tbs of apple cider vinegar to that one, which would have given us the 6x increase on the original recipe acid that we calculated in the last post.  So, we decided to make another batch with two more variations:

Variation 3:
Same amounts of flour, salt, and butter
1 Tbs apple cider vinegar + milk to 0.25 cups
0.5 tsp dry ash
no baking soda

Variation 4:
Same amounts of flour, salt, and butter
2 Tbs apple cider vinegar + milk to 0.25 cups
1 tsp ash water
no baking soda

Also, as a reality check, we decided to make Leigh's recipe, which had twice the lipid, a lot more ash water, and actually less acid:

Leigh's Recipe:
0.5 cups all-purpose flour
0.125 tsp salt
2 Tbs butter
2 Tbs milk
2 Tbs ash water
0.5 tsp white vinegar

And since we had room on the cookie sheet for three more biscuits, we made another set of the base recipe with baking soda because, frankly, those are the only ones Katie has really liked so far.

Here are the results of the second round:

Ash and ash water biscuits, THL recipe and Leigh's recipe, top view
All of the round two biscuits rose better than the round one biscuits. (Except for the baking soda control, that one was about the same.)  Leigh's recipe beats the pants off of all the variations we devised.  So, either the extra butter makes a big difference, or the extra ash water does (we're betting on the latter).  We did accidentally spill a little extra vinegar into the mix, so it was more like 1 tsp vinegar instead of 0.5 tsp.

Ash and ash water biscuits, THL recipe and Leigh's recipe, side view
It shows in the texture, too.  Both of the biscuits on the bottom earned Katie's seal of approval.

Well, now we've got a conundrum!  More ash water and less acid seems to be what it took to get the leavening effect we were going for.  So, while we calculated that we would need to boost both the ash water content and the acid content in our recipe, the ash water content clearly makes a bigger difference.  What gives?

The first thing that comes to mind is that the hydroxides in the ash water could have reacted with other ingredients in the recipe (i.e. the the butter or the milk), taking themselves out of the equation before the vinegar even had a chance to take a whack at them.  So, it's possible that doubling down on the acid in the recipe wasn't really gaining us anything. 

Similarly, sitting out on the kitchen counter, exposed to the air for a week, might have let the hydroxides react with carbon dioxide from the air, throwing our calculated hydroxide-to-carbonate ratio way off (and underestimating our total carbonate).   We think that's a more likely possibility, because when we tried to titrate the ash water a second time several days later, it took a lot less acid to reach the end points. 


Cracked measuring cup
We also helped increase the surface area of the ash water (i.e., it's opportunity to interact with atmospheric carbon dioxide) by storing it in a polycarbonate measuring cup one night.  By the next morning, there was a crack in the cup and the ash water had run out onto the counter!  Turns out, polycarbonate is not compatible with potassium hydroxide. Now we know!

For what it's worth, we did calculate that if we were able to convert all the hydroxides into carbonates, 1 tsp of ash water would have the leavening power of about 1/22 tsp of baking soda.  Since Leigh's recipe calls for 2 Tbs (6 tsp) of lye water, that's 6/22 tsp of baking soda.  6/24 tsp would be the same as 1/4 tsp, which is what our base case recipe called for.  So, the theory sort of lines up with the experiment in this case.

The only other possibility we can think of is that we did something really wrong in our titration, and we're totally not ready to entertain that idea yet!

So, some final thoughts on ash water leavening: it works!  Just follow Leigh's recipe instead of ours, and make the ash water well ahead of time so that it has time to pull carbon dioxide out of the air, eat through your polycarbonate measuring cups, and/or generally get to know you a little bit before you try to stick it in your biscuits.


Have you ever baked with ashes or ash water?  How did it go?


Saturday, March 12, 2016

Wood Ash Leavening Chemistry--Ash Water Titration

On Tuesday, we established that the process of leaching ash water likely extracts both potassium carbonate and potassium hydroxide.  But we also want to know the relative proportions of each because if we're going to use the ash water for leavening, we have to increase the amount of acid in the recipe to neutralize any potassium hydroxide, if it's present.  Today, we're going to titrate some ash water.

We can approach this task in two ways. We could 1. trudge through it with the bored disdain of an analytical chemistry student ("is it ever going to change color?"), or 2. pull out a bottle of last spring's dandelion wine, blast some banjo music, and turn this nerd party into the best date night ever!  If you've been following this blog for any length of time, you know we're about to down some libations and do some titrations!

Essentially, what we're doing in the titration is to take the ash water, which is very alkaline (high pH) and add a solution of acid a little bit at a time until we get to the point where all of the hydroxide and carbonate are converted to water (from the hydroxide) or water and CO2 (from the carbonate), at which point the water will be very acidic (low pH).  If we keep track of the amount of acid we added, we can figure out how much carbonate we have, and then back-calculate to figure out how much hydroxide.  It's like magic, but better--it's math!

The chemistry that's happening is this:  first, all the acid we add (e.g., hydrochloric acid, HCl) is eaten up by the hydroxides:

KOH +  HCl = H2O + KCl

(That's why, if both are present in the ash water, we need to add more acid to our biscuit recipe to get the leavening effect we want.)  Next, all the acid we add reacts with the carbonate to produce the bicarbonate:

K2CO3 + HCl = KHCO3 + KCl

Finally, all the bicarbonate reacts with the acid to produce carbonic acid, some of which will convert to dissolved CO2, and some of that will convert to gaseous CO2 and bubble out of solution (that's the leavening effect we're trying to get when we combine acid and baking soda in our biscuits!):

KHCO3 + HCl = H2CO3 + KCl

H2CO3 = H2O + CO2,(aq)

CO2,(aq) = CO2,(g)

For what it's worth, the acid that reacts with KOH in the first reaction above could also be H2CO3, which would generate K2CO3 and, if there were enough H2CO3 to go keep it going, KHCO3. So, bubbling CO2 through the ash water, which generates H2CO3 by Le Châtelier's principle (i.e., it pushes the above reactions backwards), would help boost the leavening power of the ash water.  In the absence of bubbling CO2 , it can help a little to leave the ash or ash water sitting out exposed to the air before using it, because it will absorb CO2 from the atmosphere, to some extent.

What are we looking for in the titration?  This book has a great visualization of what you'd expect to see when titrating carbonates, hydroxides, or a mix of both.  The only trick is that we don't have a pH meter to measure the titration progress directly, so we need a pH indicator (i.e. a molecule that changes color in response to changes in pH) instead.  This site explains that phenolphthalein and methyl orange make good indicators for this titration, while the book linked above says bromocresol green is also good for the second indicator.

What makes an indicator good for a particular titration is if it changes color at the same pH as one of the endpoints we're trying to titrate (carbonates for us).  The chart below shows where the indicators mentioned above change color in relation to the species of carbonate in the ash water.  Our kitchen doesn't have any of the three indicators commonly used in the lab, but we do have some red cabbage juice, which is a cool enough indicator to do both endpoints.  Hooray for cabbage!

Carbonate speciation and pH indicators
Phenolphthalein changes from pink to colorless just as all of the CO32- is used up (endpoint 1, or EP1, at pH 8.4).  Similarly, bromocresol green changes from blue to yellow and methyl orange changes from yellow to red just as all the HCO3- is used up (EP2, pH 3-4).  (Source.) Happily for us, cabbage juice changes from green to blue near EP1 and from colorless to pink near  EP2.  Cabbage juice solutions don't really go completely clear, but they become a very pale purple, and then the first tinges of pink should indicate our endpoint.

Titrations with indicators in general are a little tricky because the color change is always somewhat subjective.  But we can practice on a few solutions of sodium hydroxide and sodium carbonate first, to get a feel for what we're looking for.

But before we can do that, we need a strong acid to titrate our solutions with.  We picked up some muriatic acid (HCl) from Lowe's and diluted it from 31.45 wt% (10 M) to 0.05 M (essentially, 1 teaspoon (5 mL) into 500 mL (a little over 2 cups) of water to make 0.1 M HCl, and 1 cup of that plus 1 cup water to make 0.05 M.  NOTE: if you're following along at home, put on safety goggles and gloves before you start playing with 10 M HCl. Also, HCl doesn't get along very well with almost any metal, including stainless steel.  So, if you're diluting in the kitchen, don't use your nice metal bowls and measuring spoons.  Plastic and glass only for this exercise!

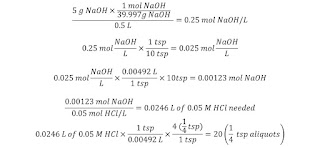
Now, we need some standard solutions. First up: just NaOH (5 g in 500 mL water to make a stock solution), diluted 1:10 (1 teaspoon of the stock solution plus 3 Tablespoons water), and added 1 teaspoon of the indicator solution. Here's the math to show how much acid we expect to need to add.  The smallest plastic measuring device we have is 0.25 teaspoon, so that's what we're going to count our titrations by.

Titration math

Calculated number of 1/4 teaspoon aliquots to add to get to EP1: 20
Calculated number of 1/4 teaspoon aliquots to add to get from EP1 to EP2: 0

Large canning jar of 0.05 M HCl, 1/4 teaspoon measuring device, small canning jar of 1 g/L NaOH in place...ok, ready, go!  1 quarter-teaspoon, swirl, 2 quarter-teaspoons, swirl, 3 quarter-teaspoons, swirl...

Actual number of 1/4 teaspoon aliquots to add to get to EP1: 13
Actual number of 1/4 teaspoon aliquots to add to get from EP1 to EP2: 0
EP 1 + 2 error: -35%
 
Titrating NaOH with hydrochloric acid using cabbage juice as pH indicator
0.05 M HCl added in 0.25 tsp aliquots.  That's the smallest non-metal measuring spoon we have!

Hmm...so, not terribly accurate, (see note at the end of this post) but we would predict all hydroxides and no carbonates, as expected.  The indicator pretty much skipped the blue and purple phases and when straight to pink-ish. 

Second standard solution: just Na2CO3 (5 g in 500 mL to make a stock solution, diluted the same way).  We can to do the same math (substituting the molecular weight of Na2CO3 for that of NaOH to get to:

Calculated number of 1/4 teaspoon aliquots to add to get to EP1: 7.55
Calculated number of 1/4 teaspoon aliquots to add to get from EP1 to EP2: 7.55

And...the results:

Actual number of 1/4 teaspoon aliquots to add to get to EP1: 5
Actual number of 1/4 teaspoon aliquots to add to get from EP1 to EP2: 5
EP1 error: -34%
EP2 error: -34%

Titrating Na2CO3 with hydrochloric acid using cabbage juice as pH indicator
0.05 M HCl added in 0.25 tsp aliquots.


So, similar errors, but again, we would conclude based on the volumes to endpoint 1 and endpoint 2 that we have just carbonate in solution, which is true.

How about a third standard solution, with a mix of the two?  5 g NaOH + 5 g Na2CO3, similar math to get to:

Calculated number of 1/4 teaspoon aliquots to add to get to EP1: 27.55
Calculated number of 1/4 teaspoon aliquots to add to get from EP1 to EP2: 7.55
Actual number of 1/4 teaspoon aliquots to add to get to EP1: 23
Actual number of 1/4 teaspoon aliquots to add to get from EP1 to EP2: 6
EP1 error: -17%
EP2 error:  -20%

Titrating a mixture of NaOH and Na2CO3 with hydrochloric acid using cabbage juice as pH indicator
0.05 M HCl added in 0.25 tsp aliquots.  We went one past our supposed endpoint to see how pink it would turn.

Better, but still large enough errors to make an analytical chemist cringe.  However, feast your eyes on this set of numbers:

Calculated ratio of carbonate to hydroxide: 0.377
Experimental ratio of carbonate to hydroxide: 0.353
Error: -6.5%

Booya!  Less than 10% error is not bad for kitchen chemistry.  It looks like we might be able to use this technique with enough accuracy to figure out relative amounts of hydroxides and carbonates in our ash water.

Now for the real stuff.  We made the ash water by mixing 0.5 cups wood ash (mainly elm) plus 0.75 cups boiling water, mixed well, and left to settle for several days (mainly because of convenience; it was well settled by the next morning).  We tried one titration undiluted, but the ash water turned out to be really strong stuff, so we ended up diluting the ash water 1:10 and titrated that with 0.05 M HCl.  Here's the stats:

Actual number of 1/4 teaspoon aliquots to add to get to EP1: 29
Actual number of 1/4 teaspoon aliquots to add to get from EP1 to EP2: 8
Experimental ratio of carbonate to hydroxide: 0.381
(Experimental ratio of hydroxide to carbonate = 1/0.381 = 2.625)
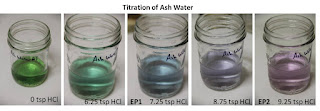
Titrating ash water with hydrochloric acid using cabbage juice as pH indicator
0.05 M HCl added in 0.25 tsp aliquots.

Whoa!  So, for every 1 molecule of carbonate in our ash water, there are 2.625 molecules of hydroxide. Or, stated another way, the leavening power-influencing parts of the ash water are 72.5% hydroxide and 27.5% carbonate.

What does that mean for baking with ash water?  If we had only carbonates, we would have to add enough acid to convert the carbonate to the bicarbonate, and then convert the bicarbonate to CO2.  But since we know that our acid will first react with the hydroxide, we need to increase the acid on top of that.  If a recipe is starting with baking soda (sodium bicarbonate) and an acid, we would want to double the amount of the acid to get the same effect from the carbonate, and then roughly triple that amount to neutralize the hydroxides.  Or, overall, if we're replacing baking soda in a recipe with ash water, we should have to add six times as much acid as the recipe calls for to get the same leavening effect.

Also, it's probably good to know how much bang for the buck we can expect to get from the ash water.  Although we noted that our quantification isn't great, we were consistently predicting 20-35% less of each component than was actually present.  So, for the carbonates, our titration calculates that there is 0.000492 mol K2CO3 and 0.00129 mol KOH per teaspoon of ash water, which works out to 0.067 g K2CO3 and 0.072 g KOH.  If we multiply those by 1.25 to account for the 20-30% error in our titration, it works out to 0.085 g K2CO3 and 0.091 g KOH.  Since the baking soda (sodium bicarbonate) has a bulk density of 801 kg/m3 (0.801 g/mL), and 1 teaspoon = 4.92 mL, each teaspoon of baking soda contains about 3.94 g of NaHCO3.  Therefore, one teaspoon of our ash water has about the same potential leavening power as 0.022 (1/46) teaspoon of baking soda.  (Actually, it has slightly less leavening power because KHCO3 weighs more than NaHCO3.)

Of course, it will only reach that potential if we add enough acid to neutralize the hydroxide and convert the carbonate to bicarbonate.  As we mentioned above, the best way to do that would be to bubble CO2 through the ash water, which will convert both the CO32- and the OH- to HCO3-. Ideally, we'd do that until the ash water (with a bit of indicator) turned blue.  That would increase the leavening power up to about 0.04 (1/22) teaspoon of baking soda.  The other readily-available way to increase the leavening power would be to boil off most of the water to concentrate the carbonates.
 
With this knowledge in hand, we can move on to the delicious finale.  Stay tuned for more biscuit trials!

 ...
 
Ok, as a follow up, we were slightly disturbed by the absolute errors in our titrations, so we did something that we should have done beforehand--mix up reference solutions to compare colors.  To get the first endpoint is easy--just mix baking soda into water and add the indicator.  All of the relevant species are present as the bicarbonate ion, so the pH is right at the first endpoint.  For the second endpoint, we added 0.25 teaspoons of our NaOH stock solution (5 g NaOH in 500 mL water) to 100 mL of vinegar, which should give a mixture with a pH of about 3.08 (calculations available on request!).

Reference solutions at pH of carbonate titration endpoints
That second endpoint (on the left) is a lot pinker (i.e., lower pH) than what we were calling our endpoint!  No wonder our errors were so large--we should have added a few more aliquots of 0.05 M HCl to each solution before calling it done.  Of course, that wouldn't help the first endpoint much; most of the solutions went from green-blue right to purple.  Guess we better stick mostly to calculating  ratios with this method.  Also, if you ever need a nerdy gender-reveal idea for your future baby, here you go!


Tuesday, March 8, 2016

Wood Ash Leavening Chemistry--An Extraction of Historical Accounts

Leigh over at 5 Acres and a Dream recently did a fascinating series of blog posts on producing leavening from wood ashes (Part 1, Part 2, and Part 3).  The high-level overview is that wood ashes contain potassium carbonate, which can be extracted and used as leavening for quick breads, biscuits, etc., similar to how baking soda is used.

Leigh made some pretty tasty-and-leavened-looking biscuits with her extracted carbonate (and with straight wood ash), but noted that they didn't rise quite as well as the control biscuit (which had baking soda).  There were also a few unanswered questions on the chemistry involved, so we wanted to follow our nerdy instincts and dive into the nitty gritty of what's happening at the molecular level.

First issue: what is actually being extracted from the wood ashes?  Carbonates, we suspect, but is that it?  In our minds, there's a controversy, since the process of extracting carbonates for leavening sounds an awful lot like the process of extracting lye (potassium hydroxide, KOH, in this case) for soap making.  We're especially keen on figuring this out because if both hydroxides and carbonates are present, it will change our biscuit recipe (specifically, we'll have to add more acid to get the leavening effect). Let's compare some descriptions.

 The very cool Caveman Chemistry website says that the major components of wood ashes are potassium and sodium carbonates, but says this of the extract:
"It contains all of the soluble materials which were present in the the ashes to begin with. This could include sodium and potassium chlorides, sulfates, hydroxides, and carbonates."
So, it sounds like both carbonates and hydroxides could be present.  Another account of potash and pearlash production from 1866 is generally consistent with that (despite a distinct lack of cavemen in 19th century North America), but doesn't mention hydroxides:

"Carbonate of potash is generally obtained from wood ashes...the soluble constituents of the ashes are the carbonate, sulphate, phosphate, and silicate of potash and chlorides of potassium and sodium.  The insoluble constituents are carbonate and subphosphate of lime, alumina, silica, the oxide of iron and manganese, and a dark carbonaceous matter."

That same account also describes the process for preparing the potash and pearlash:

"In America, the ashes are lixiviated [extracted] in barrels with lime, and the solution evaporated in large iron pots or kettles, until the mass has become a black color and the consistency of brown sugar.  In this state it is called, by American manufacturers, 'black salts.'  ... To make the substance called pearlash, the mass called black salts...is transferred from the kettle to a large oven-shaped furnace, constructed so that the flame is made to play over the alkaline mass. ... The ignition is in this way continued until the combustible impurities are burnt out, and the mass, from being black, becomes dirty bluish-white, having somewhat of a pearly lustre, whence the name pearlash. The coloring matter is probably in this case manganate of potash."
In a process flow diagram, it would look something like this:

Pearlash historical production process flow diagram
Other soluble minerals (OSM) seemed like a better acronym than Minerals of Unusual Solubility (MOUS). (Warning: obscure pop culture reference.)  You can buy pure potassium carbonate these days, and it's bright white.  To visualize the color of pearl ash, think of this color, but very faint.

So, no mention of potassium hydroxide in the old-time production, but that might be because of the production method.  The CO2 in the combustion gases that are passing over the black salts reacts with KOH to make KHCO3 (or to make H2O and K2CO3); any KHCO3 produced decomposes to K2CO3 in the heat.  So basically, if hydroxides are extracted into the ash water, they don't make it into the pearlash.

But, compare the process of making ash water for leavening with any of several similar descriptions of the process for preparing lye for making soap.  For example, this one:

"Traditionally, one uses an old wooden barrel or lye hopper for this, even hollow treetrunks in some areas. ... In the bottom, put a filter made from a couple of inch depth of twigs, and the same again of straw or hay. This helps ensure the lye comes off moderately clear. Stand the lye barrel up high enough to get a container underneath...and fill it up with those ashes. Add water. ... Leave it all overnight...[then] let the lye run out into your container."

Other descriptions call for adding lime (or slaked lime), which we noted increases the hydroxide yield by converting carbonates to hydroxides by the following reaction:

 Ca(OH)2 + K2CO3 = 2 KOH+ CaCO3

There is also a journal article in the peer-reviewed literature, which claims the ratio of hydroxides to carbonates in their crude ash extracts is 92-to-8, and more anecdotal observations that carbonates don't work very well for making soap (but ash water does) and that crude ash extract by itself doesn't do much leavening.  Therefore, it seems very likely that the crude ash water extract contains an appreciable amount of hydroxides along with the carbonates.

So there's the theory--probably both carbonates and hydroxides are present in the ash water.  Fortunately, we don't have to just sit around, dealing in hypotheticals.  We can experimentally measure the amounts of carbonate and hydroxide in the ash water through the magic of titration. (If you've suffered through an analytical chemistry class in college, we hope you didn't just throw up in your mouth a little bit.)

Wood ash and water extract
O ash water, what mysteries containest thou for us to unravel by the labor of titration?

We'll give you a few days to stew over that and then hit you with a chemistry-dense post interspersed with colorful pictures.


Sunday, March 6, 2016

Corned Beast Recipe Death Pre-Match

Guess what!  St. Patrick's Day is only two weeks away! That means if you're going to corn your own beast for reuben-making this year, it's about time to get started.

It's definitely a tradition around here to corn venison ahead of St. Patty's Day, but we've done it a number of different ways over the years.  And, as much as we hate to admit it, the sad truth is that we don't do much meat corning outside of early March.  So, when we make a  batch and try to compare its flavor and texture to the previous batch, it's a tall order for our meager brains.

How can we resolve this dilemma?  No problem.  Like we did with our french toast, we'll have a tasty corned beast recipe death match and settle the score once and for all.

The three techniques we've used to corn our venison are a vinegar-based brine, a whey-based brine, and a dry rub.  Those are the three that will be cage fighting in our kitchen this year.  Here's the basic recipe:

0.5 lb venison roast

1 Tablespoon salt
1 teaspoon brown sugar
0.5 teaspoon ground black pepper
0.5 teaspoon whole coriander seeds
0.5 teaspoon whole mustard seeds
0.25 teaspoon ground allspice
0.25 teaspoon ground cloves
1 bay leaf, crushed
1 clove garlic, sliced

That's it for the dry rub.  For the whey recipe, we added 0.5 cups of whey from a 30 min mozzarella recipe (made with 2% milk).  For the vinegar recipe, we added 2 Tablespoons of apple cider vinegar, plus water to bring the volume up to 0.5 cups.

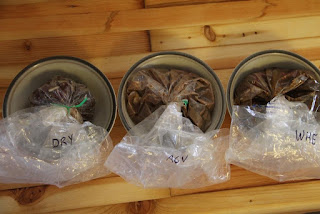
Venison, seasonings, brines for corning
From left to right: dry rub, apple cider vinegar-based brine, whey-based brine.

We mixed all the solid ingredients together (except for the meat), then added the liquid (if any) to a plastic bag, then added the meat, too, and gave it a nice massage. We expelled all the air out of the bag, sealed it with a twisty-tie, and put it in a bowl as secondary containment (just in case the bag leaks!) in the fridge.  The recipes we've seen say to flip it once a day, but for us in the past, it's been more like every other day (at best).  It's always still came out pretty tasty.  In any case, at least all three runs will get the same treatment! 


Venison, seasonings, brines for corning, in bag, ready for fridge!
Don't forget to label the bags!


What's your favorite technique for corning meat?  Have you corned meat other than venison (or beef)?


Monday, February 29, 2016

Eggshell (Calcium Carbonate) Leavening, Part 2

If you've been following this blog lately, you know that we're engaged in a multi-week battle of wits with a pile of eggshells.  Specifically, we're trying to figure out a way to isolate calcium carbonate from eggshells to use as a leavening agent.  The calcium carbonate is bound up in a matrix of protein that makes it less accessible for leavening action, so for maximum leavening effect, we have to either dissolve away the protein or dissolve away the calcium carbonate and then regenerate it.  Last week, we tried boiling ground-up eggshells in lye to dissolve away the protein.  (It didn't work very well, but at least the biscuits were tasty.) Today, we take a look at the other option--dissolving the calcium carbonate and regenerating it.


Hypothetical route from eggshells to calcium carbonate; doesn't work in real life
The first thought we had was that the CaCO3 in the eggshells can be dissolved by the acetic acid in vinegar to make calcium acetate (Ca(Ac)2), which can be decomposed to CaCO3 around 400 °C.

Calcium acetate calcined at ~500 °C
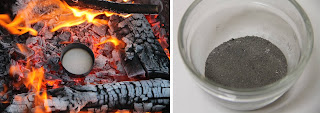
Unfortunately, some of the eggshell proteins are also apparently soluble in vinegar, and when we made calcium acetate by dissolving eggshells in vinegar and evaporating all the liquid, we ended up with a light-brown colored solid, which yielded a gray powder after a clean cycle in the oven (which gets close to 500 °C).  We got a similar looking powder when we put ground whole eggshells through the oven clean cycle.

Ground eggshells in rocket stove
The product from calcining eggshells in the rocket silo was actually a little darker colored.  As a point of reference, we're looking for CaCO3 as a fine, white powder.


This is actually a problem that's bothered us since we wrote about grinding up eggshells way back when this blog was just an infant.  While it's usually possible to burn organic matter (e.g., proteins) off of inorganic residue (e.g., wood ash, glass, stainless steel) at 400-500 °C (750-930 °F), eggshells hold on to the organic matter from their protein until 900 °C (1650 °F).  Unfortunately, at that temperature, our desired CaCO3 has transformed into lime (calcium oxide, CaO).  Thus, it's no surprise that when we put a pile of eggshells in our oven and set it to the clean cycle, our pile came back grayish-colored instead of the white color of pure CaCO3. (Although, we were surprised at the time since we hadn't done much reading on the topic!)

So, we're 0-for-2 on getting our pure CaCO3 out of the eggshells at this point, but it's worth noting two things.  First, while we haven't been able to get pure CaCO3 from eggshells, the gray powders from either the decomposed eggshells or the decomposed calcium acetate react much more vigorously with vinegar than the raw eggshells.  Still not as vigorously as baking soda as the video below shows, but bubbles abound nonetheless.  So, maybe the gray powders are worth trying as leavening.


Second, can we approximate a best-case scenario for obtaining pure CaCO3 from eggshells?  Yes! We can get a bag of pure CaCO3 for a couple bucks at the local homebrew store.  So while our blog post declaring victory on purifying CaCO3 from eggshells will have to wait until another day, we can still see what a best-case scenario for eggshell-based leavening would look like. Biscuit baking time!

Biscuit leavening comparison: no leavening, calcium carbonate, and baking soda
Same recipe as last time, but only four sets this time: no leavening, gray CaCO3 from eggshells, white CaCO3 from the homebrew store, and NaHCO3 (baking soda).  Very similar results as last time, too.  The gray CaCO3 biscuits are definitely more risen than the no leavening control, and similar to the biscuits we baked last week from raw and lye-boiled eggshells.  The white CaCO3 biscuits were noticeably more risen than the gray CaCO3 biscuits, but still couldn't hold a candle to the baking soda biscuits.

Biscuit texture comparison: no leavening, calcium carbonate, and baking soda
The textures of both sets of CaCO3 biscuits were similar to last week's results, too. Not completely cooked through at the 20 min mark, while the baking soda biscuits were definitely done. 

Banana bread leavening comparison: calcium carbonate and baking soda
The effect is more pronounced for banana bread.  Can you guess which loaf used gray CaCO3 from eggshells as leavening? (Hint: it's not the one on the right--that one had baking soda.) The grand conclusion from all these experiments?  Even though the CaCO3 releases carbon dioxide gas when mixed with an acid (same action as baking soda), the slower reaction kinetics mean that eggshell-based leavening can't get the job done.


Have you ever baked with eggshells or tried to isolate CaCO3 from them?  How did it turn out?

EDIT: After going through our wood ash leavening experiments and realizing that we could get good leavening effect by incorporating more of the leavening agent, we came back and baked another set of biscuits with 1 tsp of the finely-ground eggshells (i.e., with quadruple the amount of eggshells of our recipe).  The biscuits were definitely still not as light and fluffy as the baking soda-leavened biscuits, but were better than anything we had achieved so far, and actually, not too bad on texture.  So, if you do any experimenting on your own, start with at least four times the volume of ground eggshells as the recipe calls for in baking soda (e.g., if the recipe calls for 1 tsp baking soda, use at least 4 tsp ground eggshells).

Saturday, February 20, 2016

Eggshell (Calcium Carbonate) Leavening, Part 1

A few weeks ago, we were reading a 5 Acres and a Dream blog post about making homemade leavening from wood ashes (i.e., from potassium carbonate, K2CO3), and a reader in the comments section asked if calcium carbonate (CaCO3) from eggshells, which also reacts with acid to release CO2 gas (reaction below), could be used as a leavening agent.  We had been wondering the same thing for quite a while, and the realization that other folks were wondering the same thing provided the motivation we needed to finally get up and do some experiments.

Reaction of calcium carbonate (CaCO3) in eggshells with acetic acid in vinegar
Calcium carbonate (CaCO3) reacts with acetic acid in vinegar to make calcium acetate, carbon dioxide gas (CO2), and water (H2O).

First, some eggshell chemistry.  Eggshells are about 95% CaCO3, but the CaCO3 is bound in a matrix of protein, with a proteinaceous membrane also attached. Thus, one might expect that eggshells would make a better leavening agent if the CaCO3 could be isolated from the protein (and/or ground very finely) so that it would be more accessible to the acid during baking.  The question is, how to get rid of the protein?  We'll have to either dissolve the protein away from the CaCO3 or dissolve the CaCO3 away from the protein and then regenerate it somehow.  Today we'll try the former.

There's quite a bit of precedent for dissolving away the eggshell protein (or at least, most of it) with a strong base, such as sodium hydroxide (NaOH) or potassium hydroxide (KOH), but specific recipes are hard to come by.  Several articles refer to this original gem, the most useful being this one, which allows us to deduce that those guys boiled their eggshells in a 2.5 wt% NaOH solution for 5 minutes, which easily removed the membrane and part of the protein matrix.  They then increased the lye concentration to 10 wt% and boiled for a long time, finding that all the protein that could be removed was gone by about 7 hours.  They didn't give a lye-to-eggshell ratio, though.  Additionally, this patent references another patent (we couldn't track down the original) claiming that boiling eggshells in 3 wt% NaOH would reduce the protein content of the shells to < 0.1%, although the boiling time and lye-to-eggshell ratio wasn't specified.

A protein content of < 0.1 wt% sounds good enough to us, so we decided to follow that route most closely.  Having to guess on the time and lye-to-eggshell ratio, we decided that if we had to boil for more than half an hour and use more than a 1:1 ratio, that it wouldn't be worth our trouble. (In that case, we'd just use Leigh's ash-based leavening instead!)  Alright, experiment planned; let's do this!

Starting to boil eggshells in lye water
Here's our recipe: 15 g NaOH, dissolved in 500 g tap water, with 15 g coarse-ground eggshells (1-2 mm particles) added.   Boiled for 30 min.  Wear safety glasses and gloves until everything is neutralized later on (see below).


Boiling eggshells in lye water
As the mixture simmered, the lye water turned a cloudy yellow.  A good sign that we're dissolving protein.


Filtering lye-boiled eggshells
After boiling, we poured the liquid through a coffee filter (supported by a polypropylene funnel) into a quart jar.  The eggshells don't look that much different than before, except maybe slightly darker.  The pigment (they were brown shells) is still there.  The coffee filter is really slow, so something like an old t-shirt or terrycloth towel might be better.


Filtrate from lye-boiled eggshells
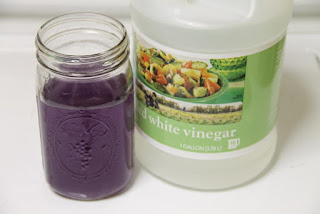
The filtrate is still highly caustic, so be careful with it!  We wanted to neutralize it before doing anything else, so we added a couple tablespoons of our good ol' red cabbage pH indicator, causing the filtrate to go from yellow to slightly-darker-yellow.  Note if you're following along at home--dumping the filtrate down the drain without neutralizing might kill some of your friendly septic system bugs, so please neutralize!


Vinegar and neutralized lye solution
Then we added vinegar until it turned green, then blue, then finally purple, indicating a neutral pH.  (We had to add a few more tablespoons of pH indicator as it got more and more dilute, because the color changes started to get hard to see.) Now it can go down the drain or into the compost.


Decreasing pH of eggshell rinses after boiling with lye
The next step is to repeatedly rinse the boiled eggshells to wash all the lye off.  These are the rinses (plus pH indicator), showing steadily decreasing alkalinity.  After the fourth rinse (which was with vinegar), the filtrate is neutral, the eggshells should be substantially free of lye (and hopefully protein!), and we're good to move on (and take off our safety glasses and gloves).  We also neutralized the second and third filtrates with vinegar, too.  Safety note: working with lye on something you're planning to eat has the potential to cause some serious damage if you don't neutralize properly.  Be careful and only do this if you're comfortable with the chemistry! Also, make sure you're using pure lye, and not some cleaner that has lye combined with other chemicals.


Drying lye-boiled, neutralized eggshells
Drying the lye-boiled eggshells makes them easier to work with. In the oven at 300 °F for 15-20 min ought to do the trick!


Biscuit experiment preparation
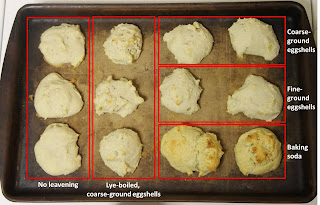
Time to make some experimental biscuits!  Five sets of three biscuits each.  Recipe per set: 0.5 cups all purpose flour, 0.25 teaspoon leavening, 0.125 (1/8) teaspoon salt, 1 tablespoon butter (in the bowls), 1 teaspoon apple cider vinegar plus milk (2%) to bring the volume up to 0.25 cups to make a faux buttermilk (in the glasses).  We processed the bowl contents in a food processor for about 5 seconds to cut in the butter, then added the "buttermilk" and processed for another 5 seconds to mix everything up, scooped the dough/batter into drop biscuits and baked at 400 °F for about 20 min.  The five sets differ only in their leavening: no leavening, lye-boiled coarse-ground eggshells, coarse-ground eggshells, fine-ground eggshells, and baking soda.


Eggshell leavening biscuit comparison
After baking, there' a clear difference between the No Leavening control and the rest, but also between the baking soda and the rest.  Between the eggshell sets, the lye-boiled and the finely-ground are about equal, and slightly more risen than the coarse-ground.  However, all the eggshell sets are very close to each other, and closer to the control than to the baking soda.  Also, we didn't have enough room for all fifteen biscuits on this sheet, so we baked the third biscuit of the last three sets separately.  Their appearance was consistent with the biscuits here.  Hooray for reproducibility!


Eggshell leavening biscuit texture comparison
The textures are consistent with the appearance, but it's hard to tell from the photos.  Also, the biscuits other than the baking soda set weren't cooked all the way through after 20 min.  We put them back in the oven; after another 15 minutes they were no longer doughy, but they didn't rise any more.  The flavor of all the sets is decent, so the control set and the eggshell sets would make decent dumplings if you're into that sort of thing.  Overall, the conclusion from these experiments is that the eggshells provide some leavening effect, but not much.  For us, the ground eggshells don't really get the job done, and it's definitely not worth the effort of boiling them in lye water to dissolve off the protein.

But we're not done with these experiments yet!  Stay tuned for Part 2, where we dissolve and regenerate the calcium carbonate part, and see how that works as leavening!