Showing posts with label Renewable Energy. Show all posts

Monday, May 23, 2016

Turbo-Braised Campfire Chicken

Back in November, we noted the serendipitous discovery that the bottom grate of a smokey joe grill fits perfectly in the bottom of our 8-quart cast iron dutch oven.

Grill grate in dutch oven
The stones are a low-thermal-conductivity support to keep the grate off the bottom of the pan and hopefully prevent roasting chickens from burning.  Also, they allow you to call your food products stone soup!

We further speculated that the setup shown above would be ideal for cooking a chicken.  This weekend, we tested that hypothesis, and we're happy to report that our hypothesis was supported.

Frozen chicken in dutch oven
We decided to do more of a braising than a pure roasting, but we started with a frozen-solid chicken, set it on the grate, and added a couple inches of water to the bottom.  Then we seasoned lightly (depending on your definition of 'lightly') with salt, pepper, garlic powder, green onion powder, cayenne pepper, and something called 'pizza seasoning.'

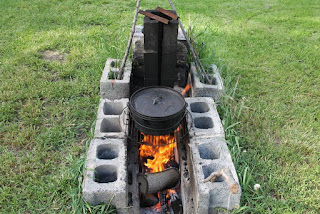
Dutch oven on fire
We used the top grate of the grill on our sap-boiling-configured rocket silo, and set the dutch oven over a relatively high heat.

Cooked chicken in dutch oven
Within a couple hours, the chicken is cooked all the way through, tender, and moist. We were happy to see that the high heat didn't burn the chicken at all.

This is the generally the same technique we use in the crock pot, but there it takes five or six hours to finish cooking.  So, the dutch oven is about about three times faster than the crock pot.  We don't have a comparison for braising a chicken on the stove or in the oven inside, but taking a whole chicken frozen to finished in less than two hours seems like it would be hard to beat.  We suspect that the weight of the lid turns the dutch oven into almost a bit of a pressure cooker, which would definitely speed things up.  The campfire-dutch oven method also gets us outside on a nice day, uses a renewable heat source (wood), and creates a valuable byproduct in the wood ashes (that we can use for baking or soap making).

Chicken broccoli carrot cheese soup in dutch oven
With all the time saved, we might just be motivated to take out the grate and stones (leaving the broth), toss in about three cups milk, four grated carrots, and four chopped broccoli heads and stalks, cook them until tender, pull the chicken meat off the bones while the veggies are cooking and return it to the pot, then thicken the stew with a half cup of flour, remove the pot from the heat, and stir in a pound of grated cheese to make a big pot of broccoli-chicken-carrot-cheese soup!

What's your favorite way to cook a whole chicken outside?


Monday, November 23, 2015

Dakota Rocket Silo, version 3.0

We love our Dakota Rocket Silo--it helps us cook outside, put our pruning brush and small-diameter dead trees to good use, render wax, make biochar, and do lots of fun things.  But the original and rebuilt designs had one flaw that cropped up during extended use:


The piece of ground between the holes gets baked pretty good, and eventually weakens and starts crumbling, which makes the chimney part not level.  It might not be as much of a problem with wider cinder blocks where more of the support comes from the sides.

But we've got skinny cinder blocks, so we took out the middle part and built a brick foundation.  They're not fire bricks, so they probably won't last too long, but they were free!  This setup lets us keep the in-ground aspect that we like so much, but hopefully will stay level for longer.  Plus, it looks kind of Petra-esque.

We fired it up, and sure enough, it burns like a champ.  Next test: will it stay level through a winter?

JalapeƱo popper, anyone? (They took a LONG time to cook this way, but they were really good!)


Sunday, October 25, 2015

Green Onion Powder, Take 2

A while back, we wrote about our green onion powder, which turned out to be a great way to preserve green onions when we had too many to use up fresh.  Earlier this summer, we found ourselves in a similar situation with some overwintered onions that suddenly bolted.  And, as with everything else around here, the process is constantly evolving.  So, here's another couple ways to make green onion powder.

Onion stalk overload!  Ahh!

Cleaned and chopped, they look much less intimidating.  We mentioned that our makeshift solar wax melter only reached about 155 °F, which wasn't very good for melting wax, but is just right for drying food.  We're still working on making dehydrator trays to fit our Langstroth boxes, but the regular dehydrator trays stacked inside give a visual approximation.  Not shown in this picture, but also dried in this batch were some chopped garlic scapes and dandelion roots.

A few weeks later, they're nice and dry.  They probably didn't need so much time, but we got busy with other stuff and had to let them go that long.  The onions probably would have been good for grinding straight from the dehydrator, but we had the unfortunate scheduling demand of taking them out first thing in the morning, when it was cool and damp.  So, in the oven they went at 150 °F for an hour to re-crisp them up.

For the grinding, we turned to the grain mill, which we've now used on eggshells, sugar, sea salt, and green onion powder (also garlic scape powder and dandelion root powder), but not yet grain.  As with the other substrates, it makes a nice, fine green onion powder.  It works really well on the garlic scapes and the dandelion roots, but the chunks of onion we had were a little too large and flimsy (even when crunchy) to really feed into the grinder well.

So, after a while, we turned to the blender (a food processor or spice grinder would also work here).  It doesn't get everything chopped up perfectly, but for many applications (like soups or casseroles, for example), the larger chunks would be fine.

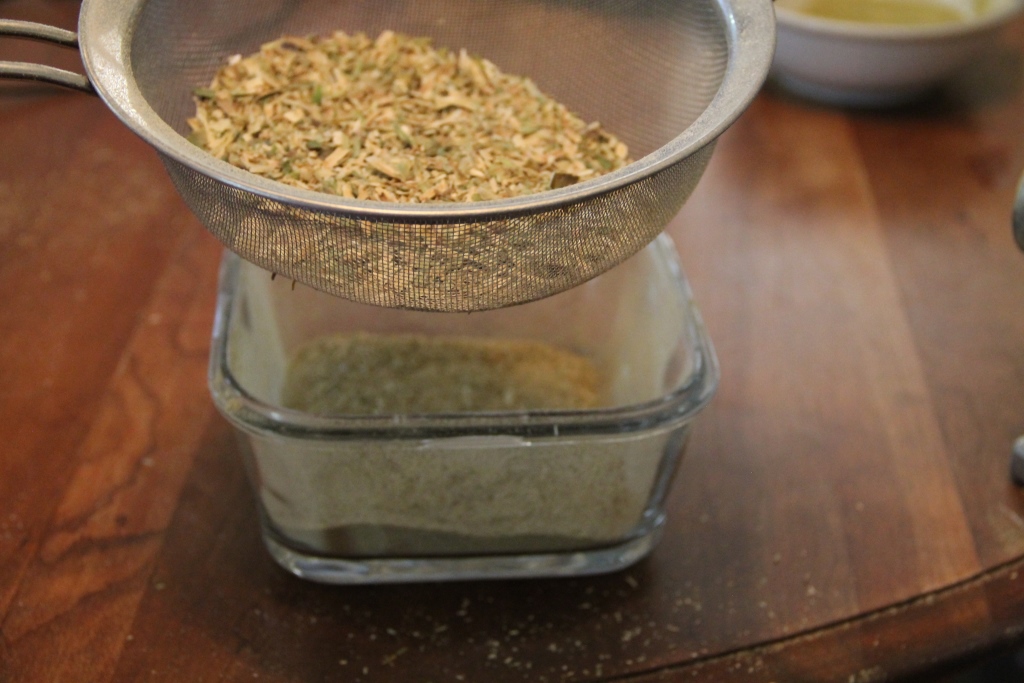
We sieved out the big chunks anyway to get some fraction of fines that make a good powder, and the rest we saved for cooking when the size doesn't matter.

Just for comparison, on the lower left is the grain mill powder, on the upper left is the fines from the blender, and on the right is the coarse fraction from the blender.  All perfectly useful in their own right, and all filled with that excellent green onion flavor.


How do you make green onion powder? (Or regular onion powder.  Or other powdered garden things.)

Sunday, October 4, 2015

Bee Reset: Wax Rendering v2.0 (and 3.0)

We wrote a couple weeks ago that we used the shook swarm method to put our bees on fresh comb and hopefully help them shake their case of EFB.  So the bees got some new digs, but what happened to the rest of the hive--the honey, combs, frames, and hive bodies that were contaminated? The whole process would make for a very long blog post, so we'll break it up into a couple posts.  But to whet your appetite, here's the overall schematic:

This whole ordeal is a zero-waste process, which is nice.  On tap for today: frames and comb, in particular, wax rendering.

We're continually adapting our wax rendering process.  Version 1.0 we wrote about before, and was more of a treatise on how not to render wax.  Version 2.0 is a solar melter frankensteined together from parts of our cold frame.  The back is a piece from the brooder box, and the places they don't fit perfectly together are plugged with fence panels.

Inside is a regular Langstroth box with a couple 9" x 13"-ish aluminum pans, each with about an inch of water in the bottom (to keep the wax from sticking to the pans).  On top is our winter-time bee feeder...

...which is lined with an old t-shirt and has another Langstroth box stacked on top.

The combs to be melted get piled on the t-shirt, and the melter is covered by the windows from the cold frame, which are stacked to make a double-glazed top.  The windows should be washed to maximize the amount of sunlight that gets through (ours weren't), and every crack and crevice should be sealed tight because when it starts to heat up, every honeybee within smelling distance will be drawn like a magnet. 

We set the whole thing up on the garage roof since it gets intense sun for most of the day.

A few days later, the combs are mostly melted down...

...but the yield of wax is a little disappointing.  A couple things probably decreased our yield.  First, the t-shirt filter held up a lot of the wax itself.  Other folks have had better luck with a paper towel.  Second, the temperature should have been higher.  We added some reflective insulation around the walls, which helped, but not enough.  More insulation and a more airtight construction would have been better.  We could have washed the windows, which would have helped even more.  As it was, we got readings up to ~155 °F inside the box when the glass was on.  Good enough to melt the wax, which happens at ~145 °, but hotter would be better.

Also, when we tried a deep Langstroth box full of frames, we only got minimal melting

Plus, during the time spent with all our rejiggering, we found out that bees aren't the only bugs interested in the wax.  Ants and earwigs love it, too.  But at least there's a silver lining: if you want bespeckled wax, the sprinkles are free!  The final takeaways from version 2.0?  There are some kinks to work out, but there's good potential.  Significant improvements wouldn't be too difficult if we could find the time to properly build a solar oven (which is on the to-do list anyway), but that will have to wait until a future date.  Also, some folks have noted that from some old combs, solar melting, even in a well-designed system, doesn't cut it.  Those combs need steam to release the wax.

Enter version 3.0.  It's inspired by a few other designs we've seen and Keith's comment on our original wax melting post.  The core is a big pot with some water in the bottom, and an aluminum pie pan boat.

That goes on top of the rebuilt Dakota Rocket Silo, which is burning the contaminated frames (and other wood).

A t-shirt filter is secured to the top of the pot.  The combs go in the filter.  The idea is that the steam rises up and condenses on the combs to melt the wax.  The wax is supposed to drip off the lowest point on the t-shirt into the pan below.

The first part of that works well.  The wax melts in half an hour to an hour if the fire is really roaring.

Unfortunately, it also runs down the side of the pot, so in addition to the nice wax cake we get in the pie pan, there's also a layer in the outer pot.  (This picture is from the following morning, after everything had cooled down.)  What we really need is some kind of impermeable insert in the top of the pot that prevents the t-shirt from contacting the pot directly, but that has a hole in the middle to direct the wax to the pie pan.  Probably could be done with aluminum foil. 

Also, we should point out that the wax accumulating on the water in the big pot can be a little dangerous because when a full layer of wax forms, it prevents the water from evaporating normally.  The result is that the water gets super-heated and instead of boiling steadily, it bumps violently, and then does nothing for a few minutes, before bumping violently again.  (The same thing can happen in your microwave if the water is very still while heating.)  When the bumping was happening in our setup, it was actually able to move the pot around, and if we hadn't been watching, it could have tipped over into the fire.  Since the wax is flammable, that would have gotten exciting quickly!

In any case, the melted wax and water can be poured into a pan to cool down.

The wax will form a cake on top, which can be easily removed.  We had a lot of comb to melt, so we ended up with several of these cakes.

To make them more compact, we built a makeshift mold, lined it with aluminum foil, and stacked pieces of the cakes inside.

When the summer heat had broken, we melted it in the oven at ~150 °F.

On cooling down, it solidified, at which point the foil and wax can be removed from the box.  The foil should readily peel away from the resulting block, leaving a nice chunk of purified beeswax to play with.

The stuff that got filtered out (slumgum) can be composted, used to start fires, or used to make swarm traps more attractive.  Since we started this whole ordeal to get rid of EFB, we won't be using it in our swarm traps.  We tried a few different ways of making slumgum fire starters, including packing it into paper egg cartons, wrapping golf ball-sized portions of it in old phone book pages, and packing a thin layer of it between layers of paper grocery bags.  In our experience, it's the residual wax that actually starts burning, and the rest of the slumgum burns, but does more to inhibit the wax burning than to really support combustion.  So, adding additional dry, combustible material like paper, sawdust, or wood chips helps a lot.  Also, getting that extra combustible material to wick up and/or be coated in the wax helps it work under wet conditions.  Once we had everything packed in like we wanted it, we put it in a 200 °F oven for an hour or two to melt the residual wax and get it to soak into the paper. The egg cartons are easily divided, but the slabs with the grocery bags we cut into 1"-2" squares.

The t-shirts themselves can also be cut up to be fire starters, or saved for future use.  Since we don't want to transfer EFB to any future batches of wax, we're going with option #1 for the t-shirts this time.

We did a quick trial run of all four of our different kinds of fire starters (clockwise from top: t-shirt, egg carton, phone book, and grocery bag), and we noticed that the phone book page-wrapped slumgum balls were hard to light and keep lit, the wax-soaked t-shirt lit the fastest and burned up the fastest, and the egg carton-slumgum and paper grocery bag-slumgum fire starters had good longevity but could still be easily lit by a match.

Finally, a quick note on cleaning up the wax.  Many folks caution that it's nigh-on-impossible to clean up cookware items that have been contacted by the beeswax, but we've not found that to be entirely true.  First, the thin coating that forms on pots and pans will eventually wear off in continued use, and beeswax is inert in the human digestive tract, so one approach is to ignore it; no harm, no foul.  Second, we've found that mixing beeswax with some kind of vegetable oil (olive oil, canola oil, soybean oil, etc.) when both are above the beeswax melting temperature (~145 °F), makes a blend that can be cleaned up with soap and water, even when cooled back down to a touch-safe temperature.  And third, a scouring powder, in particular Bon Ami, which doesn't have anything in it that we would be worried about contacting food, cleans things up pretty well.

There you have it!  Our current procedure for processing contaminated wax and frames, waste free.  How to you render and clean up wax?


Thursday, June 4, 2015

Makeshift Tripod for the Fire Pit

Having newly constructed a fire pit in the yard for a marshmallow roasting workshop, we were confronted not long afterward with an unopened package of brats in the freezer.  Much preferring a brat grilled over an in-ground hardwood fire to even a charcoal-grilled one, we concluded that an open-fire grilling apparatus was needed immediately. "'Immediately," in this case, meant, "in less time than it would take to drive to the store and buy a tripod."  Fortunately, with a little whatchagotamology, we were able to piece something together in less time than it even took the fire to burn down to 'cooking stage.'

The main features are three sticks with fork-like features at the top, three short chains, a long chain, and a grate stolen from a regular grill.

The long chain is attached to the three short chains (which were extra parts from the fluorescent light fixtures we used in the aquaponics setup) by a bent nail we pulled from some piece of free Craigslist wood.  The long chain runs up through the top of the forked sticks, and can move up or down to adjust the height of the grate above the fire.

The three short chains are attached to the grate in a similar manner, spaced evenly to make the grill level.  Also, putting the grate upside down helps keep brats and hotdogs from rolling off.  Or at least, you can tell people that if you accidentally put it on upside down.

A screw in one of the legs can be used to fix the location of the chain if, like us, you were in too big a hurry to find sticks with a suitable branch.

Brats cooking safely, lovely company, summer initiated.  Crisis averted.


Friday, May 29, 2015

The Science and Engineering of S'mores

We realize this post is a few days too late for the first major camping weekend of the summer, but the truth is, we needed a tune-up on our s'mores theory and practice ourselves.  So now, while the extensive refresher training we completed over the last few days is still at the front of our minds, we wanted to put out a short treatise on the intricacies and nuances of marshmallow roasting and s'more eating.

The first step in creating a s'more is to initiate the thermal oxidation of some woody biomass.  To avoid marshmallow ignition, we want radiant heat from the coals rather than heat from the gas-phase oxidation occurring in flames. That requires full primary combustion of the wood, which takes a considerable amount of time.

The second step is to select a marshmallow roasting device from a nearby tree or shrub, taking care to avoid the species Toxicodendron vernix.  The geometric outlay of the device is to some degree a matter of personal preference, but we've found that a half inch diameter at the base tapering to approximately a quarter inch at the business end, and 2.5-3 feet long, to be optimal for most common campfire heat intensities and standard-size marshmallows.

Similarly, the optimal linearity of the device is a subjective matter.  Some prefer a higher degree of linearity to facilitate a uniform axial rotation during roasting. Others prefer some curviness to allow the roaster to reach preferred roasting locales within the campfire from any position around the fire ring, including those toward which the smoke is not traveling, and independent of other s'more engineers who may be occupying prime roasting real estate.

Nearly all experts agree, however, on the advantage of a barbed tip to prevent marshmallow disengagement from the device during the later stages of roasting, when the rigidity of the melty marshmallow core has deceased significantly.  Similarly, there is nearly universal agreement that removal of the bark from the tip of the device prevents inadvertent transfer of bark particles to the marshmallow.

In theory, pure radiative heat from glowing embers produces the most satisfactory roasting experience.  However, in practice, maintaining sufficient heat flow from a bed of embers over the course of tens of minutes that comprise a typical roasting session is challenging (as is having the patience to wait for the wood to finish burning down to coals).  Thus, the optimal sustained roasting environment often requires a combination of actively burning wood and pockets of glowing embers.

With the marshmallow applied to the roasting device, and roasting commenced over an appropriate heat source, the sugars in the outer shell of the marshmallow will begin to caramelize.  The primary chemical challenge during roasting is to uniformly caramelize the entire shell without charring or igniting any part of it.  The preferred technique among experts is a slow, rotisserie-style rotation at 4-6" from the embers, though few possess the patience to functionally sustain such an activity for the duration of the roasting operation. Another challenge is roasting the surface closest to the base end of the roasting device.  There may be some advantage to loading the marshmallow onto the device axially to minimize the surface area facing the base end (since the flat side of the marshmallow is smaller than the curved section), and then lightly smooshing the marshmallow to convert some of the base-facing surface into side-facing surface.

When the marshmallow is satisfactorily caramelized, it can be assembled into a s'more, with graham crackers and chocolate as co-ingredients.  In some circles, a preferred embodiment of the s'more is one which can be eaten cleanly (i.e., without loss of melted marshmallow to the eater's face or hand, or to the ground).  In such an embodiment, the chocolate and graham must be of the correct pliability, such that biting into the s'more results in neither excessive compression of the marshmallow nor shattering of the graham cracker components.  The desired pliability can be achieved by mild heating of the graham and chocolate for 4-5 minutes while roasting the marshmallow (resulting in a final temperature of 100 - 105 °F).  More intensive heating melts the chocolate and toasts the graham, effectively exacerbating the problem.

A proper grip on the s'more can also help keep the s'more intact while biting.  As this hand model is demonstrating, a firm grip in one quadrant of the graham, using the end section of the first two fingers and the thumb, is optimal for minimizing transfer of marshmallow to the hand while maximizing the exposed area on which to apply the bite.  Large bites, up to the size of the entire s'more, also minimize brittle fracture of the graham into the hand.

After roasting one- or two dozen marshmallows, the roasting device can be saved for future use, but a bit of maintenance and cleaning will help preserve its integrity and avoid attracting ants.  A first step in cleaning is commonly to remove as much marshmallow residue as possible by mouth.

Particularly recalcitrant residue can be removed by charring the tip, followed by wiping with an appropriate material, such as a t-shirt or nearby grass.  The health benefits of any residual char that may be transferred to future marshmallows are unclear, but related products are highly valued in some types of cuisine (an explanation of the scientific function of biochar in the digestive tract can be found near minute 19 in the video accompanying the previous link, although the entire episode provides a much more compelling narrative if one is amused by the non-sequitor nature of Japanese cartoons).  The roasting device can be stored somewhere relatively clean and out of the fire pit until needed again.

In conclusion, many factors must be considered to produce an optimally roasted marshmallow and a satisfactorily engineered s'more.  We hope this primer has helped elucidate some of those factors, but we welcome additions and suggestions to incorporate into the second edition of this text.

What is your preferred marshmallow-roasting protocol?