**This post continues our series on the aquaponic system we set up in our apartment last year.**
The other day, we posted about the
design of our aquaponic system. We wanted to follow up today with details of the construction, and in subsequent posts, we'll talk about the fish and the water.
We mentioned earlier that one of the design criteria was that the system had to look nice. Thus, we were (Jake was) forbidden from designing it out of dimensional pine lumber from the hardware store (even though it would have matched the rest of our projects and reduced the cost and weight of the aquaponics, Katie!) It actually worked out nicely, though, because we met some nice folks up north of Lancaster, PA and got some roughsawn cherry lumber for a good price. The catch (one of the catches) was that it was a fairly long drive, and the wood was heavy. Having only a faithful old Saturn station wagon with which to haul the wood, this meant we were kind of limited to one trip, and to only as much wood as the springs on the Saturn could hold without breaking an axle. In the end, we didn't have enough to cover the sides facing the back wall, but the effect on aesthetics was minor. (Even according to Katie!)
Getting roughsawn lumber also meant we had to plane the wood in our apartment, which we did with a little 10" Ryobi planer from Craigslist. (We probably owe the neighbors another plate of cookies for the noise it made.) But the wood undeniably looks nicer than pine (and is stronger). The apartment also smelled awesome for many weeks, and we ended up using a lot of the shavings from the planer to form the bottom of the grow bed (as shown below). So, without further adieu, let's take a walk through the construction of our system.
NOTE: We took these photos on deconstruction of the system for moving rather than while constructing it, so some of the pictures may seem out of order. Don't panic! We've tried to describe the process in the actual order in which we constructed it, even if some of the components are present in the pictures that weren't there during the construction.
 |
| We started by constructing a two-level box for the grow bed, storage cabinet, and half the fish tank. This was the most stable design we could come up with; stability was a primary concern because we weren't sure how much strength would be needed to keep the Hydroton and water from exploding out onto the carpet. Speaking of which, it might be good to put a layer of plastic between the wood and the carpet because if water does get down there for some reason, it might leach some color out of the wood and onto the carpet. |
 |
| This is what the inside of the box looks like from the top. The two holes on the left side are for the bell siphon and the overflow pipe. |
 |
| Then we added an additional part of the frame for the fish tank. |
 |
| It had decking, too. We attached it to the original box part, and added doors to the openings in the part under the grow bed. We wanted to be able to get a whole human into the storage part in case we needed to fix something, so that's why one door is bigger than the other. |
 |
| After we completed the framing, we took some of the shavings left over from planing the wood and used them to form a bottom to the box that would make the holes the lowest part. |
 |
| Then we added the rubber liner, cut it out where the holes were, and installed bulkhead fittings. It's actually a double layer of rubber liner, just in case one layer got punctured by something. Yay for secondary containment! When we deconstructed the system, there was a little water in between the two liners, probably due to imperfect cutting of the rubber around the fitting, but the wood was dry underneath. Looks like it worked! The dirt washed down to the bottom after transplanting a few things from other pots. At first, we added excess rubber liner, then trimmed it to fit the grow bed later on. |
 |
| This is the bell siphon (left) and overflow pipe. The overflow pipe
should be taller than the bell siphon inner pipe, but shorter than the
top of the grow bed. We added a larger piece of pipe on the outside of
it once the grow bed was full of Hydroton to keep the Hydroton from
falling in. The inner pipe and overflow pipes are 0.75", the outer pipe is 1.5", and the Hydroton guard is 2", if we remember correctly. Other folks recommend larger pipes, but this worked for our small system. |
 |
| The bell siphon works like this. There is an inner pipe and an outer pipe with slightly larger diameter. The outer pipe is off the bottom of the grow bed a bit (we cut notches in the bottom of ours), and has a cap at the top, which is not resting on the top of the inner pipe, but is close. The big white pipe outside of the outer pipe is just to keep Hydroton from getting into the siphon (left top). As the grow bed fills up with water, so does the space between the inner pipe and outer pipe (left middle). When the water level is even with the top of the inner pipe, water starts to flow down the inner pipe. It should be flowing into the grow bed at a high enough rate that it can eventually fill the entire cross section of the pipe, which will trip the siphon (left bottom). The siphon will start to drain the grow bed as long as the bottom of the inner pipe is below the bottom of the grow bed (right top). It should drain faster than water is flowing into the grow bed, so that it eventually drains all the way back to the bottom, which will untrip the siphon (right bottom). Playing with the pipe positioning and pump flow rate to get the siphon to reliably trip and untrip is one of the trickiest parts of getting the system working. Having excess pipe at the bottom of the inner pipe (e.g., an aeration bar) can make it hard for the siphon to untrip. |
 |
| Here's the finished grow bed. The rubber is stapled to the wood, but since the Hydroton pushes it out that way anyway, the staples aren't really necessary. |
 |
| We wanted the tank to have secondary containment, too. But the fit was so tight that we couldn't build a box and then put the tank in it. So we built part of a box and put a layer or rubber down, then slid the tank in on top of the rubber. |
 |
| Then we wrapped up the rubber and built the other part of the box around it. The secondary containment here wouldn't hold all 50 gal if it spilled all at once, but could handle most other mishaps. Like if the tank was partially emptied into the grow bed when it broke, or was leaking slowly instead of catastrophically...basically anything except a sudden disaster with a full tank. |
 |
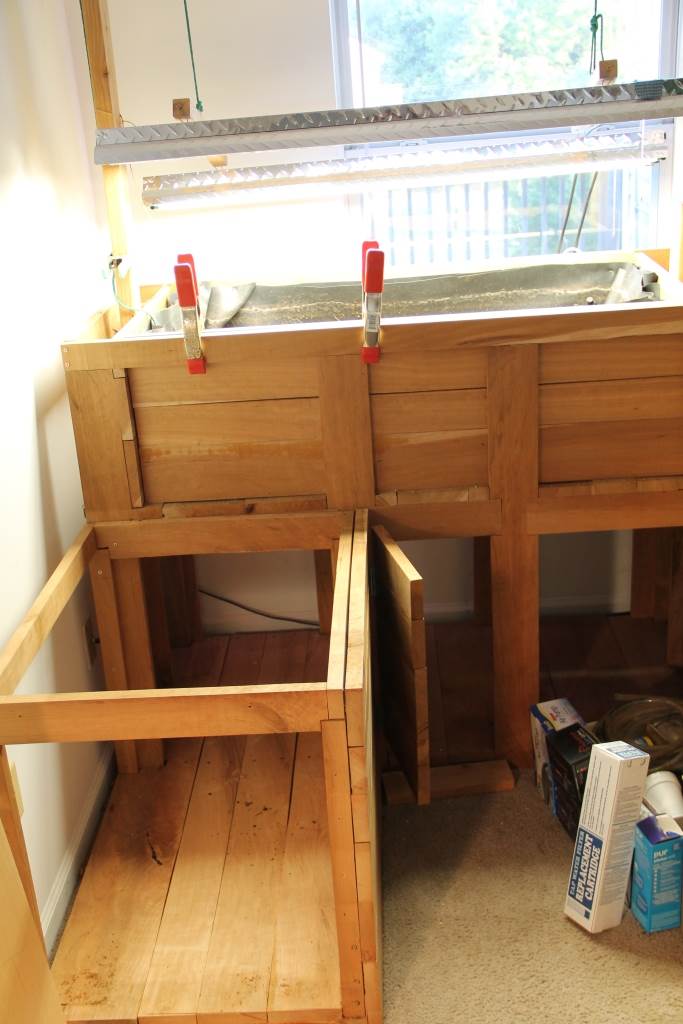
| The last major component of the system was the lighting. We wanted to have as many degrees of freedom as possible, so we built a contraption that could be higher or lower on the left or the right (so we could grow tomatoes on the left and lettuce on the right, or something), and also different heights front to back (tomatoes in the back...). We went to Home Depot and got the shop lighting fixture with the highest lumens/dollar and lumens/watt, which turned out to have T8 fluorescent bulbs. Everything but lettuce did well with this setup. In the picture, the two red clamps on the front of the light fixture are holding it level, but we also employed a number of other weights to adjust the angle. |
 |
| The ropes go up from the light fixture to a series of pulleys. |
 |
| We needed two pulleys per side to get the rope up, over, and back down. |
 |
| Here's another shot to show how they were aligned. |
 |
| Then we just clamped the rope back onto the upright to hold the lights in place. Maybe a little risky, but we never had the lights come crashing down or anything. |
 |
| And look! The storage space holds all the fish food, leftover pond liner, and everything! |
 |
| There are a few other details to consider, like tubing and pumps, but there are many more qualified venues online to find that information. (Or look in Sylvia Bernstein's book.) We followed Bernstein's suggestion to have a pump that can exchange the water every 15 minutes (which for our 50 gal tank meant roughly a 225 gph pump after taking into account the three feet of head it had to overcome). But once those details are set, the next step is to add plants, worms, and a nitrogen source, and start cycling the system! It's a lot of fun to see the plants growing well and hear the siphon tripping and untripping. Well worth all the work that went into this. Plus it doesn't look half bad! |
Any questions about details we might have glossed over? Any thoughts on design improvements? Let us know in the comments section below!


No comments:
Post a Comment