Friday, May 27, 2016

Reminder: Marshmallow Roasting Contest!

This is just a quick reminder that if you're going camping this weekend, don't forget your marshmallows and camera! Those are two of the most necessary things to enter the marshmallow roasting world championships contest on our Facebook page.

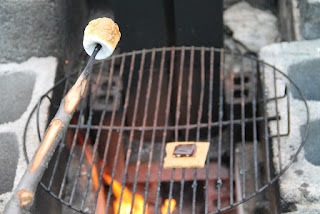
To whet your appetite, here's another one of Katie's masterpieces, from a couple weekends ago.  The evening was just too nice to head back inside after the turbo-braised chicken was done!

Marshmallow roasting on rocket silo campfire
Katie's getting pretty good at this!
Looking forward to all your entries--happy roasting!

Monday, May 23, 2016

Turbo-Braised Campfire Chicken

Back in November, we noted the serendipitous discovery that the bottom grate of a smokey joe grill fits perfectly in the bottom of our 8-quart cast iron dutch oven.

Grill grate in dutch oven
The stones are a low-thermal-conductivity support to keep the grate off the bottom of the pan and hopefully prevent roasting chickens from burning.  Also, they allow you to call your food products stone soup!

We further speculated that the setup shown above would be ideal for cooking a chicken.  This weekend, we tested that hypothesis, and we're happy to report that our hypothesis was supported.

Frozen chicken in dutch oven
We decided to do more of a braising than a pure roasting, but we started with a frozen-solid chicken, set it on the grate, and added a couple inches of water to the bottom.  Then we seasoned lightly (depending on your definition of 'lightly') with salt, pepper, garlic powder, green onion powder, cayenne pepper, and something called 'pizza seasoning.'

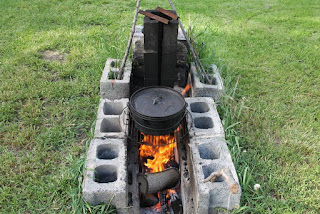
Dutch oven on fire
We used the top grate of the grill on our sap-boiling-configured rocket silo, and set the dutch oven over a relatively high heat.

Cooked chicken in dutch oven
Within a couple hours, the chicken is cooked all the way through, tender, and moist. We were happy to see that the high heat didn't burn the chicken at all.

This is the generally the same technique we use in the crock pot, but there it takes five or six hours to finish cooking.  So, the dutch oven is about about three times faster than the crock pot.  We don't have a comparison for braising a chicken on the stove or in the oven inside, but taking a whole chicken frozen to finished in less than two hours seems like it would be hard to beat.  We suspect that the weight of the lid turns the dutch oven into almost a bit of a pressure cooker, which would definitely speed things up.  The campfire-dutch oven method also gets us outside on a nice day, uses a renewable heat source (wood), and creates a valuable byproduct in the wood ashes (that we can use for baking or soap making).

Chicken broccoli carrot cheese soup in dutch oven
With all the time saved, we might just be motivated to take out the grate and stones (leaving the broth), toss in about three cups milk, four grated carrots, and four chopped broccoli heads and stalks, cook them until tender, pull the chicken meat off the bones while the veggies are cooking and return it to the pot, then thicken the stew with a half cup of flour, remove the pot from the heat, and stir in a pound of grated cheese to make a big pot of broccoli-chicken-carrot-cheese soup!

What's your favorite way to cook a whole chicken outside?


Tuesday, May 17, 2016

Foil-less Hobos for Eight

With several weekend nights suitable for outdoor cookery already in the books this year, we've been practicing some of our favorite camp recipes.  One of our all-time favorites is what we've always known as "foil packets" or "hobos."  Evidently named after those migrant workers who moonlighted as professional campers and camp chefs, hobos (the food) are hard to beat for simplicity and flavor.  The dish is just a delicious pile of root veggies, seasonings, butter, and ground meat (if you got it), sealed up (generally in a folded sheet of aluminum foil) and cooked slow over a campfire.

The only thing we find disagreeable about hobos the food is the soiled foil that must be disposed of after the meal.  The foil is hard to reuse because it tears easily, and it's hard to recycle because there's often times caramelized bits of food stuck to it.  Fortunately, we can do better if we hypothesize that our hobo friends (the people) could have come into some cast iron cookware in which to prepare their food.

Dutch oven hobo fire configuration
Our foil replacement in this case will be a big dutch oven.  It turns out that brick spacing required for sap boiling pans is also about right for a full-sized grill grate.  Sorry we didn't get a picture before cooking commenced--we just tossed in cubed potatoes, carrots, and green onions, a stick of butter, a pound of ground venison, and seasoned liberally with salt, pepper, red pepper, garlic powder, oregano, and basil.  The green onions (Egyptian onions--thanks Anna!) were something we hadn't tried before, but they worked great!

Hobo cooking in dutch oven
The lid of the dutch oven makes enough of a seal to bathe the ingredients in steam during cooking. The steam is released like a flock of doves when the lid is opened.

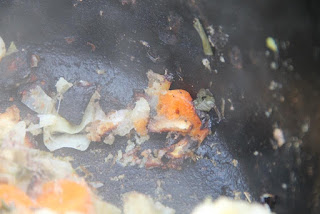
Caramelized veggies
Ideally, there is a thin layer of caramelized veggies along the bottom and sides, and a bit of excess butter to keep things from really cooking onto the surface.

Hobo with cheese and toast
If we also hypothesize that our hobo friends (the people) may have some cheese (and a cheese grater) on hand, our hobos (the food) become a food fit for kings.  Finally, if we hypothesize that our hobo friends (the people) have some bread, we can make some toast on the fire, the crumbs of which are suitable for politicians.  (Also, it's a scientific fact that bread toasted over a campfire is at least ten times better than bread toasted in any other way.)

What's your favorite way to make hobos?


This particular iteration used the following recipe:
11 medium potatoes, cubed
10 medium carrots, cubed
0.25 lb green onions
1 Tablespoon salt
2 Tablespoons each pepper, garlic powder, oregano, and basil
0.5 Tablespoon cayenne pepper
1 stick butter
1 lb ground venison

Toss everything into a 12-quart dutch oven, crumbling the venison on top of the other ingredients.  Set over a hot campfire for 30-40 min, depending on how hot. (Setting the pot directly on the coals will probably cook the bottom too quickly.)  When it starts to smell done, check on the meat and veggies near the top of the pot.  If they are close to done, put the lid back on and let it go another 10-15 minutes.  If they are not close to done, stir the pot such that those pieces will be close to the bottom.  Check frequently to ensure that an appropriate amount of caramelization happens on the bottom.  When done, scoop into bowls and top with cheese (or ketchup, if you must).  Best eaten outside with a glass of homemade wine while watching the sun set over the garden.


Monday, May 16, 2016

Righteous Anger About Wood Screws

We've been stewing over something for a long time, and it came to the surface again this last week while building our picnic table benches.  So, we're going to do something we don't normally do in public: passionately rant about mundane objects.  After all, it's time someone just got it out there: Phillips-head wood screws are stupid.  They're not as stupid as the flat-head screws they were designed to replace, but they are not much better.

Types of screw heads
Sometimes, preschoolers have the most appropriate terminology.


What's the problem, you ask?  Let's play a game.  Raise your hand if you've ever tried driving a Phillips-head screw longer than about three inches into a piece of wood without a pilot hole.  Keep it raised if you were able to drive that screw all the way in without the bit slipping out of the head.  Any hands still up?  Ok, keep it raised if you were able to do ten in a row without destroying any screws or any driver bits.  No hands up yet?  Good!  We knew we weren't alone.  And thank you for being honest.

So, why are they so hard to drive consistently?  There are at least three reasons.  First, consider that the job is a lot easier if you drill a pilot hole because the screw itself has to push a lot less wood out of the way (i.e., a lot less torque is required to keep the screw moving into the wood).  Now, consider that the diameter of the screw shank is normally pretty thin, and the drill bits that match are normally pretty short.  The correct-diameter bits in our set, for example, will only make a hole about 2" deep.  That is to say, a four-inch long Phillips-head screw with a 1/8" shank diameter has no place in a civilized society.  Philips screws shorter than 2.5" are slightly more functional, but if you're building a deck or a picnic table (and not doing fine woodworking), do you really want to drill pilot holes for every dang screw?  Ain't nobody got time for that.

Phillips head and pilot bit
Here, let me drill a woefully inadequate pilot hole for you.


The second reason is that electrically-powered screwdrivers (e.g., drills) are very common these days, so if you don't have sufficient force or just the right angle, you can strip out the head or destroy your driver bit  (depending on which is made from harder metal) really fast.  You can do the same thing with a hand-powered screwdriver, but it takes a lot longer. (Side note: we can't believe this is a real thing. Possibly the least-elegant solution ever offered by a real company. That alone suggests Phillips heads should be allowed to go extinct.)

The third, most nefarious reason is that, depending on who you ask, Phillips-head drivers are either designed to slip out of the screw head (ostensibly to avoid overtightening), or that just happens to be a feature that someone along the line decided was marketable.  Either way, Phillips put it in a patent, so they have to own it now.  That means it's not an accident that your Phillips driver bit has only four tiny triangles through which to apply force to the screw.  (Some may say that a limited amount of sympathy is due for the relatively primitive screw manufacturing technology of the time, but the Robertson square bit was patented earlier and is a much better design.)  In any case, an inherent driver-disengage feature might make sense in fragile applications, but not for regular homestead-style outdoor construction.  According to this fascinating and surprisingly-well-referenced Wikipedia article, Philips has come up with some variations to try to improve matters, but they can't get around the fact that they're tied to a design that sucks.

Comparison of Torx and Phillips force application
We've always been bigger fans of quadrilaterals than triangles, even before we studied physics.


Now, we're not hardware experts around here, but we have done quite a bit of...um...we've driven quite a few screws in our day, and we plan to drive many more.  The Torx (star) screws have become common enough that the prices are comparable to Phillips screws, especially when factoring in all the destroyed Phillips screws and driver bits, extra time, and tears of frustration.  So, we've taken a vote, Mr. Phillips, and you are off the island.

That is all.

Torx and Phillips screws
Here's a tip as a reward for reading this rant all the way to the end: the Torx screws are so much better that if you've already got a supply of really long Phillips screws,  you can use a Torx screw of similar length to make a decent pilot hole for the Philips screw.  That way you don't have to throw anything out or make an unethical business choice to sell the Phillips screws at a garage sale.


Wednesday, May 11, 2016

Picnic Table Benches...Finally!

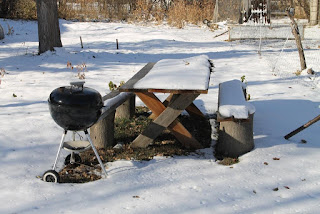
Last winter, we spent one snowy day making a picnic table.  It's a nice table, and we've gotten a lot of use out of it.  But our benches, according to at least 50% of household correspondents, were more eyesore and lawn-mowing inconvenience than rustic and charming.

Picnic table with snow
The original version was 2 x 6s on top of logs. 

Aesthetic debate aside, the original design was simple and sturdy.  Under the logs was a reliable source of fishing bait.  But despite those practical advantages, it's true that the hassle of moving them every time we mowed was a bit of a drawback.  So, making a set of proper benches got added to the to-do list.  And now, a mere 12 months later, we get to cross it off!

Picnic table bench end view
Like we did for the picnic table, we used our gate brace math spreadsheet to calculate the angles on end pieces--the width is 11" (two 2 x 6 boards-worth) and the height is 16", which turns out to be just about right for our picnic table.

Picnic table bench support
We added a 2 x 4 to keep the legs from buckling and an angle piece for extra stability.  The span between the legs is about six feet, so the middle bows a little when we sit on it.  We'll add a 2 x 4 block to help with that if the flexing boards become too unnerving.

Picnic table with benches
Admittedly, the aesthetics of the complete set may also be slightly improved.


What do your picnic benches look like?


Monday, May 2, 2016

Bee Package Box Sifter

As we were doing some spring cleaning in the garage the other day, we came across some old screened boxes that had previously contained packages of bees.  They were this kind:

Bee package boxes
Now featuring garage dust!


The originators of the boxes had no desire to get them back and, as we are definitely not in the bee package business, we clearly had no use for them.  At least, not in their current form.  We were pondering what we might do with such a contraption (other than throw it out) when we realized the screens had openings of useful dimensions.  With 10 minutes and $4 of parts, we figured we could turn them into sifters!

Package boxes on the half shell
First step: saw them in half the long way.

Sieve bolts
Second step: drill holes and bolt them together.  3/4" bolts are too short; 1" bolts work fine.

Sieve orientation and bolts
We did two to each side, and it feels a smidge flimsy for heavy sifting jobs.  More bolts would help.  Also, make sure the hole that was previously in the top is in the center or a lot of what you're sifting might spill out the sides.

Sieve on plastic tote and biochar
Our immediate use for the sifters was for processing biochar. But you could also use them for sifting compost, large quantities of powdered sugar, or whatever else you have on hand!

Washed biochar
Just sifting gets rid of a lot of the ash, but a little hose water really cleans it up.

Washed biochar closeup
Most of the dirt that came along with it is easily washed away, too (except a few pieces of now-kiln-fired clay), leaving a nice shiny batch of black charcoal for whatever we want to use it for.

What do you do with your old bee package boxes?