Monday, April 25, 2016

First Annual Marshmallow Roasting World Championship

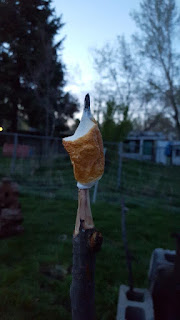
The summer season is nearly upon us, which means it's time to practice up for roasting marshmallows.  We covered the theoretical aspects of marshmallow roasting last summer, but we thought it would be fun to host a friendly competition among our readership.  Coincidentally, we conceived of this notion while initiating the 2016 marshmallow roasting season on a perfectly idyllic Sunday evening, yesterday, in our yard.  So, we hereby announce the start of the first annual Homestead Laboratory Marshmallow Roasting World Championship!

Here's how it works: roast a marshmallow, take a picture of it, and upload it to our Facebook page as a comment under the marshmallow competition post.  Add a caption to provide some context, if you like. (People love stories!)  While you're there, give a like to other uploaded photos that are pleasing to your senses, and eventually, the most-liked marshmallow photo will rise to the top.  (You can also vote on the pictures if you haven't uploaded anything.  Impartial judges are important, too!) There are only a couple of rules: 1. if it catches on fire, that marshmallow is disqualified (you can eat it and try again!), and 2. no performance enhancing substances, like brown magic markers.

The competition runs through the end of September, and the prize for the top-ranked photo will be a fun and colorful homesteading book (title to be determined).

Entry into the competition is easy, but it combines a surprisingly complex skill set: marshmallow roasting (obviously), roasting fire construction, roasting stick selection (and possibly carving), and marshmallow photography, probably in sub-optimal lighting.  Yes indeed, the winner will be a truly talented individual.  Let's take a look at some of the early entries!

Melty roasted marshmallow
Jake's got things started here with an evenly-colored, good-looking specimen.  It's clearly going to be delicious, but the 'mallow looks a little sad and saggy on the stick.  The inside is nice and melty, too, which we know makes a top-notch s'more, but it's going to cost him some points in the photography department.  Yep, he should have held the stick horizontal for the photo, but he's in first place for now.


Roasting marshmallow from afar
What's this? It looks like the first challenger is entering the contest!  It's Katie, who has selected a nice cherry-wood stick and is slowly roasting her 'mallow rotisserie-style.  Let's move in for a closer look!

Roasting marshmallow close up
She's off to a good start; that's some nice caramelized color she's got going there on the left side.  If she can keep this performance up through the finish, she's got a good chance of taking over first place.

Roasted marshmallow on stick
Look at that!  An evenly-toasted, well-structured marshmallow to make your mouth water, and a pretty good shot to capture it.  It should be good enough to...yes, it looks like the judges have confirmed.  At the end of day one, first place belongs to Katie, with Jake a distance second.  Many other challengers are sure to follow, so she'll have to be on her toes and continue honing her technique if she wants to take home the prize this fall.


Well, what are you waiting for?  Go get yourself some marshmallows and start training!


Friday, April 22, 2016

Happy Earth Day! (and, A Fun and Exciting Citizen Science Project!)

Happy Earth Day everyone!  Hope you're planning to get out and enjoy yourself some nature, make your little corner of the environment a better place, and maybe, save some frickin' trees like Tenacious D.

Along those lines, last weekend, we found ourselves trying to save some trees.  More specifically, trying to save our fruit tree blossoms, many of which decided to burst forth in glory right before an epic April Colorado blizzard. (Higher elevations saw close to 50" of snow, but we barely got a foot.)  In fact, every spring, we find ourselves wishing our fruit trees would bloom later so we wouldn't have to worry so much about fruitless years.

Chicken feed bags on peach tree
Yet another use for chicken feed bags. Not sure if it saved the flowers, but it definitely made the trees look ridiculous..


It turns out, we're not alone.  One of our favorite homestead bloggers has similar annual lamentations on her southwest Virginia homestead, and has been researching apple varieties that bloom later.  (It turns out that the bloom time is a function of the cultivar and depends on the number of hours the tree spends above 40 °F, after a chill period.)  Unable to find the necessary data from researchers in the ivory tower of academia (this paper has a good list, but features mainly commercial cultivars), Anna has started a Google spreadsheet to crowdsource the information.

Spreadsheet Screen Shot
Anna's Google spreadsheet: enter your fruit tree bloom times this spring!

This is where you, dear readers, can help.

Here's how it works, and it's super simple: click on the link above, and enter in your USDA growing zone (make sure to get the right one; some have changed in the last few years to reflect less frigid minimum winter temperatures), apple variety, and the date it reached full bloom.  Then, read through the other varieties and see which ones bloom after your last local frost or freeze date.  After that, you might want to get distracted for several hours reading about heirloom apple cultivars.

It's a short list so far, but together, we can help Anna make it the ultimate guide to frost-wise apple variety selection!  Thanks for organizing it, Anna!


Monday, April 18, 2016

Glass Storage Jar Lid Protection

Given the need for relatively small storage containers of bulk goods in our small-ish kitchen, we've settled on two-gallon all-glass jars.  They seem to be a good compromise between size, price, aesthetics, and non-plastic-ey-ness.

Brown sugar jar
They also take well to chalkboard paint labels, which is nice.

Chipped glass jar lid
We've been overall pretty happy with them, except for one small thing: the lids are fragile.

Inevitably, it happens that as we're clumsily putting them away, we'll bump something with the jar (usually the shelf we're trying to set it on), and the lid and jar will collide in just the right manner to break off part of the lid's inner rim.  With the sugar containers, we can dissolve the sugar in water, filter out the broken glass, and drink the sugar water like hummingbirds. (Which is awesome, but slightly inconvenient when we were planning to make something else with the sugar. Plus, Katie just loves it when Jake goes full hummingbird).  But with the flour containers, we've got to just toss the broken glass-contaminated flour.  Throwing food away makes us sad.

So, we've been pondering solutions to this problem for a while, and this weekend (while trapped inside by a snowstorm!) we came up with something that works well, while arguably not damaging the jar aesthetics too much.  First, we tried making a rubber o-ring with some leftover pond liner from our aquaponic grow bed, but found it was hard to get a good fit because the inner rim of the lid (the fragile part) is tapered.  Thus, it's hard to fit a sheet of rubber on to it.  Fortunately, we also had some leftover silicone caulk sealant from the butcher block counter top.

Padded jar lid
We applied a bead of the sealant around the inner rim, then smoothed it out with a flat head screwdriver.  We're definitely not professionals, but it works.  (Done is better than perfect, right?) If we were going to do it again, we'd probably tape the flat part to keep it from getting dirty, because it turns out this stuff sticks really well to glass and isn't easy to peel off.

Padded jar lid close up
Here's a close-up.  In the background, you can see the same stuff sealing the butcher block counter to the wall.

Padded lid on jar, side view
When it's on the jar, it's hard to tell it's there from most angles.  (Other than the fact that putting the lid on the jar is now much less...well, jarring.)

Padded lid on jar, top view
Even looking straight down, it's not that noticeable.  If we were starting from scratch, we'd probably get the clear silicone sealant, but for the sake of whatchagotics, we're glad the white doesn't look too bad.


Have you protected glass lids on your jars?  How did you do it?


Wednesday, April 13, 2016

Book Review: Personality Tests for Your Soil by Anna Hess

One of Anna’s most valuable skills as a writer is taking the information in long-winded and highly technical textbooks and distilling the most interesting and useful parts into concise, practical advice for non-scientists. This eBook, Personality Tests for Your Soil (Volume 1 in her Ultimate Guide to Soil series),  is yet another outstanding exhibit of exactly that. For example, did you know that the base of your soil’s personality was set in place thousands or even millions of years ago? Maybe it’s just us, but it blows our minds to think that the types of rocks that formed when the earth’s crust was solidifying, or that were ground up when the glaciers receded, impact how our garden is growing today. (At least, it blows Jake's mind.  Katie is often times more interested in keeping Jake from transferring that dirt into the house at a slightly-higher-than-glacial rate.)

BookCover
It turns out soil has a personality.  If you can convince your dirt to be easygoing and gregarious, and yet have some hoarder tendencies, it will grow good vegetables for you.


We loved this book, but before you buy it, you should know this: if your garden soil isn’t producing like it should, you can probably remedy the problem by adding organic matter. It’s like a Snickers bar when your soil is hungry, and you can probably figure that out with a few minutes of internet searching. But if you want to know HOW to add that organic matter, Anna’s got you covered (although some of her other books have more details. And if adding organic matter doesn’t work, e.g., if you happen to have an extreme underlying mineral imbalance, Anna tells you in this book how to confirm that with a professional soil test, and she promises to tell you how to remineralize your soil in Volume 3 of this series.)

If you also want to get to know your soil better, which we hope you do, Anna tells you in this volume how to interpret what your overwintered broccoli stalks, your carrots, your soil color, and your earthworms are telling you about your soil. (The worms are probably the most articulate in that sense, with their number, size, and architectural designs all telling you something.) She also gives a number of tests to help you find out your soil type, including the online Web Soil Survey. The brief tutorial on the Web Soil Survey is especially helpful for the very useful, but not-very-user-friendly web app. (Although urbanites, with their highly-disturbed soils, might not get as much value from the Web Soil Survey as more rural folks. For example, our canning jar test looked just like Anna’s—about 7% clay—but the soil survey said we should have about 30% clay in our Nunn-Urban complex. Fortunately, we realized from reading this book that we should trust the canning jar test more!)

We learned that many gardeners assume they have clayey soil when it's actually improperly-curated silt.

Overall, this book is a fascinating and quick read, and a very useful reference guide. We love it when an eBook tells us how to harness geology, biology, environmental chemistry, and materials science to help grow food, and even though we received a free copy in exchange for an honest review, we would have gladly paid the price of admission for the information Anna has crystallized in this eBook.

Monday, April 11, 2016

April Flowers

We've noticed a few new types of flowers in our yard this year, and we wanted to post them here to remind ourselves of relative bloom dates and note the identity of the ones we didn't immediately recognize.

Dandelions
For example, we're told these flowers are called 'dandelions,' and are delicious.
Violets
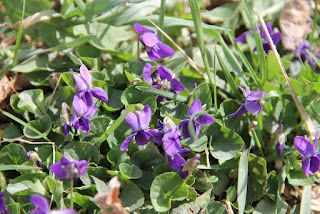
We noticed violets this year for the first time.  They're apparently edible, too, but we probably won't get to them, what with all the dandelions that need eating. 
Siberian Squill
This guy we might have seen last year, but couldn't find a record on the blog.  Looks like a Siberian Squill, which are apparently invasive, and not yet known in this area.  It sprouted from some dirt we had piled up alongside the garden.  Apparently we unearthed a bulb somewhere and unleashed this menace upon the landscape.  Oops.  At least it's pretty!
Peach blossoms
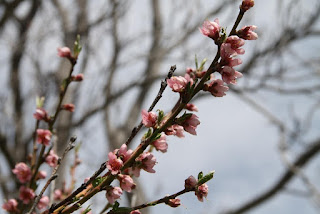
We've also got peach blossoms!  Neither our apricot tree nor our peach tree had bloomed since we've been here, but this year both did.  And while the apricot blossoms got wiped out by a snowstorm, the peach tree is small enough that we can probably cover it if (when) snow or freezing temperatures threaten again.
Crab apple blossoms
One type of crab apple is starting to bloom.  We haven't fully identified this cultivar yet (it matches Radiant or Robinson most closely, but there are so many possibilities!).  The Dolgo crab apple that makes delicious fruits is still pretty tightly budded.  The regular apples are just starting to bud, but the Bradford pears are about peak right now.
Nanking cherry blossom
The feral Nanking cherries are already starting to fade a bit.  Meanwhile, our dwarf flowering cherries, which don't yet look anything like the linked picture, are still tightly budded, but if they make fruit, this will be the first year for them!  One of the wild plums is also blooming, but none of the others even look close (or the wild cherry, for that matter), which is good because it's still too early if we want fruit.  We're trying to temper our expectations of an epic stone fruit year, but it's really hard. Fingers crossed!


What's blooming on your homestead this time of year?


Thursday, April 7, 2016

Sap Recap

With overnight lows consistently staying above freezing, it seems like the sap flow is pretty much wrapping up around here.  That means it's time to look back through our notebook and write up the results!

How did it go?  Overall, not particularly well.  But we did get about three cups of syrup, and other reports we've heard from different parts of the country have said they also didn't have a very good year.  The 2016 spring weather just didn't cooperate.  But, we definitely got some informative results, and we can put at least one data point out there on the internets for future reference.

In general, the box elders were the only trees in our yard that produced a useful amount of sap.  We got about a gallon (total) from the smaller elm, about a quart from the Lombardy poplar, and about a pint from one of the Bradford pears.  The Tree of Heaven, the other elm, and the other pear didn't produce anything.  The box elders were also running earlier than the rest of them--they were dripping when we tapped them on February 7, and had pretty much wrapped up by the end of February, which is when the elm got started.  The elm and poplar are actually still flowing now, but now that we know what the sap tastes like (see below), we probably won't bother collecting the sap any more.

Sap flow graph
The box elders started out strong, but petered out by the end of February.  The dates with the symbols are when we harvested (except 2/7, which was when we set the taps).  We should have been harvesting more frequently; this site recommends collecting sap every two days to keep the quality of the resulting syrup from degrading and/or to keep microbes from moving in and eating the precious sugar.

Early on, we harvested the box elders about once a week because the three-gallon buckets were full; the long gap between the end of February and the end of March was due to us waiting for a usable amount of sap to accumulate.  As noted in the caption above, we should have collected more frequently and stored the sap in the fridge, which would have both mitigated off flavors and given a better estimate of when the peak run was.  But, we've got some sap now, so we might as well analyze it!

Sap sugar content and color
Test #1: the 'sugar' content.  The box elder was showing about 2% sugar, which was slightly down from the earlier runs of 2.5% (it was also cloudy, when earlier runs were clear).  The Bradford pear was at about 0.7%, the Siberian elm was also at about 2%, and the Lombardy poplar at about 2.5%.  However, most of that increase in density relative to water was probably due to dissolved stuff other than sugar, because...

Sap in cups
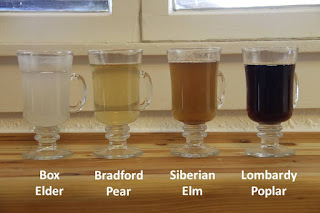
Test #2: the taste (and color)!  To be frank, they all tasted gross.  The earlier runs of box elder actually had a detectable sweetness to them, but not this time.  They did all taste slightly like the wood smells when you cut it. 
Or, in other words, here's our best description of the flavors:
  • For the box elder, it's sort of astringent and mildly acidic, 
  • For the pear it's...not much of anything, but it still somehow off-putting,
  • For the elm it's sort of like wet leaves in the fall, but somewhat more phenolic (if that helps...),
  • For the poplar it's more strongly astringent and more earthy than the box elder.  Also, really bitter.  

It's possible that the flavors changed while sitting out for almost a month, but we did try fresh elm sap that only sat for a day and it wasn't any better.   The colors didn't change much on sitting, and they smelled about the same, too.  Katie tried the elm, but none of the others, and generally concurred with the above assessment.  Actually, her response was something along the lines of, "if you already knew what it tasted like, why would you ever want me to try it?!"  (For science, of course!)

Needless to say, we didn't bother making syrup out of any of the non-box elder saps, and we won't bother tapping any of our trees other than the box elder next year.  But now we know, and now you know, too!

How did your sugaring season go this year?


Saturday, April 2, 2016

Homestead Happiness April Week 1

Spring is definitely in the air here at the Lab, with our seven chickens laying normally at least five eggs per day, the grass in the yard shrugging off the latest snowfall and threatening to need mowing in the same day, and the sap season winding down (more on that on soon!).  Here are some other signs of spring that made us happy this week.


Empty basket root cellar
This was our root cellar over the winter. We used up the last of our winter squash this week, which means we made it through our whole stash and lost only one to spoilage.  It also means that we found a corner of our house that works as a root cellar for warm-storage crops with little modification.  The trade-off is that it's just a corner of our living room, with no additional isolation.  That is, it stayed at a steady 50-60 °F all winter while the thermostat was set to 67 °F, so our house is probably not very well insulated and our heating bills are probably higher than they could be.  But still, only spoiled squash!

Tulip and Iris first leaves
Tulips and irises pushing through the mulch!

Dandelion
The first intrepid dandelions are blooming!

Freeze-killed apricot blossoms
Our unknown mystery tree is almost certainly a decades-old apricot.  This is the first time it bloomed since we've been here.  Unfortunately, as soon as the flowers opened, we got a foot of snow and all the blossoms died.  But now we know that it would be worth trying to propagate this tree and give its offspring a more protected locale.

Bradford Pear almost blooming
Meanwhile, the Bradford pears are just now looking ready to bloom, so they should do alright. (Unless we get another foot of snow...)

Young strawberry plants in container
 Transplanted strawberries looking good.  We're going to get some before the squirrels do this year, just you watch!

Egyptian onions and chives
And finally, Egyptian onions (left) and chives (right), ready to start adorning our morning eggs!  Time to start the harvest counter for this year's garden!


 What made your homestead happy this week?

Friday, April 1, 2016

Spring Pears?

We've got a big secret to get off our chests today--something we've been waiting over two years to share.

Here goes: we've been conducting an experiment on how to get pears to fruit in the spring AND the fall, and this year we've got proof that it works!  It's two pear crops per year for us from here on out, and we're super excited.

The trick, it turns out, is to graft local pear scion wood onto root stock from the opposite hemisphere of the world.  Fortunately, the homesteading corner of the blogosphere is an international community, and we were able to score some Red Anjou pear root stock from a friendly blogger in the Land Down Under (thanks, Farmer Liz!).

A little whip and tongue grafting, using Bartlett scion wood, and we managed to get one out of five grafts to take (which was much better then our Anjou rooting experiment!).  And for the last two years, we've been loving and massaging that little tree like a pretty new pet.  And since we managed to avoid killing it, the Aussie-rooted-Yankee-topped pear tree decided to reward us with a single pear this spring. 

At the same time, we were testing other methods, too.  It doesn't work to grow the seeds from the southern hemisphere or transplant a whole pear tree from there--those trees fruit ONLY in the spring.  We haven't tried it with northern hemisphere root stock and southern hemisphere scion wood; it's possible that combination would work, too.

In any case, have a look!

Pear on tree
There it is...dangling all ripe and delicious-looking from our custom pear tree.  Just underneath the pear, you can see blossoms starting to form, which we hope will give us some more pears in the fall!

Pear on counter
Once picked, it certainly doesn't look any less ripe and delicious-looking.

Pear cut in half
And, the inside looks as good as any pear we've ever had! Yum. Look,  Doyle, there's a tasty-dactyl!

What kinds of fruit are you eating this spring?  Let us know in the comments section below!

Also, happy April Fool's Day! (Props to ck, who figured it out on her own!)