Saturday, January 31, 2015

Keeping Track of Egg Production

If you keep your chickens to lay eggs rather than as pets, you probably want to keep track of how many eggs they're laying.  You probably also want to keep track of how much food, grit, etc. they're eating and how quickly they need their bedding replaced so you can calculate how much each dozen eggs is costing you.  And if you're shameless nerds like we are, you might want to put everything into a spreadsheet that automatically tracks production and costs.

Today we wanted to share our system for tracking chicken data in case any of you might find it useful or have suggestions for how to improve it.  So, without further adieu, here is EggSpreadsheet.xlsx, version 1.0, (kindly hosted by OpenDrive).

This is the general layout.  To use it, just make an 'x' in each cell corresponding to which dates each chicken lays an egg.  Up on top, input your costs for feed, grit, etc. The part in the upper left counts how many eggs each bird laid and the total (for the most recent seven-day period and since the beginning), and calculates the cost per dozen based on your inputs.  It doesn't include the bedding costs for now because the bedding works double duty as garden fertilizer once we compost it.  The part to the lower right tallies up each bird's egg count for each week and puts it into a graph so you can track the cycle.

The trends are kind of interesting.  The open symbols correspond to times when we weren't around to collect eggs forthe whole week, and we didn't want to rope our chicken-care volunteers into our goofy data collection experiment. From the left, the eggs/week started increasing as more chickens reached laying age until mid-November, when production started to fall off, probably with the decrease in day length.  Then the chickens went on a tear in mid-December before shutting it down for most of January.  But this last week shows a real up-tick again, so we better get ready!  We're not sure why the big boost in mid-December, but they seem to lay more when they're outside more and the weather is warmer. 

Also, our Ameraucana was a real good layer up until two days before the day length dropped below 10 hours (November 18), then she didn't lay a single egg until last week, two days after the day length crossed the 10-hour threshold again (January 24).  Now she's laid five in the last week.  That's consistency!

Since we don't always fire up the spreadsheet computer every day, we made a non-electronic version on the chalkboard in our kitchen that we have to walk past to put the eggs in the fridge.  That makes it way easier to remember things day-to-day.  Now, as long as we update the computer spreadsheet once a week, we'll have data as accurate as our immediate guesses as to which egg belongs to which chicken.

In other chicken-related news, our well-traveled, but previously injured, Rhode Island Red has rejoined the flock.  She let us know she was fully recovered by escaping from her tote, making messes around the house, and eating our newly-sprouted avocado tree.  Also, we've been trying to figure out what type of chicken Big Chip is.  She was a mystery bird (a.k.a. 'free rare breed') from McMurray Hatchery that looks like a Partridge Rock in terms of coloring and size (she kept pace with the Pioneer meat birds last spring), but her comb isn't quite the same, and she was a chipmunk-striped chick, which Rocks typically aren't (nor are they a 'rare breed').  Any ideas?  Maybe a mutt from their top secret 'new meat breed' program?


How do you keep track of your egg production and costs?  Let us know in the comments section below!


Monday, January 26, 2015

Grain Mill Strikes Again: Grinding Sea Salt

We ran out of store-bought salt the other day, right before we were about to do some baking.  We had some big salt rocks in one of those hand grinder things (like the kind that the waiters use to grind pepper onto your salad at fancy restaurants like Olive Garden), but when we're baking and we want a teaspoon of salt, it's hard to tell how much we've ground up.  It's much easier if we have a container of pre-ground salt that we can take from.  So, we got our grain mill out again this weekend to take our salt rocks and turn them into salt grains.  (For what it's worth, we've now used our grain mill on eggshells, sugar, and salt, but not yet grain!)


This is part of a batch we collected off Mount Desert Island in Acadia National Park, Maine.  From one gallon of sea water, we got about 75 g salt (around half a cup).  Since the salinity of seawater in that area is 31-35 g/L, we should have gotten ~118-133 g of salt, so our yield is curiously low, unless we used some of it for other stuff we can't remember. (Which is totally possible.)  We dried it in a 9 x 13" pan on top of the fridge, and finished it off in the oven.  Kind of cool to watch the crystallization process.  In an earlier batch, we dried driving off the last of the water in a plastic container in the microwave.  DO NOT do that...it took less than ten seconds for the plastic to melt and stink up the kitchen!

Anyway, the granules here are much bigger than we'd like.  In the photo, we're trying to sieve it after grinding it with a mortar and pestle.  The old M&P didn't work very well for the single crystal chunks.

But those crystals are no match for the grain mill!

When all was said and done, we had a nice bowl of white powder. Our home-dried sea salt stuck in the mill a little more than the other salts we tried (we found a container of large-grained pink Himalayan salt in the cupboard also), so maybe we didn't get it quite as dry as we thought we did.  [Ooh!  Here comes Katie!] Hey Katie, grab a spoon!  Want to try some of this fresh-ground sugar?

Post-grinding, back into the canning jar from whence it came.  We made sure to clean up the grain mill real good afterward because chloride ions and steel don't get along very well.

One other bit of info we discovered while following our curiosity on this post is that sea salt doesn't have much iodine in it. (i.e., it's I content is way lower than iodized regular salt.)  That's kind of disappointing because we were hoping that if we took a trip to the ocean once a year or so to make our own sea salt, we wouldn't have to buy salt at the store and could still avoid catching the goiter (or other iodine-deficiency disorders).  But it looks like we'll have to collect the seaweed and fish, too, to make that happen.  Or eat plenty of cranberries, which seem* to have a high iodine content despite being mostly grown in the middle of the goiter belt.  Possibly because the region they're grown in has a high organic matter content in the soil, which is very good at capturing atmospheric iodine (e.g., as CH3I) and storing it in a plant-accessible form.


*Many online sources claim that cranberries have up to 400 ug iodine per 4 oz serving, but we couldn't find the original source of that number.  A paper from 1928 gives a value of 35 ppb iodine (ppb = ug/kg), which works out to 3.97 ug iodine per serving:


Wethinks someone may have done a faulty conversion of units along the way, which was then propagated by less-than-diligent authors.  Another reminder to take internet-based information with...a grain of salt.  A more recent source gives 100 ug I /kg cranberries, or 11.3 ug/serving, which is on par with eggs, freshwater fish, and other fruits--and still nothing to sneeze at, accounting for ~7.5% of the recommended daily intake (RDI).  Since three cups of cranberries = 12 oz, at that rate, all you'd need is 2.2 pans of yuletide strata per day to completely satisfy your iodine RDI!

 
 How do you cover your salt (and iodine) needs on the homestead?  Let us know in the comments section below!

Thursday, January 22, 2015

Feeding Bees with Bent Nails (kind of)

We're in the midst of a winter that isn't overly harsh, but that is following what apparently was an epically bad summer for honey production.  As a result, our bees went into the winter with less than one deep hive box, and were starting to look pretty hungry last weekend (judging by the weight of the hive).  We figured it was probably time to put some emergency rations out for them in the form of some no-cook candy.

We started making a candy board from the instructions here and here, but then realized our staple gun was out of staples!  Should we panic, run to the store and get some more staples?  Or should we practice a bit of whatchagotamology and make something to serve the same purpose, but that's even sturdier than those flimsy staples?  Wait--before you answer, consider this: we've also got a whole pile of bent-up nails, pulled out of free wood from Craigslist, that we've been itching to find a use for.  If you guessed the second option, congratulations.  Hooray for #2!

If wealth were measured in nails like this one, we'd be rich!

We cut the head of the nail off, then the shank into two pieces.  It's possible to do this with just a pliers or wire cutter, but it's a lot easier with a bolt cutter.  Also, the pieces don't go flying around as much with the bolt cutter, so if you go the pliers rout, wear safety glasses (and maybe a helmet).

We bent the two shank pieces into a generally parabolic shape using two pairs of pliers...

...then held onto each one with one pair of pliers and used the other to squeeze the parabola until the sides were parallel.  Sort of like taking a graph of a parabola and changing the independent-variable axis to a log scale.  Definitely use a pliers to hold the nail while squeezing.  If you use your fingers in place of the first pliers, they will force you to yell expletives when the second pliers slips off and squashes your fingers instead of the nail.

The resulting products are the head of the nail (any ideas for what to do with that?), and two beefy-looking staples that could be used to hold barbed wire onto a fencepost...

...or hardware cloth onto a candy board.

Here's what she looks like all together.  We smeared pollen on the top of the candy instead of making a proper patty like in the link above, mainly because we couldn't find the pollen until after we had the candy in the board.  It turns out one of those nonstick pie crust roller-outer mats is big enough to keep everything off the table while the candy dries, and also makes it pretty easy to unstick the candy board when dry.

This is the configuration on the hive: the candy board goes between the top deep box and the inner cover, hopefully right on top of the cluster. (But don't squash it!)  The moisture quilt is based off a design like this.

What is your setup for emergency bee feeding in the winter?  Let us know in the comments section below!


Sunday, January 18, 2015

We Heart Strata

This post will be our twelfth monthly strata recipe, which means we're wrapping up our regular series on strata.  (Although such a versatile dish will certainly make a new appearance on the blog from time to time!)  As a fitting exit, we wanted to express our undying love for this quirky bread casserole the best way we know how: by making a heart strata.

We're adapting one of our favorite non-strata casseroles--cheesy potato, venison, and chard--into strata form.  (Hint: it's easy--just add layers of bread!)  Let's get to it!

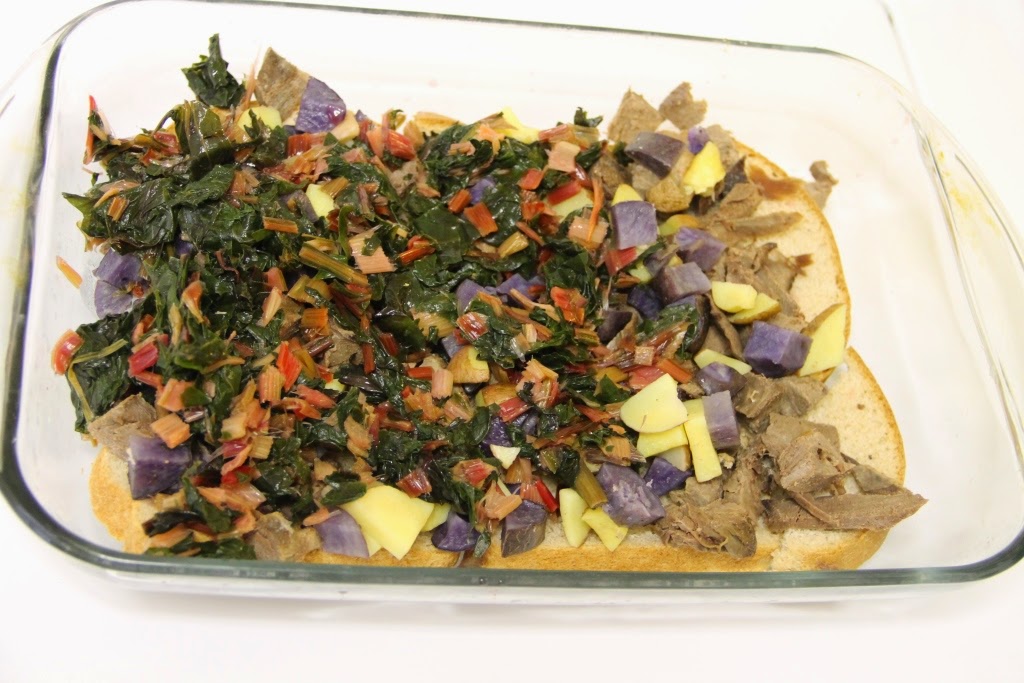
The layers this time are bread, cubed lean beef heart meat (thanks Grandma!), cubed (blue and red) potatoes, chopped swiss chard, and colby cheese.  In reality, almost any meat and leafy green (other than lettuce) will do, but the unique firmness of heart is a big plus.  We haven't tried fresh leafy greens, but frozen and/or blanched seems to work just fine.  We precooked the taters in the microwave a bit, but in hindsight, that was probably unnecessary.  We cooked the heart in a crockpot until it was tender, then cubed it up.  Katie says, "Jake, you forgot to add the cheese layer before taking this picture!" Jake says, "What? Oh, um, good job Katie!  You passed the noticing test!"
Add a second layer, then pour over the top a well-beaten mixture of six eggs, three cups milk, a teaspoon each of salt, pepper, and onion powder, and two teaspoons each of garlic powder, dried oregano, and dried basil.

Cover it up and let the whole thing soak in the fridge for several hours.

Bake it at 350 °F for 50-60 minutes until middle is lightly set and cheese on top is golden brown.

Salsa and sour cream (or plain yogurt) are pretty good condiments, but what it really wants is the tangy heat from a few squirts of vinegar-based hot sauce!  Mmmmmm......

The recipe:
Enough bread for 2-3 layers in a 9" x 13" pan
2 lb heart meat slow-cooked and cubed
3-4 cups cubed potatoes
2-3 cups cooked swiss chard or spinach
3-4 cups shredded cheese (we used colby)

3 cups milk
6 eggs
1 teaspoon each salt, pepper, and onion powder,
2 teaspoons each garlic powder, dried oregano, and dried basil

Layer bread, meat, potatoes, chard, and cheese in a 9" x 13" pan until pan is full (usually two layers each, unless your pan is exceptionally short or tall).  Beat together milk, eggs, and spices, pour over the layers, cover, and soak in fridge for several hours or overnight.  Bake at 350 °F for 50-60 min, until cooked through and toasty brown on top.  Hit with a little hot sauce and enjoy a dish more savory than the herb of that name.


Thursday, January 15, 2015

Feed Bag Archery Target

As we were stacking our chicken feed bags in the trash can the other day, something sparked a memory.  These bags looked like something we had seen before, a long time ago.  Something useful and quite durable, but not particularly attractive.  Not a Survivaball...but wait! That's it!  The old rag bag archery target!  Well, here we had a large supply of bags; we just needed some rags and we'd be in the business of converting two items destined for the trash can into a useful stopping point for flying arrows.  Or at least, making the route to the trash can more circuitous.

It just so happens we also had quite a supply of rags.  Either Katie is a little behind on her quilting projects, or she thinks old, holey pairs of underpants don't make good quilts.  Either way, this bin of rags is quite available for projects like makeshift archery targets.

They almost all fit into an empty feed bag, but not quite.  Even with pushing and punching and jumping on top, one 10-gallon tote full of rags is still slightly too much for a 40-lb feed bag.

Admitting defeat, we sewed up the top with old fishing line.

When it's sewed back up, it looks close to new!  Think we could return it to the store? 

There's a pattern on the front with lots of things to aim at, but just to make it more relevant to our own situation, we added some artwork.  Katie says, "Gee, Jake, you should probably quit your day job and become a professional squirrel drawer."

Any squirrels reading this, take note!  While we can't legally hunt you in our backyard, we are not afraid to shoot arrows at your likeness!  And we will, if you try to steal our strawberries.  Be afraid.  Be very afraid.

What do you do with old feed bags and old rags?  Let us know in the comments section below!


Sunday, January 11, 2015

Have Chicken, Will Travel

We got back the other day from a wonderful trip home to Wisconsin to visit family and friends.  We usually make the sixteen-hour drive to and from Denver in one shot, alternating shifts and driving through the night.  Preparations for being away typically entail making snacks to keep us awake, packing clothes, gifts, and other food, and finding someone to check in on our chickens.

Fortunately for our chicken-checking volunteers, the chickens are generally well behaved.  But what happens when, a week before the trip, one of the chickens gets injured and needs extra care?  Talk about a wrench in the plans!

We were going to cull her, but the injuries didn't seem to involve any vital systems, the only serious symptom being that she couldn't walk very well.  We kept her in a 10-gallon tote in the laundry room for the week leading up to the trip, and she seemed like she was intent on eventually making a full recovery.  Plus, we had just spent six-plus months rearing her into egg-laying shape and culling would have meant a lost investment on that end.

So, we decided to take her with us.

Thoughts of driving through a feather-filled ruckus from a panic-stricken bird, of inconveniencing anyone we visited, and the possibility of an overly-interesting traffic stop aside, we decided it would be a shame to cull her, and hard to ask our chicken-care volunteers in Denver to take on this extra burden.  Plus, what if she took a turn for the worse or had other unexpected problems?  At least if she was with us, we'd be the only dumbfounded ones.

Chicken setup in tote in laundry room.  Feed and water containers supported on wire hooks over edge of tote.  Water (yogurt) container has poultry nipple on bottom.  She hasn't even tried to escape, except on the second day in the tote when she somehow got out to lay an egg on the kitchen floor, but couldn't get back in.


We made room for the tote in the already-jam-packed car, packed a little extra food, and hit the dusty trail.  1000 miles and four states later, she was still happily doing chicken stuff and seeming ever-so-slightly more healed.  Since we drove most of the way through the night, she just slept, only making some annoyed chicken sounds because of the bright lights when we stopped for gas. She generally just hung out in the back seat, better-behaved than any human under the age of ten (and most humans older than that).

The tote fit nicely behind the driver's seat, and the cooler fit sideways such that the passenger seat still reclined.  That was critical for through-the-night driving!


In the time we were home, she stayed in a dog kennel in a heated garage (sans dog, of course), got to free range--or rather, free-hop on her one good leg--on some choice Wisconsin pasture (a rarity for this time of year!), eat some aquaponic lettuce, see four different relatives' houses, and entertain a cadre of young cousins.  And through it all, she was the definition of stoic.

The lesson?  If your chicken is more chill than Cub Foods-brand soda, don't be afraid to travel with it!  It was easier than traveling with a dog, and chickens don't shed.

Here's hoping she continues to recover and starts laying eggs again sometime in 2015!

Have you ever had to travel with chickens?  Do you have any funny stories or helpful tips?  Let us know in the comments section below!


Thursday, January 8, 2015

2015 Homestead Goals

The other day, we took a look back at 2014 and what we got done around The Lab.  It was definitely cool to see some of the funnest parts of the year recorded and electronically narrated here on the interwebs, (one of the benefits of blogging!), and we were surprised to see how much we got done! (Still can't believe the powdered pectin experiment worked!) 

But now it's time to complete the 360° rotation and start looking forward again.  What do we want to accomplish in 2015?  We've got a big pile of projects we'd like to work on, but there are a few we especially wanted to post here so you, dear readers, can hold us accountable!

Kitchen counter and cabinet
Our kitchen is in dire need of both horizontal and storage space.  We built a butcher block counter top with shelves underneath it to remedy that, but we have a bad habit of stopping work on something as soon as it's functional.  So once it warms up, we need to finally finish the counter and put doors on the cabinet part so it doesn't look so cluttered.

Early stage of the counter top, pre-shelves, and largely pre-clutter.  That's not a coincidence.


Garden
We expanded in the spring to 250 square feet from the 30 square feet we had the previous fall, but it still seemed cramped and insufficient to provide much in the way of veggies.  Maybe because we planted so much of it with tomatoes and they all matured late, while the onions, green beans, and broccoli didn't do much at all.  The potatoes and herbs were also disappointing.  Apparently, as a baseline, our dirt sucks!  We had also planned to expand more, but got busy with off-the-homestead stuff.  At least the Swiss chard was rockin', and by this fall we had enough compost to cover all the garden beds about 2" deep when we put the garden to sleep for the winter.  We'd like to add another 350 square feet or so this year, and that's probably about all we can fit into our backyard and still have our landlords be able to rent it out to other people when we eventually move out!  As tack-on projects to the garden itself, we've got ambitions of setting up a barrel-based drip irrigation system to keep it all watered and a solar dehydrator to help preserve all the goodies.

This is what happens when your off-the-homestead demands go off-the-charts and you accidentally think your old tomato seeds won't sprout, but they do.  Hopefully this year's garden goes more according to plan!


Livestock
Chicken feed remains the biggest cost driver in our production of meat and eggs.  We think we can do better than the pre-bagged foods, if we can find time to grow the ingredients for them.  To that end, we hope to try two new types of livestock this year: soldier fly larvae and red worms.  We've grown worms before, but we don't have a setup out here in Colorado because there's no room in the house for one and we haven't built one outside that can take the temperature extremes.  Yet.  That's going to change this summer, just you watch.

Our Worm Trunk/end table from out east.  Not insulated enough for outdoor use in Colorado.

Foraging
We've been doing ok with the dandelions, mallow, plums, and apples from the yard, but we'd like to expand our repertoire a bit.  For example, we don't have any secret morel spots out here yet, and we haven't studied other wild edibles from this part of the country very well.  This category also includes getting out to go hunting and fishing.  We haven't been fully satisfying our inner caveman since we left the Midwest, and searching for food in the wilds will be a good way to get back on track.

Ok, that's it!  There's our highest-priority homesteading to-do list for this year.  If we make it all the way through December and you haven't seen posts on some of it, please scold us harshly.

What are the top priorities around your homestead this year?  Let us know in the comments section below!

Sunday, January 4, 2015

2014 Review

The turn of the calendar from month twelve back to month one is a good excuse to reflect on the past year and look ahead to the next one.  First up: looking back.  What were the main Homestead Laboratory highlights for us and (based on page views) for our readers?

We're still relatively early in the development of the homestead, so posts on setups to process food and minimize food waste were big for us.  We built a pocket rocket stove to convert our chicken-based waste into biochar.  Later on, we substituted an in-ground rocket stove for the bucket-based one.  The in-ground rocket stove was a companion to our outdoor kitchen, which we used for canning lots of plum and apple jam.  We also grew another batch of meat chickens in an A-frame chicken tractor we built for that purpose, and did lots of new things with crab apples (original, and follow up parts one, two, and three). It was all great fun!

Alternatively, our most popular posts, ranked in order of pageviews-per-days public, were:
  1. Flours In Your Hair (Dec. 18)
  2. Merry Christmas from The Homestead Laboratory (Dec. 25)
  3. Gate Brace Math (Jun. 21)
  4. Book Review: Thrifty Chicken Breeds by Anna Hess (Jun. 28)
  5. Yuletide Strata (Dec. 23)
  6. Strata Verde Con Cerdo (Dec. 7)
  7. Pocket Rocket Stove (Jan. 16)
  8. More Fun With Crab Apples 3: The Juice (Nov. 24)
  9. Historical Lye Making, Part 2 (Feb. 9)
  10. Canned Apple Pie Filling Without ClearJel (Jan. 12)
  11. Dakota Rocket Silo (Aug. 21)
  12. Chicken Coop Feng Shui (Oct. 4)
  13. Emergency Apple Picker (Aug. 28)
  14. DIY Breakfast Cereal: Müsli! (Nov. 27)
  15. More Fun With Crab Apples 2: The Sauce (Nov. 13)
The fact that so many December and November posts show up represents the shortcoming of the 'per day' method (i.e., that more recent posts are weighted more heavily for a given number of regular readers), but clearly the posts in this list from January, February, and June have proven that they at least have some interesting content! It's also nice to see that some of our favorites, like the rocket stove posts, line up with reader favorites.

Also, we wanted to give a shout-out to our favorite posts from some of the other homesteading blogs we follow, both to give props for what we thought were exceptionally interesting posts, and to collect the the most pertinent links in a handy place for us to refer back to.  So, thanks for inspiration to:

Walden Effect
Anna's favorite veggie varieties (and most nutritious veggies)
Anna's list of storage apple varieties (and rust-resistant/not resistant ones)
Lunchtime Series on Naturally Bug Free
Unpowered Gate Opening (and here)
Cold Hardy Greens
Lunchtime Series on Bees in America
How to Start Sweet Potato Slips
Lunchtime Series on Thrifty Chicken Breeds
How Many Chickens Will A Black Soldier Fly Bin Feed?


Root Simple
Most of their Saturday Linkages/Saturday Tweets posts
Growing Fodder for Chickens (and other small livestock)
Defeating Cabbage Worms
Choosing Greywater-Compatible Detergents
Resources for No-Treatment Beekeeping
Tortilla Presses
Journal of the New Alchemists
Solar Food Dehydrators
Tomato Disease Diagnosis Tool
Discussion on GMO Risks
Seed, Fruit, and Nut Energy Bars (and these)
Trailcam for the Garden
Storing Fresh Fruits and Veggies
Making Shoes
Processing Acorns to Eat
Biochar Podcast
Earth-Friendly Holiday Decorations


5 Acres and a Dream
Monthly To-Do List for a Georgia Homestead
Alternatives to Alfalfa for Goats (lots more thoughts here)
Garlic for Healthy Humans, Goats, and Cats
Interesting Facts About Whitewash
Solar Ovens (and here)
Composting with Chickens
Dehydrating Eggs (and here)


Green Machine Farm
Small-Scale Egg Packing
Piglet Processing
Advanced Craigslisting (i.e., kind of like Regex golf for Craigslist farm supplies)

It turns out that going back through a whole year of posts at one time is quite an undertaking!  (All you other homesteading bloggers are such admirably prolific writers!)  While these are the top four on our blogroll, look for links to other great resources, too, like No Tech Magazine, which we started following more recently.


How about you?  What were your favorite posts from 2014, either here or from other homesteading blogs?  Let us know in the comments section below!