Showing posts with label Gardening. Show all posts

Tuesday, June 28, 2016

Cherry Pitter Hack for Nanking Cherries

It's generally accepted among scientists that Nanking cherries evolved to be smaller than regular cherries so that standard-size cherry pitters wouldn't work on them. The rationale is that the smaller size would cause humans to be less likely to collect them, and as a result, Nanking cherry seeds would be spread further and wider by birds and squirrels. (Don't bother looking that up, we only surveyed household scientists.)

Fortunately, humans are capable of evolving as well, and have now provably adapted to allow efficient predation on Nanking cherries.  Evidence: a primitive modified cherry pitter tool.  Fortunately for future archeologists, the development of the tool was captured in this equally primitive blog post.

Glass with Nanking cherries
We picked nearly a cup of these tasty-dactyls last week.

Nanking cherry in cherry pitter
But they're too small for our cherry pitter!

Washer in cherry pitter
Rummaging around in the garage, we found a washer that fits inside the cherry pitter, with a small enough inner diameter to hold the Nanking cherries but large enough to still let the plunger through.

Pitted Nanking cherries
From the batch we collected, there were no survivors.

Nanking cherries on ice cream
We shall honor their passing with great reverence...and plenty of ice cream.  (We also scattered the pits through the chicken pasture so the Nanking cherries, as a species, don't get too mad at us. Ahh, symbiosis!)


How do you process Nanking (or other small) cherries?


Saturday, June 25, 2016

Homestead Happiness, June Week 1-ish

This post is actually a couple weeks late, but it's still a relevant tour of our June yard.  Nature is at peak biomass production this time of year both for weeds (boo...) and garden plants (yay!)  Fortunately, we've been more on top of the garden this year than last and most of the tree fruit survived the late snow storms, so things are looking good!

June garden
We got the garden in and mulched, and the drip irrigation set up.  It's crazy how much the tomatoes (left) and potatoes (right) have already grown since this photo was taken.

Healthy rhubarb
After two years of struggling, it looks like our rhubarb has finally turned the corner!  The likely culprit for its struggles: a quack grass root right through the center of the crown.  If you have a rhubarb plant that's inexplicably struggling, make sure it's not being assaulted by quack grass.

New rhubarb
Some new neighbors put up a fence, and in the fervor of their construction, ended up tossing part of a rhubarb plant into our yard.  What else to do but plant it?  The leaves it already had died right away, but it was sprouting new leaves from the root within a week.  Jake's mom has another story about a piece of rhubarb root left out in a garden shed over the winter, and rediscovered in the spring, frozen and dried out.  She put it in the ground and it's growing now!  Respect.  May we all be as resilient as rhubarb!

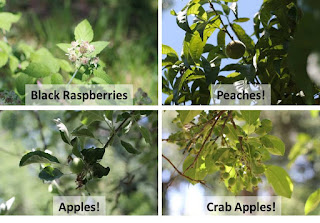
Unripe fruit on trees
We have our largest variety yet of pre-fruit this year--the black raspberries are finally bearing (they were fall-planted in 2013), while the peach tree bloomed for the first time and a few of the fruits survived the late snow storms.  The apples and crab apples survived, too!  We could have also added wild plums and sour cherries to this picture.  It's going to be a busy August/September around here!

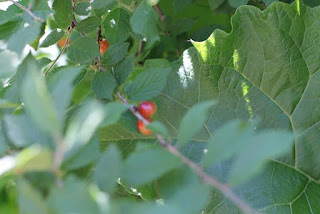
Nanking cherries
On the other hand, the Nanking cherries are just about ripe.  More on that soon!

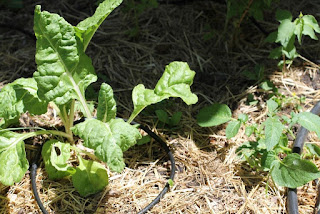
Volunteer chard and potato
We've been mulching with aged chicken bedding, and it's sprouted almost as many volunteer garden plants as weeds because of all the kitchen and garden scraps we gave the chooks.  You can see Swiss chard and a potato plant in the photo, and just outside the photo is some borage.  We had an empty space where we relocated some strawberries to hedge our bets against marauding squirrels, so it's a nice surprise to see it fill in with edibles!

Chives and volunteer catnip
Speaking of volunteers, we were disappointed when the catnip plant we planted last year died.  But one of its offspring has taken its place!  Nature seems to be granting all our plant-related wishes this year.

What made your homestead happy this week?


Monday, May 2, 2016

Bee Package Box Sifter

As we were doing some spring cleaning in the garage the other day, we came across some old screened boxes that had previously contained packages of bees.  They were this kind:

Bee package boxes
Now featuring garage dust!


The originators of the boxes had no desire to get them back and, as we are definitely not in the bee package business, we clearly had no use for them.  At least, not in their current form.  We were pondering what we might do with such a contraption (other than throw it out) when we realized the screens had openings of useful dimensions.  With 10 minutes and $4 of parts, we figured we could turn them into sifters!

Package boxes on the half shell
First step: saw them in half the long way.

Sieve bolts
Second step: drill holes and bolt them together.  3/4" bolts are too short; 1" bolts work fine.

Sieve orientation and bolts
We did two to each side, and it feels a smidge flimsy for heavy sifting jobs.  More bolts would help.  Also, make sure the hole that was previously in the top is in the center or a lot of what you're sifting might spill out the sides.

Sieve on plastic tote and biochar
Our immediate use for the sifters was for processing biochar. But you could also use them for sifting compost, large quantities of powdered sugar, or whatever else you have on hand!

Washed biochar
Just sifting gets rid of a lot of the ash, but a little hose water really cleans it up.

Washed biochar closeup
Most of the dirt that came along with it is easily washed away, too (except a few pieces of now-kiln-fired clay), leaving a nice shiny batch of black charcoal for whatever we want to use it for.

What do you do with your old bee package boxes?

Friday, April 22, 2016

Happy Earth Day! (and, A Fun and Exciting Citizen Science Project!)

Happy Earth Day everyone!  Hope you're planning to get out and enjoy yourself some nature, make your little corner of the environment a better place, and maybe, save some frickin' trees like Tenacious D.

Along those lines, last weekend, we found ourselves trying to save some trees.  More specifically, trying to save our fruit tree blossoms, many of which decided to burst forth in glory right before an epic April Colorado blizzard. (Higher elevations saw close to 50" of snow, but we barely got a foot.)  In fact, every spring, we find ourselves wishing our fruit trees would bloom later so we wouldn't have to worry so much about fruitless years.

Chicken feed bags on peach tree
Yet another use for chicken feed bags. Not sure if it saved the flowers, but it definitely made the trees look ridiculous..


It turns out, we're not alone.  One of our favorite homestead bloggers has similar annual lamentations on her southwest Virginia homestead, and has been researching apple varieties that bloom later.  (It turns out that the bloom time is a function of the cultivar and depends on the number of hours the tree spends above 40 °F, after a chill period.)  Unable to find the necessary data from researchers in the ivory tower of academia (this paper has a good list, but features mainly commercial cultivars), Anna has started a Google spreadsheet to crowdsource the information.

Spreadsheet Screen Shot
Anna's Google spreadsheet: enter your fruit tree bloom times this spring!

This is where you, dear readers, can help.

Here's how it works, and it's super simple: click on the link above, and enter in your USDA growing zone (make sure to get the right one; some have changed in the last few years to reflect less frigid minimum winter temperatures), apple variety, and the date it reached full bloom.  Then, read through the other varieties and see which ones bloom after your last local frost or freeze date.  After that, you might want to get distracted for several hours reading about heirloom apple cultivars.

It's a short list so far, but together, we can help Anna make it the ultimate guide to frost-wise apple variety selection!  Thanks for organizing it, Anna!


Wednesday, April 13, 2016

Book Review: Personality Tests for Your Soil by Anna Hess

One of Anna’s most valuable skills as a writer is taking the information in long-winded and highly technical textbooks and distilling the most interesting and useful parts into concise, practical advice for non-scientists. This eBook, Personality Tests for Your Soil (Volume 1 in her Ultimate Guide to Soil series),  is yet another outstanding exhibit of exactly that. For example, did you know that the base of your soil’s personality was set in place thousands or even millions of years ago? Maybe it’s just us, but it blows our minds to think that the types of rocks that formed when the earth’s crust was solidifying, or that were ground up when the glaciers receded, impact how our garden is growing today. (At least, it blows Jake's mind.  Katie is often times more interested in keeping Jake from transferring that dirt into the house at a slightly-higher-than-glacial rate.)

BookCover
It turns out soil has a personality.  If you can convince your dirt to be easygoing and gregarious, and yet have some hoarder tendencies, it will grow good vegetables for you.


We loved this book, but before you buy it, you should know this: if your garden soil isn’t producing like it should, you can probably remedy the problem by adding organic matter. It’s like a Snickers bar when your soil is hungry, and you can probably figure that out with a few minutes of internet searching. But if you want to know HOW to add that organic matter, Anna’s got you covered (although some of her other books have more details. And if adding organic matter doesn’t work, e.g., if you happen to have an extreme underlying mineral imbalance, Anna tells you in this book how to confirm that with a professional soil test, and she promises to tell you how to remineralize your soil in Volume 3 of this series.)

If you also want to get to know your soil better, which we hope you do, Anna tells you in this volume how to interpret what your overwintered broccoli stalks, your carrots, your soil color, and your earthworms are telling you about your soil. (The worms are probably the most articulate in that sense, with their number, size, and architectural designs all telling you something.) She also gives a number of tests to help you find out your soil type, including the online Web Soil Survey. The brief tutorial on the Web Soil Survey is especially helpful for the very useful, but not-very-user-friendly web app. (Although urbanites, with their highly-disturbed soils, might not get as much value from the Web Soil Survey as more rural folks. For example, our canning jar test looked just like Anna’s—about 7% clay—but the soil survey said we should have about 30% clay in our Nunn-Urban complex. Fortunately, we realized from reading this book that we should trust the canning jar test more!)

We learned that many gardeners assume they have clayey soil when it's actually improperly-curated silt.

Overall, this book is a fascinating and quick read, and a very useful reference guide. We love it when an eBook tells us how to harness geology, biology, environmental chemistry, and materials science to help grow food, and even though we received a free copy in exchange for an honest review, we would have gladly paid the price of admission for the information Anna has crystallized in this eBook.

Monday, April 11, 2016

April Flowers

We've noticed a few new types of flowers in our yard this year, and we wanted to post them here to remind ourselves of relative bloom dates and note the identity of the ones we didn't immediately recognize.

Dandelions
For example, we're told these flowers are called 'dandelions,' and are delicious.
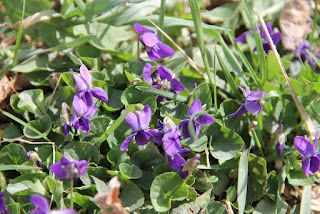
Violets
We noticed violets this year for the first time.  They're apparently edible, too, but we probably won't get to them, what with all the dandelions that need eating. 
Siberian Squill
This guy we might have seen last year, but couldn't find a record on the blog.  Looks like a Siberian Squill, which are apparently invasive, and not yet known in this area.  It sprouted from some dirt we had piled up alongside the garden.  Apparently we unearthed a bulb somewhere and unleashed this menace upon the landscape.  Oops.  At least it's pretty!
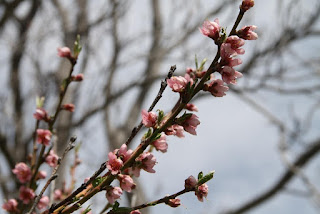
Peach blossoms
We've also got peach blossoms!  Neither our apricot tree nor our peach tree had bloomed since we've been here, but this year both did.  And while the apricot blossoms got wiped out by a snowstorm, the peach tree is small enough that we can probably cover it if (when) snow or freezing temperatures threaten again.
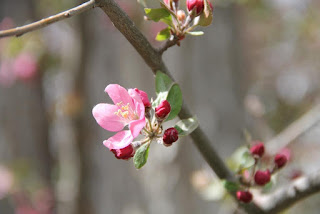
Crab apple blossoms
One type of crab apple is starting to bloom.  We haven't fully identified this cultivar yet (it matches Radiant or Robinson most closely, but there are so many possibilities!).  The Dolgo crab apple that makes delicious fruits is still pretty tightly budded.  The regular apples are just starting to bud, but the Bradford pears are about peak right now.
Nanking cherry blossom
The feral Nanking cherries are already starting to fade a bit.  Meanwhile, our dwarf flowering cherries, which don't yet look anything like the linked picture, are still tightly budded, but if they make fruit, this will be the first year for them!  One of the wild plums is also blooming, but none of the others even look close (or the wild cherry, for that matter), which is good because it's still too early if we want fruit.  We're trying to temper our expectations of an epic stone fruit year, but it's really hard. Fingers crossed!


What's blooming on your homestead this time of year?


Thursday, April 7, 2016

Sap Recap

With overnight lows consistently staying above freezing, it seems like the sap flow is pretty much wrapping up around here.  That means it's time to look back through our notebook and write up the results!

How did it go?  Overall, not particularly well.  But we did get about three cups of syrup, and other reports we've heard from different parts of the country have said they also didn't have a very good year.  The 2016 spring weather just didn't cooperate.  But, we definitely got some informative results, and we can put at least one data point out there on the internets for future reference.

In general, the box elders were the only trees in our yard that produced a useful amount of sap.  We got about a gallon (total) from the smaller elm, about a quart from the Lombardy poplar, and about a pint from one of the Bradford pears.  The Tree of Heaven, the other elm, and the other pear didn't produce anything.  The box elders were also running earlier than the rest of them--they were dripping when we tapped them on February 7, and had pretty much wrapped up by the end of February, which is when the elm got started.  The elm and poplar are actually still flowing now, but now that we know what the sap tastes like (see below), we probably won't bother collecting the sap any more.

Sap flow graph
The box elders started out strong, but petered out by the end of February.  The dates with the symbols are when we harvested (except 2/7, which was when we set the taps).  We should have been harvesting more frequently; this site recommends collecting sap every two days to keep the quality of the resulting syrup from degrading and/or to keep microbes from moving in and eating the precious sugar.

Early on, we harvested the box elders about once a week because the three-gallon buckets were full; the long gap between the end of February and the end of March was due to us waiting for a usable amount of sap to accumulate.  As noted in the caption above, we should have collected more frequently and stored the sap in the fridge, which would have both mitigated off flavors and given a better estimate of when the peak run was.  But, we've got some sap now, so we might as well analyze it!

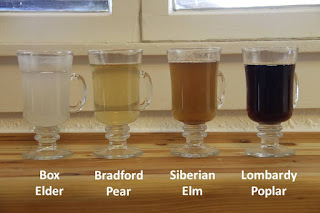
Sap sugar content and color
Test #1: the 'sugar' content.  The box elder was showing about 2% sugar, which was slightly down from the earlier runs of 2.5% (it was also cloudy, when earlier runs were clear).  The Bradford pear was at about 0.7%, the Siberian elm was also at about 2%, and the Lombardy poplar at about 2.5%.  However, most of that increase in density relative to water was probably due to dissolved stuff other than sugar, because...

Sap in cups
Test #2: the taste (and color)!  To be frank, they all tasted gross.  The earlier runs of box elder actually had a detectable sweetness to them, but not this time.  They did all taste slightly like the wood smells when you cut it. 
Or, in other words, here's our best description of the flavors:
  • For the box elder, it's sort of astringent and mildly acidic, 
  • For the pear it's...not much of anything, but it still somehow off-putting,
  • For the elm it's sort of like wet leaves in the fall, but somewhat more phenolic (if that helps...),
  • For the poplar it's more strongly astringent and more earthy than the box elder.  Also, really bitter.  

It's possible that the flavors changed while sitting out for almost a month, but we did try fresh elm sap that only sat for a day and it wasn't any better.   The colors didn't change much on sitting, and they smelled about the same, too.  Katie tried the elm, but none of the others, and generally concurred with the above assessment.  Actually, her response was something along the lines of, "if you already knew what it tasted like, why would you ever want me to try it?!"  (For science, of course!)

Needless to say, we didn't bother making syrup out of any of the non-box elder saps, and we won't bother tapping any of our trees other than the box elder next year.  But now we know, and now you know, too!

How did your sugaring season go this year?


Friday, April 1, 2016

Spring Pears?

We've got a big secret to get off our chests today--something we've been waiting over two years to share.

Here goes: we've been conducting an experiment on how to get pears to fruit in the spring AND the fall, and this year we've got proof that it works!  It's two pear crops per year for us from here on out, and we're super excited.

The trick, it turns out, is to graft local pear scion wood onto root stock from the opposite hemisphere of the world.  Fortunately, the homesteading corner of the blogosphere is an international community, and we were able to score some Red Anjou pear root stock from a friendly blogger in the Land Down Under (thanks, Farmer Liz!).

A little whip and tongue grafting, using Bartlett scion wood, and we managed to get one out of five grafts to take (which was much better then our Anjou rooting experiment!).  And for the last two years, we've been loving and massaging that little tree like a pretty new pet.  And since we managed to avoid killing it, the Aussie-rooted-Yankee-topped pear tree decided to reward us with a single pear this spring. 

At the same time, we were testing other methods, too.  It doesn't work to grow the seeds from the southern hemisphere or transplant a whole pear tree from there--those trees fruit ONLY in the spring.  We haven't tried it with northern hemisphere root stock and southern hemisphere scion wood; it's possible that combination would work, too.

In any case, have a look!

Pear on tree
There it is...dangling all ripe and delicious-looking from our custom pear tree.  Just underneath the pear, you can see blossoms starting to form, which we hope will give us some more pears in the fall!

Pear on counter
Once picked, it certainly doesn't look any less ripe and delicious-looking.

Pear cut in half
And, the inside looks as good as any pear we've ever had! Yum. Look,  Doyle, there's a tasty-dactyl!

What kinds of fruit are you eating this spring?  Let us know in the comments section below!

Also, happy April Fool's Day! (Props to ck, who figured it out on her own!)


Saturday, March 26, 2016

Book Review: Small-Scale No-Till Gardening Basics by Anna Hess

If you follow Anna Hess' blog, or if you've read her books on gardening, you know she's passionate about dirt.  Especially the dirt in which she grows vegetables.  As a result, she's spent a LOT of time turning an eroded, nutrient-depleted patch of ground into an impressively productive garden space on her southwest Virginia homestead.

The cover shows Anna with good dirt, Anna with giant sweet potatoes, and a soybean cover crop in a solarized bed, all on a background of an oat (or ryegrass?) cover crop.  That's two positive outcomes and two tools in the toolbox, if you're counting.
 
Not surprisingly, she's learned quite a bit in the process, and is currently distilling her real-world experience and knowledge of soil science theory into an easy-to-read, highly-actionable eBook series to help you do the same for your garden.  Small-Scale No-Till Gardening Basics is Volume 2 in the series, and is an excellent addition.  By the end of Volume 1, you should know what kind of dirt you're dealing with.  In Volume 2, Anna tells you how to start dealing with it in the context of no-till (or till-once) gardening, which is hands-down the optimal way to build fertility and battle weeds (that is, optimizing speed, cost, and effort).

Accumulating organic matter and strategically using kill mulches are the backbone of small-scale, no-till gardening (after initially remedying things like compaction issues), but how to best deploy those tools depends on your specific circumstances.  The book has very detailed advice for normal-to-overly-wet garden areas, because that's where Anna has the most experience. There aren't as many tips for dry-climate gardens (which, coincidentally, is where we happen to garden), but if you are in a dry climate and not garden-space constrained, Steve Solomon's Gardening Without Irrigation is a useful complementary reference.  (If you are space constrained like we are, you may have to resign yourself to installing some type of irrigation, but minimal tillage is still a good idea.)

One possibly-confusing note is that the "plant-now" lasagna gardening technique mentions squash as a good option in this "shallow-roots-only" system early in the book, but says later on that winter squash are deep-rooted and not suitable for that system. We had to wonder, is summer squash ok and winter squash not ok?  We couldn't find much differentiation between winter squash and summer squash root systems, except slide 93 of this random, 241-slide presentation, which does indeed suggest that winter squash cultivars have deeper root systems than summer squash cultivars.  However, the same slide includes tomatoes with the deep-rooted veggies, while Anna says they work well in the shallow-root-only system.  On the other hand, this book lumps winter and summer squash together.  So, there's a bit of ambiguity on the squash front, but otherwise things seem to check out.

Finally, while there is a ton of practical advice throughout the book, we thought the recommendations might also be usefully represented as a flow chart.   So, although there are many details and insights we couldn't fully capture in a graphic like this, we put together a sort of 'quick-start guide' to help you get your no-till (or till-once) garden started this year:

If you're planning to break new ground for your garden, you might want to consider getting a broadfork.

Our overall conclusion: We liked this book a lot, and although we received a free copy in exchange for an honest review, we feel it's definitely worth the $2.99 price of admission. There are a lot of lessons from the school of hard knocks in these pages, and for all the effort and experimentation it took to learn those lessons (and write them into book form!), three bucks is definitely fair.


Saturday, January 16, 2016

Frozen Wild Greens Recap and New! Liquid Carrots for Dessert

When Katie's out of town, as was the case this last week, the kitchen experiments around here tend to get a little more curious.  In particular, the opportunity exists to use up things from the freezer that aren't allowed in the kitchen at the same time as Katie.  Not that she's particularly picky, but it's been a busy week nonetheless.

First, the last of the frozen wild greens are now used up.  There were a couple quart bags of dandelions and one of sorrel in the freezer.

If memory serves, one bag of dandelions was blanched before freezing, and the other just soaked to extract the bitter taraxinic acids, then frozen without blanching.  Both seemed to be functionally equivalent to frozen spinach, except slightly bitter (in a good way).  In the future, we definitely won't bother with the blanching!

The sorrel also seemed to be functionally equivalent to frozen spinach.  This one we didn't blanch because heating the fresh sorrel makes it turn a weird green-gray color.  Interestingly, after it came out of the freezer, it stayed green in the frying pan.  There was only one bag of sorrel, though (no replicate in this experiment!), so we'll have to try again next year to try to reproduce the lack of color change on heating.

One staple dish around here for frozen greens is a a mix of the sauteed greens, potatoes, plain yogurt (or sour cream if you're trying to get some extra calories in), and seasonings.  Pretty good stuff.  The combination of bold flavors also makes it a good hiding place for odd cuts of meat that some of the Homestead Laboratory resident scientists would object to eating as a featured course.

...such as this delectable bit, which was just as tender and scrumptious as the Curious Coconut promised.  Any guesses what it is? (Hint: click the link.)

An approximate total recipe for this iteration of the dish is something like 10 oz greens, 5 cups cubed, cooked potatoes, 1 lb cubed meat, 2 cups plain yogurt, and salt, pepper, onion powder, garlic powder, basil, and cayenne pepper to taste.  Topped with some melty cheddar, it's a dish fit for kings.  Or at least, the king of this castle when the queen isn't around.

We're also big fans of cramming vegetables into our desserts, although Katie tends to be less excited about untested combinations.  For example, the picture shows the makings of a carrot-apple cider-caramel ice cream smoothy.  It took about three medium carrots (which the kitchen scale said was 5.65 oz), about 1.5 cups apple cider, and three big scoops of salted caramel ice cream.  Carrots got chopped in the food processor with the apple cider, then ice cream jumped in and everything got processed until smooth.  Before you wrinkle your nose, keep in mind that carrot juice and apple juice are no strangers to each other in the juicing world (search 'carrot apple juice' to find a litany of recipes), and apples and caramel are one of the best flavor combinations of all time.  (And that is a scientific fact!)  It actually tastes mostly not like carrot.
That's a big, tall glass of yum, right there.  Yup.

What kind of experiments have you been working on in the kitchen?


Monday, January 11, 2016

Trimming Root Vegetables--Do We Really Have To?

We made a big pan of roasted root veggies last night.  Potatoes, carrots, and onions.  Yum.  In the middle of judiciously cutting off all the green parts of the skins and all the eyes out of the potatoes, we started to wonder how much of this tedious prep work was really necessary.  Everyone knows that green potatoes will murder you in your sleep if you eat them, right?  And green-shouldered carrots are probably just as bad?  Green-shouldered onions will probably make you cry while they do it.

But what if these silent killers were just getting a bad rap?  As it turns out, some are, some, maybe not.  Read on--the Homestead Laboratory investigates!

solanine and chalconine
For potatoes, the green color comes from chlorophyll, but these guys (the glycoalkaloids solanine and chalconine) are the toxic part.  Plants in the nightshade family use them as a defense mechanism, and they ramp up production in response to stress or light.  Also in response to light, they ramp up chlorophyll production, which is why the green color is associated with the toxicity.  Strictly speaking, however, the green color is not required for high glycoalkaloid content. The glycoalkaloids are also bitter, though, so we can still tell when there is a lot of them without having to have any analytical equipment fancier than a tongue.

Green potatoes on cutting board
Next, is there enough of the glycoalkaloids to actually do any damage?  The dose commonly cited to cause toxic effects for solanine is 2 mg/kg body weight, or 140 mg for a 70 kg person.  The half life in the body for humans is 1-2 months, which works out to a total steady-state body burden of 50 mg if the intake of solanine is 1 mg/day.  How many potatoes would you have to eat to take in 1 mg/day of solanine?  Normal solanine contents of potato tubers are about 7.5 mg/100 g fresh weight (varying widely across samples).  The green parts can have more than 200 mg solanine/100 g fresh weight.  For reference, the four potatoes in the picture cumulatively weigh 211 g, and the stripes on the cutting board are 1" wide.  So, it wouldn't take much if you ate taters every day.    Looks like we'll definitely continue to trim the green parts, and probably space out our potato eating a little more, too. 

On the other hand, most researchers seem to consider the eyes as part of the tuber, so if they aren't sprouting, it seems there's no need for us to worry about additional solanine coming from the untrimmed eyes.  Looks like we can save ourselves a lot of time on eye-trimming.  However, if the eyes are sprouting at all, the solanine content in the tuber can go up, down, or stay the same, depending on the variety.  One thing is clear, though--the sprouts have the most solanine of all, so we'll be staying away from them!  In that case, we'll definitely trim more liberally, and probably make a bit of effort to ease off on our potato intake for a while once that dish is gone.

Also, some solace for french fry and potato chip lovers--the frying process doubles as a high-temperature extraction (reducing the content of the solanine in the fries) because the glycoalkaloids are somewhat oil-soluble.  Probably still would be good to not eat the green ones.

Carrot with greenshoulder
Carrots get some green on their shoulders from the sunlight, too, but aren't in the nightshade family.  So, while the green color still comes from chlorophyll, the glycoalkaloids don't come along with it.  The green color does still bring some bitterness, but the molecules that cause it have not been identified (or at least, they hadn't as of 2007, and we couldn't find any more recent papers).  It's known that some types of molecules, including terpenoids, can result in a bitter flavor, even in non-greened carrots , but apparently in the green parts, these are not the terpenoids we're looking for.  One would think they'd also have looked for glycoalkaloids.  But the whole carrot plant, including the top, is edible, so the green parts of the carrot roots might be unpalatable, but not likely dangerous.  Similarly for onions, the greening that happens on the shoulders of the bulb when exposed to sunlight is due to chlorophyll, but not likely dangerous.  It might even be beneficial due to concomitant flavonoid formation!  Maybe the carrots are also making flavonoids.

Of course, if the green parts of the carrots and onions end up being too bitter for us, chicken taste buds might handle them better.  Guten apetit!


What do you do with the green parts of your root veggies?


Saturday, January 9, 2016

Root Vegetable Storage Guide

Earlier this fall, as we were bringing in veggies, we found ourselves referring often to curing-and-storing guides.  Most sources we found were overly comprehensive, including fruits and vegetables from all regions of the world and dividing up the information into unintuitive (to us, anyway) groupings.  Eventually, we decided to compile all the information we needed for our modest garden into one chart: what we grow (or will grow soon), how to cure it, how to store it, and what not to store it with.

In the off chance that you might find it useful, too, we wanted to make it downloadable as a .pdf to print off and hang on your fridge (which is what we did to help memorize the contents).  But you'll have to earn it!  It's not hard. Visit us on Facebook, where you'll find a link to the download.  You don't have to Like the page to download the file, but it will help us out a little (in Facebook's eyes) if you do, and it gives you another way to follow us if you don't want to subscribe to the e-mail list or add us to your RSS feed.  In addition to the free .pdf file, you'll also earn our undying gratitude for helping to spread the word about THL.  What a deal!

How to use the guide: RH = relative humidity; storage humidity is also given as relative humidity.  Avoid storing ethylene-producing crops  with ethylene-susceptible crops as much as possible.  Chill susceptible veggies go bad quickly if their storage temperature dips below the minimum of the recommended range.


(Alternatively, if you're not a Facebookian, you can always download the low-res image above as a jpeg.)
Also, if you have any suggestions for how to improve the chart, or additional vegetables you think would be useful, let us know in the comments section below!

Ok, ready? Go!


Saturday, December 5, 2015

Hose Storage Solution: The 30-gallon Metal Trash Can

As we noted in our garden lessons learned post the other week, we're starting to accumulate quite a bit of garden hose infrastructure.  And with that infrastructure comes the need to store it over the winter.  A quick Google image search shows that there are lots of interesting home-made apparatuses to wrap a hose around, but most look to hold about 50-100 feet of hose.  We've got two 6-footers, a 15-footer, six 50-footers, and easily another 100 feet of drip irrigation hoses.  We needed something nearly as compact as the tight-as-a-tiger wonder-coils the hose manufacturers create by some sort of sorcery.

Enter: the 30-gallon trash can.  With a base diameter of 18", a top diameter of a 20.625", and a height of 27", they can hold an awful lot of hose coiled up inside (even without the help of sorcerers).  How much? Time for some math!

We need some dimensions to get a ballpark figure.  In the United States, most hoses are 5/8 inch (0.625") in diameter, meaning that if they were stacked perfectly, 43 coils would fit in 27".  If the diameter of the can increases from 18" to 20.625" over those 27", each coil gets an extra 0.061" in diameter.  The circumference (which is the length of hose that fits in one coil) therefore increases from 4.71 feet at the bottom to 5.38 feet at the top.  In sum, that equals just over 217 feet of hose!

Good news: we should be able to fit all our hoses in just two trash cans.

More good news: the hole left in the center has plenty of room for holding hose accessories like sprayer nozzles, unused drip irrigation parts, motion-detector sprinklers, or a five-gallon bucket with even-more-tightly-coiled hose.

Even more good news: the garden-irrigation season and the meat chicken-growing season are mostly concurrent, meaning that when those metal trash cans are empty of hoses, they can be full of chicken feed.

The last two are also advantages over the arguably-better-looking plastic box hose reels of similar capacity.  Plus, the cans are less-expensive and are American-made!


Hose storage solution: success!  Not quite as cleanly coiled as our theory predicted in the first picture, but chalk this one up in the win column.


How do you store your hoses for the winter?