Thursday, August 8, 2013

Aquaponic Fish

**This post continues our series on the aquaponic system we set up in our apartment last year.**

Possibly the funnest choice one gets to make in setting up an aquaponic system is the one about fish.  What type of fish?  How many can I grow?  Are there freshwater sharks?  Could piranhas actually help dispose of unwanted house guests and pesky city squirrels?

For us, locating the right type of fish on a proper scale was one of the hardest tasks.  If you have a large system and don't mind paying $80+ for overnight shipping, have no worries.  You can probably get whatever you want without much trouble.  If you only want five (edible) fish like we did, be ready for lots of phone calls and incredulous responses.  In this post, we want to talk about the types of fish we considered, how we found the ones we wanted (kind of), and our experiences with them in our system.

We only had a 50 gallon tank, so we wanted something with a relatively small mature size.  We made an assumption, possibly incorrect, that fish with a large mature size would initially 'add frame' and then bulk out.  That ruled out large species like bass and catfish.  We knew we had limited time at our location, and so we wanted something that would grow to worthwhile-eating size in less than a year.  This ruled out slow-growing wild species like bluegill. We also knew that we didn't want to have fish that would be sensitive to high water temperatures or low-oxygen conditions like trout (an assumption that may also have been incorrect).  Finally, we wanted something that would be easy to fillet, with a simple bone structure, which ruled out goldfish, koi, and other carp species.  We also considered crustaceans like crayfish, but decided against it for some reason we can't remember now, and minnows for fishing bait. We probably would have done minnows since they're cheap and readily available (and apparently work well!), but weren't excited about the local wild fishing prospects where we would use them as bait, wherein it was hard to find unpolluted waters.  Katie said we couldn't turn them into sardines.  So in short, we narrowed the field to tilapia.


Bone structures that must be considered when filleting fish.  View is looking along backbone (black dot) of fish, blue lines represent bones other than the rib cage (pin bones, lateral line bones, or "floating intramuscular" bones.  Sources: Temagami Stewardship Council (three on the left), LSU Agriculture Center (carp), Pacu.

Even among tilapia, there are a number of choices.  We looked at a number of online sources, none local to us, which meant high shipping costs and a typical minimum order of ~25 fish.  Too large a scale for us.  We searched and searched local pet stores, and finally came up with one an hour away that didn't have tilapia in stock, but was willing to find some for us.  What they came up with (after considerable searching of their own, it seemed) was Tilapia Buttikoferi, which we were initially excited about.  Evidently, they thrive at lower pH than other tilapia species (closer to the range plants prefer), prefer somewhat cooler temperatures, and grow relatively fast, at least compared to other aquarium fish.  They also typically get aggressive when larger, but we figured it would be ok to start with them.

Comparison of Buttikoferi with other commonly grown aquaponic tilapia species.  Sources: Fishbase.org for Buttikoferi, Nile, Blue, and Mozambique; IJAB and SDSU for some pH data.
They arrived in what seemed to be good shape as 2" fingerlings, acclimated to the tank without much trouble, and initially even nibbled on food we gave them.  Unfortunately, it went downhill from there.  They were never active eaters, and didn't grow quickly.  They took advantage of coffee mugs we put in the tank for cover but were often inactive (although they normally swam to the back of the tank when we were around), and eventually all six died.  NH3 and NO2- levels were consistently zero and the pH ranged between 6.5 and 7.2.  Temperature was steady at 75 °F.

The little fishies, fresh from the pet store.  All six looking relatively healthy.  Only two grew noticeably larger than this, and unfortunately, none made it to our table.  Cause of death: undetermined.
We haven't figured out why they didn't grow well and eventually expired.  Did they come with a disease we didn't know about and eventually all succumb to it?  Was the salinity of our water too low or too high?  Did we contract a disease in our water that we didn't know about?  Symptoms of the common fish diseases didn't match up with our fishes' behavior, as far as we could tell.  Where's that darn Sherlock when you need him?

One incident is worth commenting on.  When we had to be away for a weekend, we got an automatic fish feeder and set it up (the one on the left in the picture below).  It seemed to be working well, but when we came back from our weekend away, the feed canister had fallen into the tank, spilling most of the food, and three of the fish were dead. (Although when we tested for ammonia levels, they were < 0.25 ppm.)  Did the fish overeat on their sudden smorgasbord?  Probably not, since they weren't even excited about the pinches of food we were normally feeding them.  Was there a spike in ammonia to which they fell victim?  The mystery remains.  Later on, when we were going to be gone for another weekend, we set up a second automatic fish feeder  (on the right in the picture below), which just didn't work.  Fresh battery when we left, just didn't dispense food.  The second time there were no adverse effects on the fish, just disappointment in our feeder.

The two automatic fish feeders we tried, neither of which worked well for us.
So, despite our thorough fish species research and rock-solid fish-choosing logic, we didn't end up putting any fish on the table.  But still, we don't want to leave this post with a negative message!  So, what did we learn from this experience?  First, our plants grew fairly well on a pretty minimal nutrient load.  Basil, thyme, chives, and swiss chard were our most prolific producers, with about as much as we cared to eat.  Dandelion greens weren't far behind, and our green onion also did well.  And that was on the nutrient load from five fingerling fish.  Imagine how they would have done if the fish had grown at all!  Second, the pH was quite steady, even in a 50 gal tank, which is on the small end of aquaponic setups and rumored to be prone to unwieldy pH swings.  Part of our stability was likely because the fish stayed small (others seem to experience a consistent pH decrease if they don't correct it as the fish grow), but we'll call it a success nonetheless.  Third, our aquaponic system design was for the most part solid, and worked for more than a year (other than the fish not surviving).  We'll make a few changes in version 2.0, but the design should (we think) definitely get a passing grade.

We'll post updates when we get our new system up and running, so check back often!

Do you have any experience with buttikoferi in aquaponic systems?  Any thoughts on why our fish didn't make it?  Let us know in the comments section below!

Other posts in this series:
Review of Aquaponic Gardening by Sylvia Bernstein
Design of our aquaponic system
Construction of our aquaponic system
Preparation our aquaponic water


Sunday, August 4, 2013

Aquaponics Water

**This post continues our series on the aquaponic system we set up in our apartment last year.**

The lifeblood of an aquaponic system is the water.  The fish live in it, the plants need it to survive, and it carries nutrients from the fish tank (where they're a liability) to the grow bed (where they're an asset).  There are a number of important parameters for the water, including temperature, pH, chlorination, salinity, dissolved oxygen content, and level in the fish tank.  Generally the fish are more sensitive to extremes and rapid changes in these parameters than the plants are, but both do better when the parameters are optimized.  The pH in our system turned out to be pretty self-regulating (high at first before adding fish, then decreasing to a steady 6.5 after a month or two with fish), and the water level was just something we had to keep an eye on.  A surprising amount evaporated, especially when we had a bubble bar going to increase the oxygen content, and we needed to add almost 5 gallons per week to keep the tank topped up. The salinity was the default salinity of our tap water (after the dechlorination discussed below), which is the factor to which the fish are generally the least sensitive.  That is to say, most of the parameters required only minimal effort to optimize or standard aquarium solutions.  Therefore, we want to focus here on our experiences with temperature and chlorination, which required a little creativity (temperature) or were particularly challenging (chlorination).

Temperature:
Plants can do well over a wide range of water temperatures, but fish often times require fairly narrow ranges.  For example, tilapia do best between 72 and 90 °F, and grow much slower when the temperature is below 70 °F.

We controlled our temperature with an old aquarium heater graciously donated by Matt and Elise.  It was a heater designed for an aquarium with constant water level, so we had to make some adjustments for our slightly fluctuating levels.  It turns out that three or four styrofoam cups with a heater-sized hole cut in the bottom (we were looking for a way to reuse them!) work well, as long as we added a few pieces of gravel to keep the center of gravity low.  Then the heater could float around the tank like a bobber.
We monitored the water temperature with a meat thermometer near the outlet into the grow bed.  Within a few days of minor adjustments on the heater, we were at a steady 75 °F.  Homeostasis restored.

Chlorination:
If you have well water, congratulations.  You can probably skip this part, unless you're interested in water chemistry problems experienced by most folks on municipal (city) water systems.  For the rest of you, let's do some chemistry!  Municipal water is almost universally chlorinated as a final treatment step to sterilize the water before releasing into the pipelines that eventually end at shower heads and kitchen sink faucets.  Generally it's a good thing because, hey, who wants to get a life-threatening bacterial infection from their drinking water?  The problem with chlorination in aquaponics is twofold: the chlorine can kill the fish, and the chlorine can kill the nitrifying bacteria that convert the fish waste into harmless nitrates (at least harmless for the fish, to a certain extent).  For a long time, the primary chlorinating agent was hypochlorous acid (HOCl), typically added as sodium hypochlorite (NaOCl), or bleach.  Hypochlorous acid is very effective at killing bacteria, but is relatively volatile and will evaporate away within a few days.  Chlorine in this form is called 'free chlorine' and itself doesn't pose a huge problem for aquaponists because the water can be dechlorinated just by letting it stand (or circulating it through the system) for a few days.  And if water is added to the system in small amounts (e.g., to offset evaporation), the concentration is low enough that the fish don't have too much trouble.

The evil older brother of free chlorine, however, is combined chlorine, or the chloramines (especially NH2Cl, but also NHCl2 and NCl3).  Recently, many municipalities (including our former town) have begun ammoniating their chlorinated water to convert hypochlorous acid into monochloramine (NH2Cl), which is not as good as HOCl at killing germs, but sticks around a lot longer.  For municipal water suppliers, monochloramine means the water stays safe for longer, which is a good thing.  For aquarists and aquaponists, monochloramine means that water stays toxic to fish for longer, which is a bad thing.  (Chloramines are quite toxic to fish and likely people, especially after reacting with organic matter).  Fortunately, through the magic of chemistry, there are a number of ways to get rid of even the chloramines without too much trouble.  We were gearing up to do a first-of-its-kind series of experiments here at the Homestead Laboratory to figure out the best way to get rid of these dastardly devils, but as is so often the case in research, someone had already done it.  (And did a better job than we were probably going to do!)

While the chloramines will eventually evaporate away if given enough time (see here and here), they are likely to kill your fish and friendly bacteria in the meantime.  Thus, other methods of chloramine removal are necessary.  Two ways that seem to work well and that are the especially practical are 'equilibrium shifting' and 'reactive adsorption,' which we want to discuss in more detail partly because the chemistry is super cool and partly because it's what we did in our system.

'Equilibrium shifting'
Hypochlorous acid and all three of the chloramines exist in equilibrium with ammonia (NH3) in solution, which means that the solution has the ability to convert these compounds into each other in order to give itself the lowest possible energy. (Nature is kind of lazy this way--always trying to minimize it's energy and stuff.) 

Equilibria of ammonia (NH3), hypochlorous acid (HOCl) and the chloramines.  The higher volatility compounds are easier for aquaponists to deal with because they just float away into thin air.  Adding bleach (or hypochlorous acid, if you can find it) shifts the equilibrium toward the more volatile compounds.  Of course, you still have to let the bleach evaporate before adding the water to your aquaponic system.


Le Chatelier's principle says that if we add more of one component, the concentrations of all the other components will adjust to reestablish the equilibrium.  Since we've got a limited amount of NH3 (essentially what was added at the water treatment plant), if we add more HOCl, we will shift the distribution of the chloramines to the more chlorinated species (NHCl2 and NCl3).  Such a shift is good because the more chlorinated chloramines are more volatile, so they will evaporate and take the chlorine with them.  This approach is similar to what's called 'breakpoint chlorination,' in which free chlorine is added to the point where the chloramines are converted to NHCl2 and NCl3 and evaporate away.

The salient point here is that the equilibrium can be shifted the same way by adding bleach, which is something many folks already have on-hand.  (For this purpose, however, use only the stuff that doesn't have additional fragrances or other additives.) Alternatively, instead of adding bleach, it would also work to lower the pH (e.g., by adding the aquarium product pH-Down), presumably by converting OCl- into HOCl, which essentially shifts the chloramine equilibrium in the same direction.  On the other hand, if you're going to add external chemicals to the system, you might as well just add a campden tablet (sodium or potassium metabisulfite, Na2S2O5 or K2S2O5, respectively, which reacts with essentially all of the chlorine (both free and combined, as long as the proper ratio is campden/chlorine is observed) within a minute.  Campden tablets are available at most homebrew stores (both online and in real life).

'Reactive adsorption'
The other way that can readily be used to dechloraminate the water is with a carbon filter.  Depending on the distribution of chlorine species present in the water, the carbon acts either as a catalyst or as a reagent through the following set of reactions:

Reactions of the chlorinated species with a carbon filter.  C* represents an active site on the filter, CO* is an oxidized active site.  Since monochloramine can react with both the active sites and the oxidized active sites, it doesn't consume the filter material.  Since the other two species will be present to some extent, the filter will eventually need to be replaced.  Even if the filter material is still visible, it's a good idea to test the water for chlorine!  Testing kits are easy and not that expensive (e.g., here).


The pitcher-type water filters (e.g. Brita or Pur) can be used to remove the chlorine from the water, but they don't do the job completely, and are pretty slow.  That's why we ended up investing in a water deionizer from an aquarium supply company.  We didn't need the deionization, but the system comes with two parts--the ion exchange resin (IER) and the carbon filter.  The IER is aimed at extracting metal cations from the water (Ca2+, Fe3+, etc.), and is typically exhausted after about 50 gallons, according to the packaging.  (The pH of the water is considerably lower after the fact, so to some extent the ions must be exchanged for H+.)  However, the dechlorination part should continue to work as long as there is solid carbon filter material present, with the added bonus (in a sense) that the pH won't be artificially low after the ion exchange resin is exhausted.  We've been using the same filter cartridge for well over 100 gallons and the chlorine removal is still complete.  Plus we can hook it up to the sink and let it run until the tank is full.  (Normally we let it fill a container in the bathtub so that when we inevitably forget about it, we don't flood anything.)

There you have it--chemical equilibria, multiphase reactions, and heterogeneous catalysis in a real-life amateur science project.  Isn't chemistry cool?

Do you have any tricks you've used to control your aquaponic water parameters?  Do you have any other ideas for chlorine removal?  Let us know in the comments section below!

(We don't get any kickbacks from the companies linked above, so if you know of a better deal, please tell us!)

Thursday, August 1, 2013

Aquaponics Construction

**This post continues our series on the aquaponic system we set up in our apartment last year.**

The other day, we posted about the design of our aquaponic system.  We wanted to follow up today with details of the construction, and in subsequent posts, we'll talk about the fish and the water.

We mentioned earlier that one of the design criteria was that the system had to look nice.  Thus, we were (Jake was) forbidden from designing it out of dimensional pine lumber from the hardware store (even though it would have matched the rest of our projects and reduced the cost and weight of the aquaponics, Katie!)  It actually worked out nicely, though, because we met some nice folks up north of Lancaster, PA and got some roughsawn cherry lumber for a good price.  The catch (one of the catches) was that it was a fairly long drive, and the wood was heavy.  Having only a faithful old Saturn station wagon with which to haul the wood, this meant we were kind of limited to one trip, and to only as much wood as the springs on the Saturn could hold without breaking an axle.  In the end, we didn't have enough to cover the sides facing the back wall, but the effect on aesthetics was minor. (Even according to Katie!)

Getting roughsawn lumber also meant we had to plane the wood in our apartment, which we did with a little 10" Ryobi planer from Craigslist.  (We probably owe the neighbors another plate of cookies for the noise it made.)  But the wood undeniably looks nicer than pine (and is stronger).  The apartment also smelled awesome for many weeks, and we ended up using a lot of the shavings from the planer to form the bottom of the grow bed (as shown below).  So, without further adieu, let's take a walk through the construction of our system.

NOTE: We took these photos on deconstruction of the system for moving rather than while constructing it, so some of the pictures may seem out of order.  Don't panic!  We've tried to describe the process in the actual order in which we constructed it, even if some of the components are present in the pictures that weren't there during the construction.

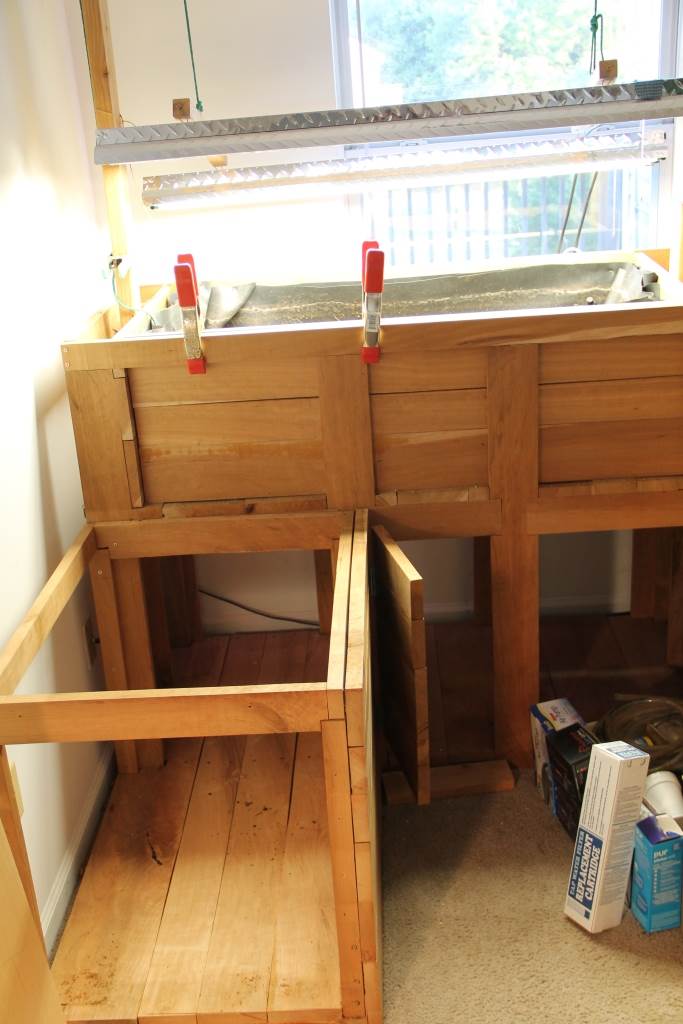
We started by constructing a two-level box for the grow bed, storage cabinet, and half the fish tank.  This was the most stable design we could come up with; stability was a primary concern because we weren't sure how much strength would be needed to keep the Hydroton and water from exploding out onto the carpet.  Speaking of which, it might be good to put a layer of plastic between the wood and the carpet because if water does get down there for some reason, it might leach some color out of the wood and onto the carpet.
This is what the inside of the box looks like from the top.  The two holes on the left side are for the bell siphon and the overflow pipe.
Then we added an additional part of the frame for the fish tank.
It had decking, too.  We attached it to the original box part, and added doors to the openings in the part under the grow bed.  We wanted to be able to get a whole human into the storage part in case we needed to fix something, so that's why one door is bigger than the other.

After we completed the framing, we took some of the shavings left over from planing the wood and used them to form a bottom to the box that would make the holes the lowest part.
Then we added the rubber liner, cut it out where the holes were, and installed bulkhead fittings.  It's actually a double layer of rubber liner, just in case one layer got punctured by something.  Yay for secondary containment!  When we deconstructed the system, there was a little water in between the two liners, probably due to imperfect cutting of the rubber around the fitting, but the wood was dry underneath.  Looks like it worked!  The dirt washed down to the bottom after transplanting a few things from other pots.  At first, we added excess rubber liner, then trimmed it to fit the grow bed later on.
This is the bell siphon (left) and overflow pipe.  The overflow pipe should be taller than the bell siphon inner pipe, but shorter than the top of the grow bed.  We added a larger piece of pipe on the outside of it once the grow bed was full of Hydroton to keep the Hydroton from falling in.  The inner pipe and overflow pipes are 0.75", the outer pipe is 1.5", and the Hydroton guard is 2", if we remember correctly.  Other folks recommend larger pipes, but this worked for our small system.
The bell siphon works like this.  There is an inner pipe and an outer pipe with slightly larger diameter.  The outer pipe is off the bottom of the grow bed a bit (we cut notches in the bottom of ours), and has a cap at the top, which is not resting on the top of the inner pipe, but is close.  The big white pipe outside of the outer pipe is just to keep Hydroton from getting into the siphon (left top).  As the grow bed fills up with water, so does the space between the inner pipe and outer pipe (left middle).  When the water level is even with the top of the inner pipe, water starts to flow down the inner pipe.  It should be flowing into the grow bed at a high enough rate that it can eventually fill the entire cross section of the pipe, which will trip the siphon (left bottom).  The siphon will start to drain the grow bed as long as the bottom of the inner pipe is below the bottom of the grow bed (right top).  It should drain faster than water is flowing into the grow bed, so that it eventually drains all the way back to the bottom, which will untrip the siphon (right bottom).  Playing with the pipe positioning and pump flow rate to get the siphon to reliably trip and untrip is one of the trickiest parts of getting the system working.  Having excess pipe at the bottom of the inner pipe (e.g., an aeration bar) can make it hard for the siphon to untrip.
Here's the finished grow bed.  The rubber is stapled to the wood, but since the Hydroton pushes it out that way anyway, the staples aren't really necessary.
We wanted the tank to have secondary containment, too.  But the fit was so tight that we couldn't build a box and then put the tank in it.  So we built part of a box and put a layer or rubber down, then slid the tank in on top of the rubber.
Then we wrapped up the rubber and built the other part of the box around it.  The secondary containment here wouldn't hold all 50 gal if it spilled all at once, but could handle most other mishaps.  Like if the tank was partially emptied into the grow bed when it broke, or was leaking slowly instead of catastrophically...basically anything except a sudden disaster with a full tank.
The last major component of the system was the lighting.  We wanted to have as many degrees of freedom as possible, so we built a contraption that could be higher or lower on the left or the right (so we could grow tomatoes on the left and lettuce on the right, or something), and also different heights front to back (tomatoes in the back...).  We went to Home Depot and got the shop lighting fixture with the highest lumens/dollar and lumens/watt, which turned out to have T8 fluorescent bulbs.  Everything but lettuce did well with this setup.  In the picture, the two red clamps on the front of the light fixture are holding it level, but we also employed a number of other weights to adjust the angle. 
The ropes go up from the light fixture to a series of pulleys.
We needed two pulleys per side to get the rope up, over, and back down.
Here's another shot to show how they were aligned.
Then we just clamped the rope back onto the upright to hold the lights in place.  Maybe a little risky, but we never had the lights come crashing down or anything.
And look!  The storage space holds all the fish food, leftover pond liner, and everything!
There are a few other details to consider, like tubing and pumps, but there are many more qualified venues online to find that information.  (Or look in Sylvia Bernstein's book.)  We followed Bernstein's suggestion to have a pump that can exchange the water every 15 minutes (which for our 50 gal tank meant roughly a 225 gph pump after taking into account the three feet of head it had to overcome).  But once those details are set, the next step is to add plants, worms, and a nitrogen source, and start cycling the system!  It's a lot of fun to see the plants growing well and hear the siphon tripping and untripping.  Well worth all the work that went into this.  Plus it doesn't look half bad!


Any questions about details we might have glossed over?  Any thoughts on design improvements?  Let us know in the comments section below!

Saturday, July 27, 2013

Mid-Atlantic Shout-Outs

If you've been following this blog for long, you may have noticed that we've mostly kept a strict Thursday/Sunday posting schedule, with occasional delays when we're super busy.  However, it's now been two Thursdays and a Sunday since our last post, with nary an explanation.  (Maybe you're grateful that we haven't been cluttering your inbox or absorbing your time that could be spent reading something more useful!)  Well, here is our explanation: we're in the process of moving across the country!  (ok, two-thirds of the way across the country).  We're excited about picking up some new digs, but we're going to miss all the nice folks we've met out on the east coast.  As an expression of gratitude to our favorite local businesses in the Maryland-Delaware-Pennsylvania, we wanted to raise an electronic toast to the places we frequented for our essentials. (Mainly food and car repairs--the rest of our income went to gas stations and school loan-holding banks, neither of which are we particularly fond of!)  So here are our favorite locales, in no particular order:

Cherry Knoll Greenhouse/Farm - Run by some great folks, the greenhouse has an amazing selection of cacti and other succulents throughout the year, and many garden vegetables during the spring planting season.  We got our milk and eggs from the farm, with the milk fresh from the cows.  The people are always cheerful and friendly, and very accommodating.

Pleasant Valley Country Store - A bulk food store run by some more great folks, this was the place to get staples like flour, sugar, and maple syrup, as well as cheese and butter when we didn't make our own.  They also had amazing prices on apples in season (and for most of the winter), and this was the only place we found that carried hog casings for making sausage.  They also gave us a lot of boxes in which to move our stuff.

Jim's Market - A nice little produce market open from April through December with good variety of veggies; locally-grown in season.  Best prices on mushrooms that we could find!  They've usually got quarter-bushel baskets of 'spotted' produce for $1.00 each, of which we often took advantage.  More often than not these baskets required only minimal trimming, and we enjoyed many hearty and delicious 'spotted' dishes.  Plus, anything we trimmed off immediately became fodder for our herd of worms.  They seemed to enjoy the variety.

Newark Farmer's Market - This Hispanic food-themed market was a little more out of our way, but had the largest variety of peppers we've ever seen.  Also, the best variety of other less-common vegetables, like cactus and odd-looking pear-type things.  Lots of seafood, too.  They also have a non-food section, and we were thrilled to find a cast iron tortilla press and related items there.  This place is neither particularly local nor particularly organic, but if we needed something obscure, we could usually find it here. 

Godfrey's Farm - Best prices by far on pick-your-own (PYO) strawberries, blueberries, and peaches.  It was a bit of a drive for us, but definitely worth it.  We liked that they didn't put a premium on PYO fruits, which some of the more local farms did.  They also sold 25 lb. boxes of their canning tomatoes for probably not enough.  The people are also cheerful and friendly, which is nice.

A to Z Auto Repair - Reddy was our go-to guy for repairs on our aging cars.  Because our cars were old, we saw Reddy more than we would have liked, but his crew always did a great job for a fair price, and only fixed what was needed.  If you're in the area for a while, get to know Reddy--he's a great guy.  Hopefully we'll find someone just as honest and reliable in our new stomping grounds!


View Mid-Atlantic Shout-Outs in a larger map

So, here's to you, fair and friendly small businesses of the MD-PA-DE tri-state area!  Thanks for keeping us moving and keep up the good work!  We'll miss you!

Did we forget any good local businesses in our former neck of the woods?  Do you have any recommendations for our new neck of the woods (Denver)?  Want to give a shout-out to a similar business in your area?  Let us know in the comments section below!

EDIT: We did forget one!  We got our bike stuff taken care of at Wooden Wheels in Newark.  Friendly and helpful folks, good prices, just like the rest of the places we frequented.   Check 'em out if you're in town!


Monday, July 15, 2013

Aquaponics Design

When Matt and Elise introduced us to aquaponic farming, we thought, 'How cool!  We like to eat salads and fish, too!'  and we knew we were going to have to try it.  The trick was, we didn't have the space for a big greenhouse and grow beds.  To make matters worse, we didn't even live on the first floor of our building, which meant we were fairly restricted in how large a system we could build.  A third strike was that at least 50% of our household (population: 2) didn't want some cobbled-together monstrosity in the guest bedroom.  It had to look nice.  But with a little old-fashioned creativity and some elbow grease, almost anything is possible.

In the interest of full disclosure, we didn't have the foresight to take a lot of photos while we were building the system.  But now that we have a blog to post this kind of stuff to, we take pictures of just about everything.  Since we're packing up to move soon, that means temporarily deconstructing the aquaponic system...and a second chance to record the construction process, albeit in reverse.  The bonus for you, faithful readers, is that we can reflect on the system's form and function over the last year or so, and you can avoid any mistakes we made the first time around (there might have been one or two).  The deconstruction is currently underway, but of course, it needs to be essentially complete to start the story at the beginning.  So for today, we just wanted to give a quick overview of our design and what went into our thought process in figuring out the size, location, and orientation of the system.  And to make some fun pictures in powerpoint.

This is a schematic of the system.  It's not quite to scale.  You can tell because we had more than one fish, and they were all much smaller than the one shown in the tank.  Also, the plants were much bigger.
One of our primary concerns in setting up the system was the weight.  We've got the weight of the water, the grow bed, and the wood frame as the major factors (and, in our imaginations, the weight of the fish).  We read that tanks up to 55 gallons can go just about anywhere.  But what about a 50 gallon tank attached to a 50 gallon grow bed?  We might be pushing the limits a little bit there.  In order to spread the weight out as much as possible, we decided to go with an L-shape, with the grow bed overlapping the tank.  In our particular situation, the floor joists are perpendicular to the long side of the grow bed (we think), so at its heaviest (grow bed full of water), the load is distributed across more joists.  Along the same lines, we went with Hydroton as the growth medium since it is considerably lighter per volume than gravel or sand.  (The tradeoff is that it's relatively expensive, but we were lucky enough to find a local place that was selling it for almost half off the cheapest online source we could find!)

We found a fish tank on Craiglist without much trouble, but the grow bed took a little more thought.  We had settled on a wood frame, but we needed to line it with something waterproof.  We considered a variety of totes and other containers, but in the end we decided on an EPDM rubber pond liner for its durability and fish safeness.  We searched a number of places online, but the best value seemed to be Just Liners. (It must be one of those ironic names, since they clearly sell more than pond liners.  Or maybe their liners are socially responsible.  We may never know for sure.)  We were happy with the purchase, and haven't had any leaks.

Part of the reason the liner has held up well might be because we were careful not to let any sharp corners or edges rub against it.  Before we set the liner in place, we padded the inside of the wood frame with wood shavings (we had a lot because we got the frame lumber rough-sawn and planed it in our living room with a little 10" power planer that we also found on Craigslist.  (That's a good reminder--we probably owe our neighbors another plate of cookies.)  The wood shavings also gave us a chance to form the bottom so that the lowest part was the area by the siphon, and minimize the amount of water that stayed in the grow bed when the draining stopped.

One advantage of having the orientation set up this way is that the only breaks in the grow bed liner were directly over the fish tank, where we had to punch through to install the siphon and overflow pipes.  Thus, any leaks were likely to cause minimal damage.  The tradeoff is that the back half of the fish tank is not very accessible.  (Guess where the fish preferred to hang out?)  It was difficult to check in on the fish, and sometimes even find them, because the grow bed blocked both view and access.  In the next system we build, we will try to create less of an overlap.  As a side note, minimizing overlap was one of the design principles Sylvia Bernstein recommended in her Aquaponic Gardening book (which we ignored, and now wish we hadn't).

This is one of the few photos of the young system.  It shows the general location of the system (with which we tried to maximize the natural light contribution), and the grow bed before it was completely full of Hydroton and had its pond liner was trimmed.  It also shows the lighting setup, which we'll cover in more detail in a future post.


For the plumbing between the pump and the grow bed, we used clear vinyl tubing.  It has worked well, with a few catches.  Having clear tubing is disadvantageous because algae will grow on the inside of the tubing.  It's inevitable.  At first, the algae would build up to the point where they started to block flow, and the siphon wouldn't trip to drain the grow bed.  Then we had to try to clean out the tube, which worked best if we threaded a piece of fishing line through it, wrapped a small piece of cloth around one end, and pulled it through the tube like a miniature cylindrical squeegee.  The first time, it took almost an hour to thread the fishing line through the tube (with the help of several skinny, heavy objects), but then we left the fishing line in there, with enough out one end to pull our little squeegee through and not reach the end of the line.  That saved us a lot of time for the second pass.  Still better was when we got smart and buried the tubing in the Hydroton except for the very end.  Then the algae didn't build up at all!  Additionally, the flexibility of the tubing is nice to have, especially for water changes.  It's much easier to alter the configuration than it would be with the rigid PVC piping normally recommended.

Finally, having the storage space underneath the grow bed has been really nice.  It has allowed us to keep all the aquaponics equipment in one place, and out of sight.  Spare pumps, leftover pond liner, the carbon filter for chlorine removal from the water, and fish food all stay there.

In sum, we have been happy with most of the features of this design, except the overlap of the grow bed and fish tank.  It looks nice enough to keep Katie happy, and produces enough basil to keep Jake happy.  Check back on Thursday for more details!


Have you tried your hand at aquaponics design?  Have you had to consider weight restrictions in locating a fish tank?  Tell us about it in the comments section below!

Thursday, July 11, 2013

Look what Katie made!

Sometimes Katie likes to organize stuff.  The other day she made an organizer thingy for the wall.  It looks pretty neat.

She started out with a picture frame and took away everything but the frame.  Then she cut a piece of hardware cloth (0.25"), a piece of cork board, and a ribbon to fit in the frame.  She uses it like a big fly swatter--see all the big shiny bugs she caught?  Just kidding--those are tiny reflectors that she uses to attract crows and raccoons.
She fit the ribbon and the corkboard in where it was supposed to go, then she stapled the hardware cloth into place.
Then she took the cardboard backing that came with the frame and cut it to be the same size as the hardware cloth.  She didn't like the look of the cardboard, so she glued fancy paper on one side and poked two little holes on one end.
The holes are for little wires that fix the cardboard piece to the hardware cloth.  She made the wires longer at first so it would be easy to get through the holes, then trimmed them off so it looks better.  In case you couldn't tell, the cardboard from the previous picture is black on the back side.
Once everything was in place, she folded down the little tabs on the frame to hold everything in place.
Then she hung it on the wall!  She uses it to organize her fishing lures and other stuff.  She says the hardware cloth part is good for ones with long hooks, and the cork part is good for pokey ones without long hooks.


What do you use to organize stuff on your walls? How else have you combined hardware cloth and picture frames?  Tell us about it in the comments section below!

Sunday, July 7, 2013

Banana Bread French Toast

A couple weeks ago, as we were road-tripping across the country to a wedding, Katie got the best gift a guy could ask for--a big bunch of $0.39/lb bananas from KwikTrip.  (Ok, it would have been better back when they were still $0.29/lb, but it's still pretty good.)  As it happened, the bunch was so big, we couldn't finish it by the time we got home.  But there was no way we were going to let those still-good bananas go to waste!  We peeled, mashed, and froze 'em for future use.  Then, this last week, we were experimenting with different leavening agents for the homestead (stay tuned for a future post with those results), and we ended up with a surplus of banana bread.  We could have also frozen that for future use, but we were still feeling all experimental-ey, so we decided to try something else.  After making our Independence Nog earlier this week, we had a half-dozen egg whites to use up, also.  This sounds like the perfect opportunity to find out what banana bread would taste like if it were french toastified.  (Or freedom toastified, if you prefer.)

Here's the surplus banana bread, sliced up and ready for action.  It's thirteen slices, if you're counting.
Next we melted a tablespoon or so of butter in a frying pan.  Little known fact: butter melting in a frying pan is the universal symbol for 'about-to-be-delicious.'
We dredged the banana bread slices through a beat-up mixture of the six leftover egg whites and about 2 tablespoons of milk.  This piece isn't getting soggy, it's soaking up extra flavor.
Then we fried them on the first side. (Ok, we realize that probably all you needed to figure out how to make this recipe was the title, but we like taking pictures of our supper.  It's like being an documentary journalist, but just in our own kitchen.  Also, we wouldn't have had a chance to make as many lame jokes if we just posted the recipe.)
Then we admired the perfect golden brown-ness of the first side while the second side was cooking.
All thirteen delicious pieces, ready for 'post-processing.'  What are you going to eat, Katie?
Just kidding, Katie can have some.  What to eat with it?  How about some sauteed aquaponic swiss chard and some homemade applesauce!  ♫We like to eat, eat, eat our ayples and banaynays...♫  It tastes a little like banana pancakes, except...toastier.  Katie says it tastes a little like banana bread with syrup.  Jake and Buddy the Elf don't think that's a bad thing.

The Recipe:
13 slices banana bread
6 egg whites (or 6 eggs)
2 tablespoons milk
1+ tablespoons butter

Melt butter in frying pan.  While butter is melting, beat together egg whites and milk.  Dredge bread slices through egg mixture and fry in frying pan until golden brown, turning once.  Refresh butter in frying pan between batches as necessary.

How have you made use of surplus bananas or banana bread?  What other kinds of breads have you french toastified?  Let us know in the comments section below!