Sunday, October 25, 2015

Green Onion Powder, Take 2

A while back, we wrote about our green onion powder, which turned out to be a great way to preserve green onions when we had too many to use up fresh.  Earlier this summer, we found ourselves in a similar situation with some overwintered onions that suddenly bolted.  And, as with everything else around here, the process is constantly evolving.  So, here's another couple ways to make green onion powder.

Onion stalk overload!  Ahh!

Cleaned and chopped, they look much less intimidating.  We mentioned that our makeshift solar wax melter only reached about 155 °F, which wasn't very good for melting wax, but is just right for drying food.  We're still working on making dehydrator trays to fit our Langstroth boxes, but the regular dehydrator trays stacked inside give a visual approximation.  Not shown in this picture, but also dried in this batch were some chopped garlic scapes and dandelion roots.

A few weeks later, they're nice and dry.  They probably didn't need so much time, but we got busy with other stuff and had to let them go that long.  The onions probably would have been good for grinding straight from the dehydrator, but we had the unfortunate scheduling demand of taking them out first thing in the morning, when it was cool and damp.  So, in the oven they went at 150 °F for an hour to re-crisp them up.

For the grinding, we turned to the grain mill, which we've now used on eggshells, sugar, sea salt, and green onion powder (also garlic scape powder and dandelion root powder), but not yet grain.  As with the other substrates, it makes a nice, fine green onion powder.  It works really well on the garlic scapes and the dandelion roots, but the chunks of onion we had were a little too large and flimsy (even when crunchy) to really feed into the grinder well.

So, after a while, we turned to the blender (a food processor or spice grinder would also work here).  It doesn't get everything chopped up perfectly, but for many applications (like soups or casseroles, for example), the larger chunks would be fine.

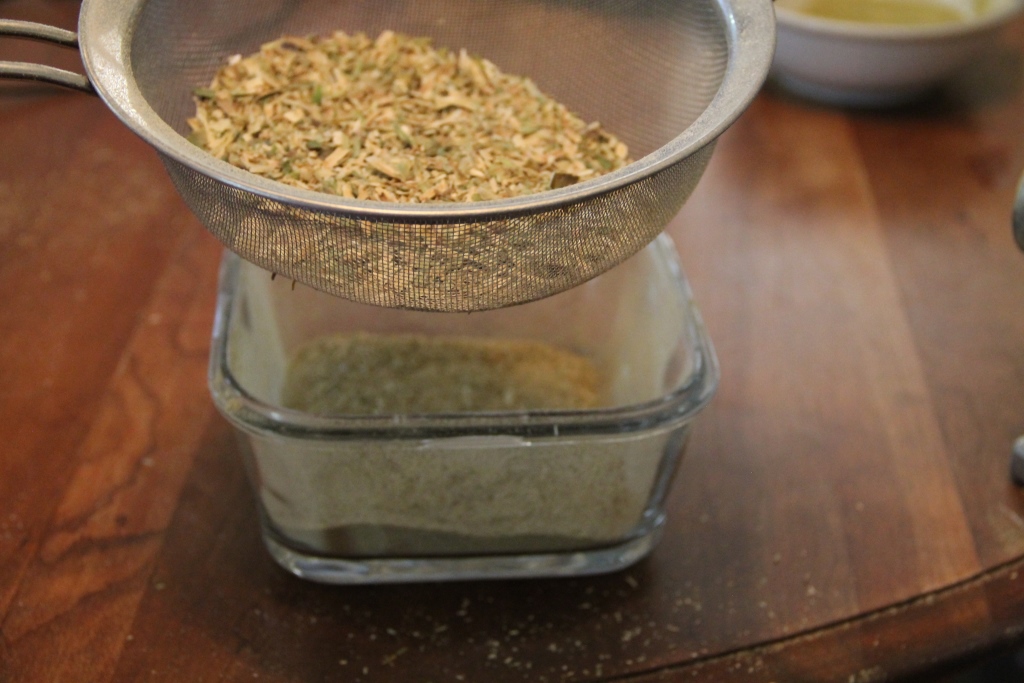
We sieved out the big chunks anyway to get some fraction of fines that make a good powder, and the rest we saved for cooking when the size doesn't matter.

Just for comparison, on the lower left is the grain mill powder, on the upper left is the fines from the blender, and on the right is the coarse fraction from the blender.  All perfectly useful in their own right, and all filled with that excellent green onion flavor.


How do you make green onion powder? (Or regular onion powder.  Or other powdered garden things.)

Friday, October 23, 2015

Bee Reset: Honey, Mead, and Sterilizing the Hive Bodies

While our capers with shook swarming and wax rendering have been great, one other main benefit in pressing the reset button on our bees is the edible part.  We humans aren't going to catch the foulbrood, so if the bees can't eat their honey, we might as well!  We just need to extract it.  Fortunately, this post will be a lot shorter than the others.  Heck, we can even throw in the sterilization of the hive bodies for good measure, and wrap this story up!

As a reminder, here's the overall process we're working with.

We did the honey by a whatchagot version of the crush and strain method, since we were working mainly with brood frames, which meant honey around the outside, brood in the middle.  That is, we didn't want to extract whole frames, just select chunks of comb.  Our setup is two buckets; the top one has holes in the bottom.  A t-shirt goes between the buckets to strain out chunks of comb, etc., and the comb gets mashed with our hands and goes in the top bucket.  In this particular case, the bottom bucket also had holes, so the whole setup is in a cookie sheet for secondary containment.

Once the comb is crushed up, the honey will eventually drain out.  It took several days, but it's a low-tech, low-effort system!  Of course, some honey will end up stuck to the comb (probably more than if we had a centrifugal extractor).  We washed the comb through with water, to recover any residual honey for making mead.  Some of the YouTube videos we saw in the research phase of this post showed people washing their wax before extracting it and just throwing out the water--so this is similar, but we keep the water for something tasty!

The water won't be concentrated enough to make a very strong mead as-is, so we added sugar to boost the final alcohol content (hence the name quasi-mead, since this stuff isn't made purely from honey).  Also, the wine yeast need more nutrients than just the (diluted) honey and the sugar can provide, and the mead will need some tannins to keep it from tasting like vodka or cough syrup (depending on how much residual sugar there is), so we added some very strong rose petal-and-raisin-tea.  We might forego the rose petals next time, since they didn't seem to be a very good source of tannins.  Hopefully we'll have a post soon on our approach to making fermented beverages.

Our final yield was about 4.5 quarts of honey, or about 14 lbs. (There is a quart jar-and-a-half missing from this photo because Katie is part pooh bear.)  Note that if you are extracting uncapped honey (as you may be doing during a bee reset), check the refractive index of it to make sure it has a low enough moisture content that it won't ferment in the jar.  Below 20% is normally the standard, but other sources say 17-18% is a better target.  Those other sources also say that if it's a little higher moisture content than that, keeping it below 50 °F can also prevent spoilage.

Finally, sterilizing the boxes.  Some say to heat everything, especially the corners and other nooks and crannies, until the wood is a uniform deep coffee brown color.  The bacteria that causes EFB (Melissococcus plutonius, although it was originally called Bacillus pluton) is inactivated above 65 °C, which isn't enough to turn the wood brown.  But heating until the wood is a little charred is an easy visual to make sure we're in the safe zone for killing EFB (and any other diseases that might be hanging around).  Sort of like roasting a giant wooden square marshmallow, but from the inside (the paint on the outside doesn't need to change color).  By far, the easiest and fastest way to do this would be with a propane blow torch.  But if you don't like the thought of all those difficult-to-recyclable propane canisters, you can get a similar effect with a little alcohol-fired camp stove.  Definitely not the OSHA-recommended protocol, but it works!

Once all the parts the bees have touched are uniformly charred (minus the extra-resinous parts, which saw the same heat, but didn't turn color), we should be good to re-use the box.

 How do you extract your honey and sterilize your hive boxes?

Sunday, October 4, 2015

Bee Reset: Wax Rendering v2.0 (and 3.0)

We wrote a couple weeks ago that we used the shook swarm method to put our bees on fresh comb and hopefully help them shake their case of EFB.  So the bees got some new digs, but what happened to the rest of the hive--the honey, combs, frames, and hive bodies that were contaminated? The whole process would make for a very long blog post, so we'll break it up into a couple posts.  But to whet your appetite, here's the overall schematic:

This whole ordeal is a zero-waste process, which is nice.  On tap for today: frames and comb, in particular, wax rendering.

We're continually adapting our wax rendering process.  Version 1.0 we wrote about before, and was more of a treatise on how not to render wax.  Version 2.0 is a solar melter frankensteined together from parts of our cold frame.  The back is a piece from the brooder box, and the places they don't fit perfectly together are plugged with fence panels.

Inside is a regular Langstroth box with a couple 9" x 13"-ish aluminum pans, each with about an inch of water in the bottom (to keep the wax from sticking to the pans).  On top is our winter-time bee feeder...

...which is lined with an old t-shirt and has another Langstroth box stacked on top.

The combs to be melted get piled on the t-shirt, and the melter is covered by the windows from the cold frame, which are stacked to make a double-glazed top.  The windows should be washed to maximize the amount of sunlight that gets through (ours weren't), and every crack and crevice should be sealed tight because when it starts to heat up, every honeybee within smelling distance will be drawn like a magnet. 

We set the whole thing up on the garage roof since it gets intense sun for most of the day.

A few days later, the combs are mostly melted down...

...but the yield of wax is a little disappointing.  A couple things probably decreased our yield.  First, the t-shirt filter held up a lot of the wax itself.  Other folks have had better luck with a paper towel.  Second, the temperature should have been higher.  We added some reflective insulation around the walls, which helped, but not enough.  More insulation and a more airtight construction would have been better.  We could have washed the windows, which would have helped even more.  As it was, we got readings up to ~155 °F inside the box when the glass was on.  Good enough to melt the wax, which happens at ~145 °, but hotter would be better.

Also, when we tried a deep Langstroth box full of frames, we only got minimal melting

Plus, during the time spent with all our rejiggering, we found out that bees aren't the only bugs interested in the wax.  Ants and earwigs love it, too.  But at least there's a silver lining: if you want bespeckled wax, the sprinkles are free!  The final takeaways from version 2.0?  There are some kinks to work out, but there's good potential.  Significant improvements wouldn't be too difficult if we could find the time to properly build a solar oven (which is on the to-do list anyway), but that will have to wait until a future date.  Also, some folks have noted that from some old combs, solar melting, even in a well-designed system, doesn't cut it.  Those combs need steam to release the wax.

Enter version 3.0.  It's inspired by a few other designs we've seen and Keith's comment on our original wax melting post.  The core is a big pot with some water in the bottom, and an aluminum pie pan boat.

That goes on top of the rebuilt Dakota Rocket Silo, which is burning the contaminated frames (and other wood).

A t-shirt filter is secured to the top of the pot.  The combs go in the filter.  The idea is that the steam rises up and condenses on the combs to melt the wax.  The wax is supposed to drip off the lowest point on the t-shirt into the pan below.

The first part of that works well.  The wax melts in half an hour to an hour if the fire is really roaring.

Unfortunately, it also runs down the side of the pot, so in addition to the nice wax cake we get in the pie pan, there's also a layer in the outer pot.  (This picture is from the following morning, after everything had cooled down.)  What we really need is some kind of impermeable insert in the top of the pot that prevents the t-shirt from contacting the pot directly, but that has a hole in the middle to direct the wax to the pie pan.  Probably could be done with aluminum foil. 

Also, we should point out that the wax accumulating on the water in the big pot can be a little dangerous because when a full layer of wax forms, it prevents the water from evaporating normally.  The result is that the water gets super-heated and instead of boiling steadily, it bumps violently, and then does nothing for a few minutes, before bumping violently again.  (The same thing can happen in your microwave if the water is very still while heating.)  When the bumping was happening in our setup, it was actually able to move the pot around, and if we hadn't been watching, it could have tipped over into the fire.  Since the wax is flammable, that would have gotten exciting quickly!

In any case, the melted wax and water can be poured into a pan to cool down.

The wax will form a cake on top, which can be easily removed.  We had a lot of comb to melt, so we ended up with several of these cakes.

To make them more compact, we built a makeshift mold, lined it with aluminum foil, and stacked pieces of the cakes inside.

When the summer heat had broken, we melted it in the oven at ~150 °F.

On cooling down, it solidified, at which point the foil and wax can be removed from the box.  The foil should readily peel away from the resulting block, leaving a nice chunk of purified beeswax to play with.

The stuff that got filtered out (slumgum) can be composted, used to start fires, or used to make swarm traps more attractive.  Since we started this whole ordeal to get rid of EFB, we won't be using it in our swarm traps.  We tried a few different ways of making slumgum fire starters, including packing it into paper egg cartons, wrapping golf ball-sized portions of it in old phone book pages, and packing a thin layer of it between layers of paper grocery bags.  In our experience, it's the residual wax that actually starts burning, and the rest of the slumgum burns, but does more to inhibit the wax burning than to really support combustion.  So, adding additional dry, combustible material like paper, sawdust, or wood chips helps a lot.  Also, getting that extra combustible material to wick up and/or be coated in the wax helps it work under wet conditions.  Once we had everything packed in like we wanted it, we put it in a 200 °F oven for an hour or two to melt the residual wax and get it to soak into the paper. The egg cartons are easily divided, but the slabs with the grocery bags we cut into 1"-2" squares.

The t-shirts themselves can also be cut up to be fire starters, or saved for future use.  Since we don't want to transfer EFB to any future batches of wax, we're going with option #1 for the t-shirts this time.

We did a quick trial run of all four of our different kinds of fire starters (clockwise from top: t-shirt, egg carton, phone book, and grocery bag), and we noticed that the phone book page-wrapped slumgum balls were hard to light and keep lit, the wax-soaked t-shirt lit the fastest and burned up the fastest, and the egg carton-slumgum and paper grocery bag-slumgum fire starters had good longevity but could still be easily lit by a match.

Finally, a quick note on cleaning up the wax.  Many folks caution that it's nigh-on-impossible to clean up cookware items that have been contacted by the beeswax, but we've not found that to be entirely true.  First, the thin coating that forms on pots and pans will eventually wear off in continued use, and beeswax is inert in the human digestive tract, so one approach is to ignore it; no harm, no foul.  Second, we've found that mixing beeswax with some kind of vegetable oil (olive oil, canola oil, soybean oil, etc.) when both are above the beeswax melting temperature (~145 °F), makes a blend that can be cleaned up with soap and water, even when cooled back down to a touch-safe temperature.  And third, a scouring powder, in particular Bon Ami, which doesn't have anything in it that we would be worried about contacting food, cleans things up pretty well.

There you have it!  Our current procedure for processing contaminated wax and frames, waste free.  How to you render and clean up wax?


Thursday, September 10, 2015

EFB? ACK!

Earlier this summer, we noticed our new package of bees wasn't building up as quickly as it should, and the brood pattern wasn't full and solid like it would be in a healthy colony.  We started looking closer at the combs, and noticed a few things.  Most of the uncapped cells all had eggs or larvae in them, so the queen was laying fine.  But many of the uncapped larvae didn't look quite right--some were sort of discolored and laying at the back of the cells; others started to extend out toward the front of the cells, but were slightly twisted, as if they had a stomach ache. In short, a lot of our brood frames looked like these and these.  Sounds like trouble.  Not trusting our limited beekeeping experience to officially diagnose the problem, we decided to send a comb sample to the USDA bee lab, where they test it for free and tell you what disease your bees have (if any).  A few weeks later, the results came back: our bees had European Foulbrood (EFB).  Oh no!

Here's the old brood comb, with the sample we cut out to send to the Bee Lab.  Although they only ask for a 2" x 2" square, we cut out a section to fit a small USPS box instead.  Don't want them to wish they had more to test!

So what are our options for treatment?  While EFB is no walk in the park to get rid of, it's not quite as bad as its evil sibling American Foulbrood (AFB) in that it doesn't form spores.  For AFB, the only treatment is to kill the bees and burn them along with the frames and comb (hive boxes and other equipment the bees have come into contact with can sometimes be sterilized by high heat or bleach).  For EFB, there are a few more options (and here):
  1. Do nothing, since in a strong hive, symptoms will often clear up when the nectar flow is strong.
  2. Treat with the antibiotic Oxytetracycline (trade name Terramycin).
  3. Re-queen, since a disruption in the brood cycle will often clear up symptoms.
  4. Use the "shook swarm" method to restart the colony on uninfected combs in a new hive (this also disrupts the brood cycle).
  5. Kill the bees and burn or sterilize everything, same as for treating AFB.
Of these options, we had already been trying #1 for a while, and it clearly wasn't clearing up.  We're trying to minimize chemical treatments of our bees, so #2 wasn't a great option, either.  #3 would be ok, but it seems like we could get the same effect by #4, which was preferable to us since our queen seemed to be laying well and we already had everything we needed.  #5 is obviously a last resort, and we weren't there yet!

So, shook swarm it is!

The general operation is simple, and shown here: we're just taking all the bees from the old hive and shaking them into the new hive.  A few tricks that aren't shown in the video: the new hive should have a queen excluder on the bottom (actually functioning as a queen includer) so that she doesn't have the opportunity to decide she doesn't like the new digs. Also, the chances are good that she'll end up in the new hive if we're efficient in our shaking operation, but we can increase the odds by spraying the frames down with sugar water to reduce flying bees before shaking them, or if we wanted to be really sure, we could find the queen and catch her, and then install her in the new hive once the rest of the bees are in there.

Also, in our case, since we're trying to clear up EFB, the new hive should just have foundation and not already-drawn comb so that the bees have a chance to sort of purge their system before they have to feed new brood. Some sources recommend holding off on feeding them for a few days for the same reason.

After a couple weeks in the new hive, they've started drawing out comb and generally looking healthier.  Can you find the queen in this picture?  Her name is Waldo.

If we blow a little smoke on them to clear the bees away, we can see that the brood pattern looks a lot more full than it did in the old hive.  Time will tell if they can build up enough to make it through the winter, but they've got a better chance now than they did before!
Stay tuned to find out what happened to all the old frames, comb, and the honey they had stored.

Have you dealt with EFB before?  Have you done the shook swarm method with your bees?  How did it go?  Let us know in the comments section below!


Thursday, September 3, 2015

What Selenium?

A couple months ago, we noted that our soil had non-alarming levels of all the heavy metals tested for, except selenium.  The selenium level was 40x higher than background for our area, and possibly in the range that we would want to do something about it.  So we did some more digging (ha!) to verify if we did indeed have such high levels of selenium, find out if it is dangerous, and find out where it came from.

First, verification.  We sent soil samples to a second lab (more local, and cheaper for single-element heavy metal testing).  One sample taken with our fancy soil sampler tool, the other with a standard spade-dug hole from areas we knew we wanted to dig up.  The results came back: < 1 ppm selenium in both samples!

What?

That was unexpected!  But, it seems we have a bona fide controversy!  Get some popcorn, ye lovers of analytical chemistry-themed drama!

We should preface this discussion by saying that, since it wasn't exactly the same sample analyzed by both labs, it's possible that we hit a pocket of high-selenium soil in the first sample and missed it in the second sample.  That is, both labs could technically be correct.  But...we think the 30 ppm number is erroneously high, as we'll explain below.

On the analytical side of things, the two labs used slightly different techniques.  Both labs digested the sample using nitric acid and hydrogen peroxide (to render it soluble and fully oxidize the selenium), and fed it into an inductively-coupled plasma (ICP).  But the output of the plasma was analyzed by atomic emission spectroscopy (AES) at the first lab, and by mass spectrometry (MS) at the second lab.  Both techniques suffer from plenty of spectral interferences (see here and here) in addition to the instrument-specific quirks that crop up with any piece of analytical equipment. There are ways of compensating for the spectral interferences, however, none of the known interferences are supposed to be able to increase instrument response from < 1 ppm to ~30 ppm.

Of the two labs, the second reported extensive quality control data, including blank runs (to make sure that no selenium is detected in a sample that's not supposed to have any), multilevel sample matrix spikes (where they add a known amount of selenium to our dirt and make sure the level increases by the amount they added), and standard control runs (where they run other materials with known selenium content to make sure selenium is detected at the expected level).  The first lab did not, but responded by email to say that they run two standard control samples per batch...one of which came back almost three times as high as it should have, and said that other samples in the same batch also showed elevated selenium levels.    But if it were random jumps in apparent selenium, it's weird that both of our samples were so close to each other.  Did the other samples show up to 30 ppm selenium? We don't know. We asked enough questions that the first lab finally said to just send them another sample and they'd run it for free (not including shipping, of course).  We haven't taken them up on the offer yet.  In any case, we were leaning toward higher confidence in the second lab's (low selenium) results anyway.

Nevertheless, if the first lab was wrong, we wanted to know why.  So, we took to the interwebs to search for possible interferences from other components in our dirt that might not have been accounted for .  The first lab mentioned that they used the 203.985 nm emission line to measure the selenium, and we found an awesome tool from NIST that conveniently allows one to see what other elements might emit in the same range.  The general fertility test for our soil said we had really high levels of Mg, Ca, and P, so we started there.  But Ca has nothing in the right wavelength range, and Mg and P aren't supposed to affect that the selenium measurement at that wavelength very much.  According to the first lab, molybdenum is the only known interference at that wavelength, but we couldn't find anywhere that confirmed that, or to what degree it interferes.

What the ICP-AES spectrum of our soil might look like in a perfect world, with equal concentrations of Mo, Se, and Ca, an instrument resolution of 0.035 nm, and no bcvkground noise.  If anyone wants to buy us an actual ICP, we'll gladly replace this figure with a real graph!

Unfortunately, there aren't a lot of qualitative biological indicators that could help us differentiate 30 ppm selenium from 1 ppm selenium, either.  Sometimes selenium hyperaccumulators, such as some species of Astragalus and Stanleya, can be used to gauge if a soil is high in selenium, but our yard didn't have any of the hyperaccumulator species growing when we moved in, and selenium toxicity in most plants doesn't usually present itself until much higher selenium levels than 30 ppm. (Unfortunately, the numbers cited for selenium toxicity in wheat and peas in that article don't actually appear in the paper it cited!)  Similarly, we couldn't find any data suggesting that we'd be able to notice defects in our soil invertebrates or other wildlife at 30 ppm.

Second, would it be dangerous anyway, even if we were at 30 ppm?  The first lab said possibly, quoting an EPA document that says 20 ppm is the threshold level at which they start to dig deeper into things like bioavailability (which depends on soil pH, soil sulfate content, the form of selenium in the original source, and other factors).  On the other hand, A&L Eastern Labs says not to worry about concentrations less than 50 ppm.  What about a local office?  We emailed the Colorado extension service, who said that the main risks in this area are forage plants that hyperaccumulate selenium, leading to toxicity in grazing livestock, but not normally vegetables grown for human consumption.  If it were accumulated to dangerous levels in our veggies, we would expect to see symptoms like brittle fingernails and hair, and we haven't yet.

Third, where could it have come from? Most soil selenium comes from weathering seleniferous rocks, volcanic eruptions, coal burning, and metal refining.  We wondered if it might have been from spilled chicken feed, since we were dragging our chicken tractor around the yard with our extremely messy broilers last summer, and the chicken feed they spilled was fortified with selenium.  However, it turns out the FDA only allows 0.3 ppm selenium in poultry feed, which means that, unless our feed is mixed by scofflaws, we'd have to have our soil essentially made out of composted chicken feed with very little selenium transport for that to be the main contributor.  The broilers were messy, but not messy enough to build up 8" of soil throughout the yard from spilled feed!

Final conclusions? The 30 ppm was a false positive.  Also, that was a lot of research hours spent to decide there's nothing to worry about.

Time to get back to the garden!

The garden in August: some late tomato blight, some powdery mildew, lots of raccoon, squirrel, and chicken damage, but no dangerous levels of selenium!


Wednesday, August 19, 2015

Fresh Garlic

...and, we're back!  It's been an epic couple of months of battling winged and bushy-tailed garden destroyers, off-homestead duties, and a cute little time vacuum, but things are finally starting to slow down enough to devote some eagerly-saved effort to blogging.  But don't worry, grasshoppers, we shall regale you with the full tale of these recent months in due time.

Today, we're talking garlic.  About a month ago, we realized the garlic tops hadn't grown in quite a while and the leaves were starting to turn brown.  Time to harvest!  While we managed to dig up most of the bulbs unscathed, we found three with damage.

(Katie says, "From the trowel you dug them up with?"

"No, no, of course not.  I would never make a careless mistake like that; they had those slices before I dug them up.  There's a new invasive species of Italian worm that makes marks just like those...surprised you haven't heard about it yet  Also, don't bother looking that up."

*Katie rolls her eyes.*)

So, what to do with the damaged bulbs?  They probably won't survive the normal curing process, being full of invasive Italian worm bites and all.

Any fresh garlic recipe will work, but we put most of it on pizzas.  The flavor of the fresh garlic was unreal.  Very different than even the garlic cloves from dried bulbs.  Yum.  As a side note, we didn't think to try Clotilde's use for the inter-clove membranes, which aren't dry and papery on fresh garlic, but you can bet your boots we will next year.

Also, we had a good time with the chopped scapes on the pizzas, but there are lots of other ways we're looking forward to trying next year, too.  For example, garlic scape pesto? That sounds pretty good!


What's your favorite use for freshly-pulled garlic?  Let us know in the comments section below!


Friday, July 10, 2015

Quick Chicken Fence Repair

We found out the other weekend that wire mesh movable electric fences (one of these guys) and lawnmowers don't get along very well.  While trying to get into a tight spot behind the bee hive, the lawnmower managed to reach out and pull one slightly-less-than-taught section of the fence into the blade.

Here's a question for you: given that it takes the human brain around 0.2 seconds to process a stimulus and react, that the lawnmower blade spins at 200 rpm, and that the fence cost $165, can you calculate how many dollars per blade revolution the lawnmower did?  Ready, go.

Easy, you say?  0.2 seconds equates to 2/3 of a revolution, and the fence was obviously destroyed, bringing the total to $247.50 per revolution?

Wait, there's more information: first, we didn't have the fence electrified and weren't planning to since it kept the chickens in just fine without electricity (until we put a big hole in it with the lawnmower), and second, we saved the wire wrapping that our rolls of hardware cloth and woven wire fencing came in, along with plenty of other wire scraps.  Turns out that, as long as we still don't want to electrify it, the cost was more like an hour of Jake's time, or basically, $0.00.

We started by laying the damaged section of fence as flat as possible, figuring out what strands were missing, then replacing the vertical missing vertical strands with pieces of 16 gauge wire.  Where there were a few remnants left, we tried to wrap them around the new wire.  We also fed the new wire through the horizontal strands when they were still intact.

Similar drill for the horizontal wires, except using the thinner wire that the hardware cloth roll was wrapped up in.  Our thinking is that the thinner wire will make it more flexible in the horizontal direction when we eventually roll up the fencing.  In extra-damaged places (like in the first photo), we wrapped the horizontal wire directly around the new vertical pieces.

The finished product doesn't look perfect, but it does keep the chickens out of the garden.  Will it ever be electric again?  Hard to know.  If we decide to try it, we'll update the post.  In the meantime, mission accomplished!


How do you do electric fence netting repair?