Monday, November 30, 2015

Fall Broiler Stats

In mid-November, we put our fall batch of broilers in the freezer.  Now that the books are closed on them, we wanted to take a look and see if we came out any better than our previous batches of meat chickens on a price per pound level.  We stuck with the same feed source we had for the previous batches, but we had a slightly different feeder setup that probably saved some wasted feed.  We also raised all Cornish Cross this time around instead of Red Rangers or Pioneers (or a mix of those and Cornish Cross), and the birds came from Meyer Hatchery instead of McMurray.  Ok, here's the numbers!

We ordered 25 birds, and one came free, so we started with 26.  We lost two as chicks, and had to cull three more at the six-week mark due to leg injuries, so 21 birds made it to the butcher date at eight weeks.  That's a mortality rate of 19%, or 8% if we don't include the six-week culls, although 26 birds is a pretty small sample size.  The butchering price increased from $3/bird to $4/bird for us this year.  The dressed-to-live weight yield is 72%, and the feed conversion ratio is ~2.5:1.  For comparison, the industry figures are 4-5% mortality rate, 71-74% dressed-to-live weight yield, and just under 2:1 feed conversion ratio.

The feed again accounted for the major portion of the overall cost, but the initial cost of the chicks and the butchering were also significant costs.  If we lived in a place where we were allowed to butcher them ourselves, we could have decreased the price to $3.34/lb dressed weight.  Some day!

To compare with other organic whole chicken prices, we're right in the range of what's available online (sources here and here), and a little above what's available in our local Sprouts grocery store.  Of course, if we got it from them, we wouldn't get any fertilizer for the garden!  We're also $0.54/lb less than our batch last year, even with the increased processing price, so we're definitely moving in the right direction.

Now that's a happy freezer!


Next steps for us? Start growing our own feed and get better set up to do our own butchering!

How do your home-grown chicken prices fall out?


Saturday, November 28, 2015

Trellis Review

Earlier in the summer, we wrote about a multitude of trellises we were trying; some were based on well-thought-out designs, others were the fastest thing we could put together with what we had on hand.  Now that it's the end of the season, which designs performed well, and which crashed and burned?  Let's take a look.

The only ones that really worked well this year were the woven wire fence ones, which provided good support of the cucumbers and some of the beans, and were really quick and easy to set up.  The only drawback is that they're a pain to clean off at the end of the year, since things wrap around the wires so well.  Cleaning these off should be the perfect justification for building a flame thrower, but Katie doesn't' seem to be completely on board.

Our wooden bean trellis fell over in the wind, and although we could have maybe kept it upright by adding screws (rather than rely on friction) and pounding the legs down into the ground, the beans didn't climb the legs very well anyway (maybe because they had to keep being reset when it tipped over).  In any case, we probably won't do that one again.

Our other bean trellis, the UFO on a stick, did ok.  The beans didn't have trouble climbing the wires, but we just weren't overly thrilled with it.  Katie didn't like it right from the start, so she won't miss this clever and functional (Jake's adjectives), but tacky and less-functional-than-Jake-implies (Katie's words), work of art.

The two-tiered tomato lines didn't do well, mainly because our tomatoes were so stout and bushy this year that they never got tall enough to add cross-pieces like we planned.  But even if they had, we'll probably try to fashion some other design next year.

Similarly, the big tomato trellis was too tall for the stubby little romas.  But it would have done better with our Mr. Stripey tomato, which tendrilled out of control and encroached on the peppers and eggplants.  We'll probably use this trellis again, but be more careful to only plant indeterminate varieties on it.  We'll also position the plants on the outside next time.

What's your favorite trellis design?


Friday, November 27, 2015

Reader Tips: Neill's Bike Tube Wood Clamp

Today's post is a tip from reader and whatchagotics expert, Neill Goltz, who came up with a great way to repurpose old bike tubes.  He says:
I just had a wonderful result repairing an old bureau (with mirror) where the laminate exterior had gone bad, i.e., was coming up off the underlying wood on the surface of the main drawer.

Not shilling for a particular product, but I used Gorilla brand wood glue. (I'm sure that Elmers would work just as well here. Or perhaps readers of this site already know how to make their own? Horses' hooves? Not going there…)

Anyway, two possible points of interest to your blog-readership.

How to apply a clamp - and what kind to a large drawer. Didn’t want to take it apart…

Working with glue is messy, and it extrudes from the seams once the clamp is applied.

The solutions:

As a clamp item I used old bicycle tires freely given by the owner of the local shop. They wrap beautifully around any unusual configuration and can be adjusted to any lengths and tension all the way around the project, in this case the drawer.

I just put a loop in one end, and thread the other end thru and pulled to desired tension. [I] recommend that you put "Shoe-Knot loop" thru on the second tie off so as to release it very easily when glue is dry. 

  I wanted to create a barrier-layer between the glue (which would extrude) and the tubes. A magazine cover or ordinary cardboard would be adhered to by the glue, so I tried the cellophane wrapper from a box of Cheerios.

Photo credit: Neill Goltz.

Voila! The results could not be better. [Excess glue can be removed with] water-based OOPS or GOOF-OFF. It's water-based, but I still use rubber gloves.

Photo credit: Neill Goltz.

Jake's Note: there are multiple formulations of those paint removers; some are water-based, some are not.  Definitely wear gloves with all of them!
Great work repairing your bureau drawer, and thanks for sharing the story, Neill!


Thursday, November 26, 2015

HAP, November week 4: Happy Thanksgiving from THL!

Happy Thanksgiving everyone!  We wanted to make a slight variation on our normal homestead Happiness-and-Progress posts and give a quick rundown of some of the things we're thankful for.

First: you! THL broke the 50k all-time-pageview barrier this week.  While that's pretty small compared to most real blogs, it's still humbling (and motivating!) to realize we have an actual audience outside our immediate family.  So, thanks for reading!

Second: a yard in which to do all our goofy experiments, and which also looks nice and scenic while being coated in gently-falling snow.

Third: Craigslist, which not only lets us find great deals like this trailer, but also lets us meet lots of friendly and interesting people in the process.  It's easy to forget when watching and reading the news, but there's a lot of good people in this world.  There's also a lot of good free horse manure, and this little beauty will be hauling a significant portion of it to our yard.

Fourth: a not-empty freezer and pantry.  See also: item #2.

Fifth: the holiday season, with its abundant homemade treats.  Sugar high will be in effect from now through the new year.  Hooray for the holidays!

What are you thankful for?

Monday, November 23, 2015

Dakota Rocket Silo, version 3.0

We love our Dakota Rocket Silo--it helps us cook outside, put our pruning brush and small-diameter dead trees to good use, render wax, make biochar, and do lots of fun things.  But the original and rebuilt designs had one flaw that cropped up during extended use:


The piece of ground between the holes gets baked pretty good, and eventually weakens and starts crumbling, which makes the chimney part not level.  It might not be as much of a problem with wider cinder blocks where more of the support comes from the sides.

But we've got skinny cinder blocks, so we took out the middle part and built a brick foundation.  They're not fire bricks, so they probably won't last too long, but they were free!  This setup lets us keep the in-ground aspect that we like so much, but hopefully will stay level for longer.  Plus, it looks kind of Petra-esque.

We fired it up, and sure enough, it burns like a champ.  Next test: will it stay level through a winter?

Jalapeño popper, anyone? (They took a LONG time to cook this way, but they were really good!)


Saturday, November 21, 2015

Garden Lessons Learned

The garden gives us many things--delicious vegetables, emotions ranging from frustration to sheer giddyness, and perpetual education on the ways the world works (including some forced reflection on our own habits and tendencies). We've celebrated the vegetables in our last two posts, so before we forget, we wanted to write down some of our garden-themed teachable moments from this last growing season.  It will be strongly irrigation-themed.  The pictures have some detailed notes to help us remember, so if you don't want all that, scroll to the bottom for the executive summary.

Gardening in Colorado without some kind of irrigation is like discussing politics with your in-laws: not likely to go well.  Raising chickens without water has even lower odds of success.  So, over the last couple years, we've built up a sort of infrastructure of hoses that waters the chickens and the garden mostly automatically.  This year, we added a barrel reservoir and some motion detector sprinklers.

A hose splitter coupled to a shutoff valve was the key to the barrel reservoir system.  (In the picture, hose water from the house comes in from the left, the barrel is off to the right, and the branch going toward the chicken butt leads to the drip irrigation tubing.)  Close the shutoff valve and open both branches of the splitter to fill the barrel.  Close the hose inlet and open the shutoff valve to drain the barrel out into the garden.   It worked great! ...except for a couple things.  First, the barrel drained out at an appropriate rate for the plants, but was empty after 24 hours.  So, we had to fill it every day to keep the transplants healthy and get the direct-seeded plants to germinate. (except we didn't, because we're apparently too lazy busy to even walk out to the garden to flip a valve and wait 15 minutes for the barrel to fill once a day...) Second, if we wanted to run on ditch water, which was the original intent of the barrel reservoir, the 55-gallon barrel was woefully undersized, and so was our pump.  We'd probably be better off with a 500 gallon pond and a siphon into the drip system.  We like the pond idea, so that'll be our first-choice modification next spring.  But if we don't get to it, we'll probably break down and buy a pressure regulator and automatic timer for the hose. 

Next, despite being admonished to never buy cheap hoses, we did just that our first year here.  And sure enough, mom was right--after only a year, it had leaky fittings on both ends and several hopeless kinks in the middle.  But coupled with some hose repair fittings and a knife, we were able to convert the non-kinked parts of this otherwise useless hose into several shorter hoses that delivered water to the custom-built drip irrigation system.  The best way to keep the cheap hoses from kinking is to not move them.  So a stationary drip irrigation system is a perfect application, and if we had to start from scratch, we'd probably buy a new cheap hose just to cut it apart! 

Also, for what it's worth, the mineral deposits made some of the fittings on the fancy hoses useless, too.  Our water is apparently pretty hard.

We tried growing some potatoes and sweet potatoes in feed bags as an approximation of those fancy ones that are supposed to make harvesting a lot easier.  But not having the feed bag taters on an automated irrigation system meant they were doomed from the start since these guys dry out even faster than the in-ground garden.

The motion detector sprinklers were a great addition to the garden.  We were losing several tomatoes a day (and our entire corn crop) to renegade squirrels, raccoons, and misbehaving chickens, but the sprinklers helped quite a bit.  We weren't sure if the sprinklers would be sensitive enough to pick up a squirrel, but witnessed one of the little devils making his way toward our acorn squash, only to hightail it back the other direction when the sprinkler went off.  That made our week right there!  The sprinklers did have some drawbacks, though.  It's hard to keep them from leaking, and tightening too much causes the bases to crack.  We tried just making the leaks part of the drip irrigation, which sort of worked.  Except eventually, the ground became saturated and the force of the sprinkler going off was enough to tip the whole setup partway over, such that the motion detector was pointing at a useless 45° angle above the ground.  Also, the batteries ran out completely after about 6 weeks, but the motion detection started to weaken even before that.  The lack of sprinkle triggering was not lost on the renegade varmints.  Ultimately, it might have been better to pony up for the more expensive solar powered version.  We'll see what we can do to fix the leaks for next year.  Maybe we can customize these guys, too.


Lastly, a non-irrigation-related picture.  Some of the volunteer potatoes made a valiant effort to quell the encroachment of quack grass into the garden, and paid the price for it.  There were several with quack grass roots going right through the tubers!  A very visual reminder that if we don't keep fighting against the weeds, they'll take back over in short order.

So, to summarize, the main lessons are:
  1. Fully automated irrigation is necessary for our undisciplined lifestyle.
  2. Cheap hoses are ok for some applications.
  3. Motion detector sprinklers are good, even better with live batteries and no leaks.
  4. Squirrels, raccoons, and quack grass form a relentless axis of evil, but can be battled to some extent with sprinkles and potatoes.

What did your garden teach you this year?


Monday, November 16, 2015

Garden Review

It's the time of the year that we're wrapping up the bulk of our gardening activities for the season.  When the frost threatened in mid-October, we picked all the remaining tender veggies, protected the hardy greens, and started putting the garden to sleep.  The fall greens will continue to trickle in, but the majority of the harvesting is done until spring.  And now that we've had a few weeks to let the fervor of vegetable processing subside, we wanted to take a look back and see how we did!

First, what did the garden look like?  This was our general setup: 15 beds at 3' x 9', or about 400 square feet of growing space.  However, we harvested basically nothing out of six of those beds due to poor germination, inconsistent irrigation, or marauding varmints.  So, we were actually working with more like 250 square feet.

Second, what did we grow?  Mainly tomatoes, squashes, potatoes, and onions, it turns out.  We totaled a little over 150 lbs total.  Back in January, we had set an arbitrary goal of harvesting 100 lbs of food from the yard, so blowing past that mark by more than 50% was satisfying.  It might not sound like much when some of our electronic friends are growing more than 225 lbs of butternut squash alone, but hey, we gotta start somewhere!

Third, how did it compare to our meal plan?  Most things were quite a bit less, but the summer squash and zucchini exceeded our plan by a lot.  We didn't have any delusions of being able to grow all our vegetables in 250 (or even 400) square feet of growing space, but we hit about 20% of our total annual vegetable demand (or about 50% during the harvest season).  That is, over the summer, we were bringing in about 7 lbs/wk of produce from the local farmers market, and harvesting about 7 lbs/wk from the garden, which was about as much as we could keep up with.  Those 14 lbs/wk through the whole year work out to 728 lbs of veggies.  For what it's worth, our meal plan called for about 675 lbs of vegetables over the course of the year (not counting garlic powder, onion powder, or herbs, if we wanted to make those, too), so not too far off.  Is it just us, or does the fact that our theory and our experiment line up so well make you really excited too?  ...Just us?  Ok, nevermind.

We'll just finish up then with a few pictures to show you how the end-of-growing season frenzy played out here.  This is the 25 lbs of veggies we brought in right before the frost.  It's about 80% green tomatoes.

These are the volunteer potatoes we dug a few days later.  The volunteers made up about 60% of our potato harvest, probably because they got to start growing right away in the spring while the rest of the garden was still too wet to dig and plant until early June.

Part of putting the garden to bed is pulling out the delicious weeds, like these dandelions.  But wait!, you say?  You're harvesting and eating the quintessential spring green that supposedly turns irreparably bitter after blooming, in October?  Why yes, dear readers!  Soaking the greens (and roots!) in cold water removes most of the bitterness any time of year.  It's great!

All the damaged volunteer potatoes ended up in this casserole, along with some freshly smoked bacon, some of the damaged tomatoes, green beans, some onions and garlic, and a creamy plain yogurt sauce.  It doesn't look terribly colorful from this angle, but the flavor was great!

The sweet potatoes, nearly all of which were damaged on harvest, ended up in this quiche, along with more tomatoes, onions, garlic, and plenty of herbs.  Yum!

We had made buffalo-seasoned cauliflower before, but then we got the idea to try it with other veggies, too.  The eggplant, with its spongy, sauce-saturated texture, was the best, but the summer squash and zucchini weren't bad, either.

We made multiple types of pizza; these two had a buffalo-type sauce, except with spicy salsa instead of Frank's hot sauce.  Our recipe needs some tweaking yet, but the concept is good, and the pizza was delicious!


How is your gardening season wrapping up?

Sunday, November 15, 2015

Homestead Happiness, November Week 2

It's been a while since we posted a HAP post, but with our schedule finally settling back to normal after several crazy months, it's time to get back on track.  Here are a few things that made our week.

The chard and kale, protected by the row cover chicken tractor, survived the first couple snows of the winter.  The temps only dipped down into the upper 20s (°F), so the real test will come later.  But so far, so good!

Some of the unprotected dandelions survived, too, including this audacious specimen!  The last few days it's been warm enough for the bees to fly, too, and this little guy has very little competition for their pollination services.  Well played, dandelion.

We finally got the broilers their own setup in the shed, with some pasture space outside.  Better for them with more space, better for us because they're easier to take care of than when they're inside the brooder box.  This batch of broilers, although almost 20% had to be terminated early for various reasons, was a lot cleaner and more rambunctious than previous batches.  They even wandered away from the feeder to explore the pasture at times!  They all went in the freezer on Saturday, which means we're about ready to close the books on them and write up the stats.

Did you know that the bottom grate of a Smokey Joe grill fits perfectly inside a Lodge 12", 8-quart dutch oven?  That's an important discovery considering how many chickens we now have available to roast.


What made your homestead happy this week?


Tuesday, November 10, 2015

Fun with Green Tomatoes

In years past, we've covered our tomato plants with tarps through the first frosts of the fall, and eventually brought them inside to let them ripen up through Thanksgiving or so.  But some never ripen, eventually shriveling up into tomato raisins.  Others go bad.  And even the ones that do ripen seem to lack the pizzazz that fresh summer tomatoes have.  And this year, we planted a lot more tomatoes than in years past, so there would have been sacrifices of counter or garage space.  Most importantly, however, when we started experimenting with green tomato recipes last fall, we realized that we were only brushing the surface of our green tomatoes' potential

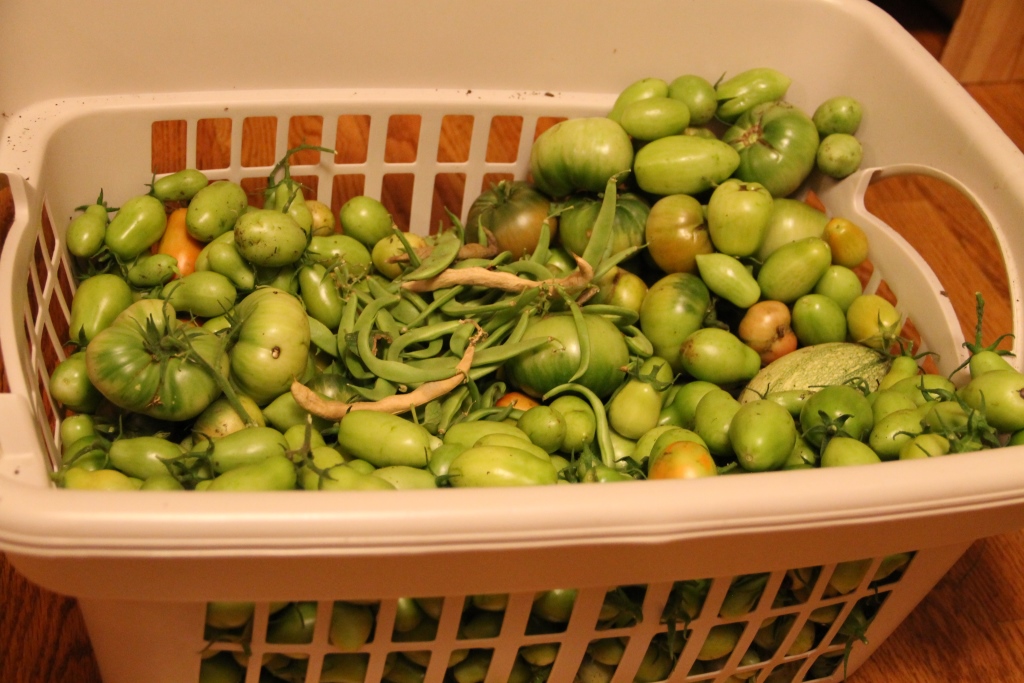
It was a perfect storm such that when frost threatened in mid-October this year, we gleefully picked all the tomatoes and got to work processing them right away, ripe or not.  Here's what we tried this year.

This bowl is just the Romas! It's about 15 lb. worth.  The green Black Krims, Mr. Stripeys, and volunteers made up about another 7 lb.

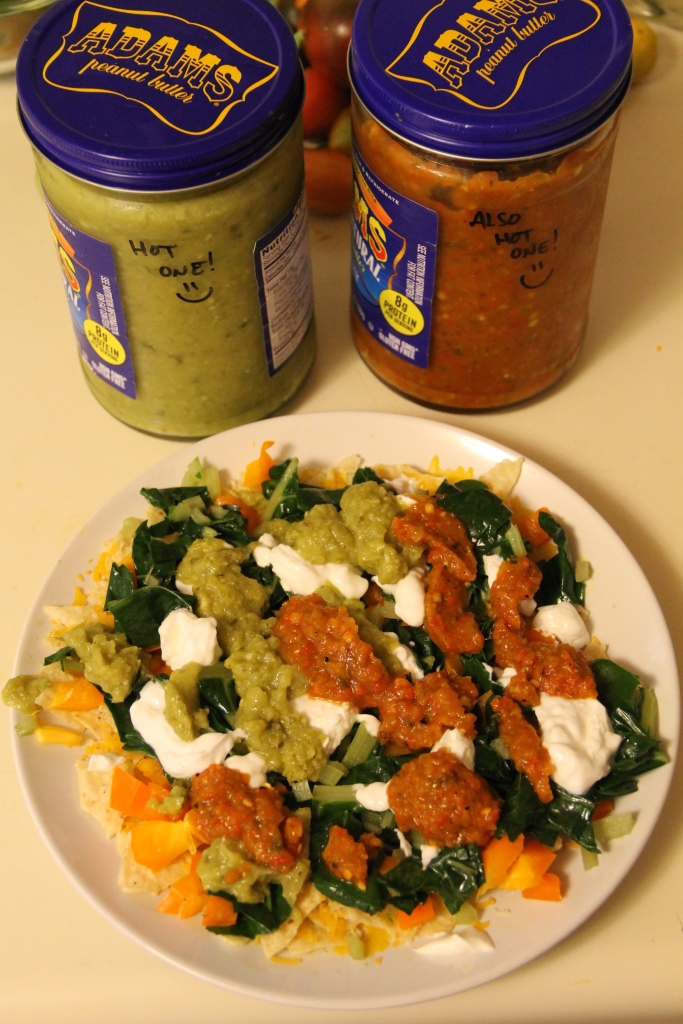
As we did last year, we didn't scrimp on the salsa making.  The batches all come out pretty good, but we haven't found a home-run recipe yet.  When we do, we'll for sure post it on here.  Our favorite uses for the salsas new this fall: nachos (of course), corn bread (both for part of the recipe and on top), and eating straight-up for sinus clearing.  Katie requires any homemade creations with more than about 2,000 Scoville units to be labeled as hot.  As a point of reference, all of the red color in the right-hand jar comes from cayenne peppers.  That kind of heat will keep you feeling warm and fuzzy inside all day!

We also made a green tomato jam (with vanilla and ginger), mainly following this recipe, but chopping everything with a stick blender in the pot, and ignoring the advice to remove the tomato seeds.  It's pretty good, but we feel like the long cooking time lets the ginger and vanilla flavors (especially the vanilla) start to dissipate.  Next year, we'll probably add some pectin and make it like regular jam.  The site we got the recipe from says it's good on plain yogurt, which it is, and it's also good on a sandwich with peanut butter (the way jam is meant to be enjoyed!).  Katie says the ginger flavor is a a little strong for her tastes, so you might want to cut back on that if you're somewhat ginger-averse.

The jam recipe also makes a pretty mean fruit leather.  It's got a molasses-type flavor, but the ginger still comes through strong enough to deter Katie.  (But she says she's not a bigot, and that some of her best friends are gingers.)

And last, but not least, mince filling!  We had never had a mincemeat pie before, but will definitely make it again.  We followed this recipe for the most part.  On its own, the filling kind of tastes like a spicy apple butter.  When mixed with an oat-and-almond crust, it tastes kind of like a Fig Newton. 

All told, those green tomatoes contributed to 14 pints worth of food, not including the test samples taken above.  Pretty good!

What do you do with your green tomatoes?